How to configure ASP.NET Core Web API .NET Core Service Configuration
When developing with .NET Core we do not make use of the old web.config file we know from good old .NET projects. Instead, we make use of the built-in .NET Core Service Configuration framework in .NET Core.
Having a good understanding of how you configure your project and its services that will be used until we are done with the development part, is crucial.
In this tutorial, I will be talking about configuration methods inside the Startup class. I will also teach you how to register for different services and how to create extension methods to be used in the startup class.
Create the new API project and modify LaunchSettings
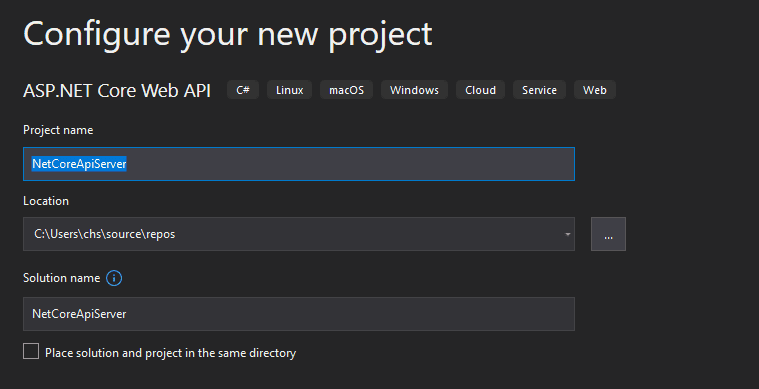
Alright - The first thing we have to do is create a new project. Go ahead and open Visual Studio Community 2019 (or the IDE you prefer). Create a new project where you select the type ASP.NET Core Web API. I have named mine NetCoreApiServer.

Leave the default settings in the configuration of the new project to default except for the name.
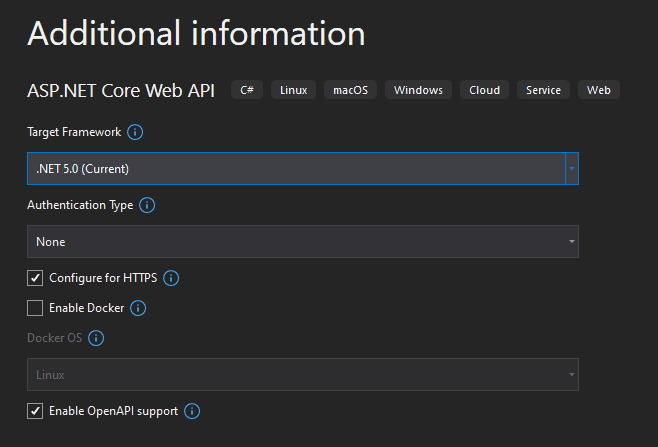
In the following window Select .Net 5.0 and Configure for HTTPS. For now, leave the Docker Support unchecked. Finish up by clicking on the Create button.
Okay then – our project has been created and loaded into the IDE. The first thing we are going to do is open up the launchSettings.json file. – this is a crucial file when talking about the .Net Core configuration.
Let’s start by changing the launchBrowser properties to false from true. You can find the launchSettings.json file in the Properties folder.
{
  "$schema": "http://json.schemastore.org/launchsettings.json",
  "iisSettings": {
    "windowsAuthentication": false,
    "anonymousAuthentication": true,
    "iisExpress": {
      "applicationUrl": "http://localhost:21578",
      "sslPort": 44331
    }
  },
  "profiles": {
    "IIS Express": {
      "commandName": "IISExpress",
      "launchBrowser": true,
      "launchUrl": "swagger",
      "environmentVariables": {
        "ASPNETCORE_ENVIRONMENT": "Development"
      }
    },
    "NetCoreApiServer": {
      "commandName": "Project",
      "dotnetRunMessages": "true",
      "launchBrowser": false,
      "launchUrl": "swagger",
      "applicationUrl": "https://localhost:5001;http://localhost:5000",
      "environmentVariables": {
        "ASPNETCORE_ENVIRONMENT": "Development"
      }
    }
  }
}
An introduction to Program.cs and Startup.cs
Within the file Program.cs you will find the following code. This code has been auto-generated when creating the project at first.
using Microsoft.AspNetCore.Hosting;
using Microsoft.Extensions.Hosting;

namespace NetCoreApiServer
{
    public class Program
    {
        public static void Main(string[] args)
        {
            CreateHostBuilder(args).Build().Run();
        }

        public static IHostBuilder CreateHostBuilder(string[] args) =>
            Host.CreateDefaultBuilder(args)
                .ConfigureWebHostDefaults(webBuilder =>
                {
                    webBuilder.UseStartup<Startup>();
                });
    }
}
If you remember ASP.NET Core 2.2 you might notice that the new version of .Net Core makes use of a Generic Host instead of the old separate Web Host. They actually rebuilt it from the ground up.
CreateHostBuilder now got two parts. CreateHostBuilder() and ConfigureWebHostDefaults(). The first one is used to configure the app configuration, logging, and dependency injection. The second one is responsible for adding everything else required in a .Net Core app (stuff like middleware pipeline, kestrel config, etc…).
webBuilder.UseStartup<Startup>() makes sure that our application is using the mandatory Startup class for the app. The Startup class is the class we configure embedded or custom services that our application depends on.
Try and open up Startup.cs – At first eyesight, we can see that we got a constructor and two methods – during tutorials here on my website I will be adding and updating content within the two methods.
The ConfigureServices method is the one doing what its name says – Services. This is the place for configurations, middleware, and the request pipeline. As you might have guessed this file can easily get hard to maintain or read for a developer (if the application is big). As a result of this, I will be creating extension methods that contain configuration details. This makes it easier to read the Startup class and easier to maintain the application in the long run.
How to add Extension Methods and Extra Configuration for .NET Core Service Configuration?
Extension methods are a great way of increasing the readability of our configuration code. As you might have noticed the methods are static, but what differentiates them from other static methods is that it accepts this which is the data type of the object that is using the given extension.
I have added a new folder named Extensions at the root of the project. Within the folder, I have added a new class named ServiceExtensions. By default the class is not static, so please change the code according to what I have added below:
namespace NetCoreApiServer.Extensions
{
    public static class ServiceExtensions
    {
    }
}
If you have ever worked with a web application that is running on the same server or just needed to access a resource from a server on a different domain, then you might have touched CORS.
CORS is short for Cross-Origin Resource Sharing and is a mechanism that allows a user to access endpoints from a server on a different domain. I am planning to make use of a separate client project later for the client operations, so I need to configure CORS – else I will get into trouble. Below is the code for allowing any origin to access the resources in our application.
public static void ConfigureCors(this IServiceCollection services)
{
      services.AddCors(options =>
      {
          options.AddPolicy("CorsPolicy",
              builder => builder.AllowAnyOrigin()
              .AllowAnyMethod()
              .AllowAnyHeader());
      });
}
At the moment I allow any origin and header. This can be narrowed down to a specific IP or other domain. The methods allowed can also be adjusted to only allow for GET requests if you need that. If you would like to change the configuration to a specific domain, method(s), header, etc… you can do the following:
public static void ConfigureCors(this IServiceCollection services)
{
      services.AddCors(options =>
      {
          options.AddPolicy("CORS",
              builder => builder.WithOrigins("https://christian-schou.dk/")
              .WithMethods("GET")
              .WithHeaders("accept", "application-json"));
      });
}
IIS (Internet Information Services) Integration Configuration
I will be hosting this application on a Windows Server running IIS. By having the IIS configuration as an extension I’m helping myself when I have to deploy the application to IIS. In your ServiceExtensions class add the following piece of code:
public static void ConfigureIISIntegration(this IServiceCollection services)
{
      services.Configure<IISOptions>(options =>
      {
      });
}
I won’t be changing the configuration as I’m already satisfied with the default values. If you would like to know more about the properties available for the IIS configuration, please take a look at IISOptions Class.
Your ServiceExtensions class should in the end look similar to this:
using Microsoft.AspNetCore.Builder;
using Microsoft.Extensions.DependencyInjection;

namespace NetCoreApiServer.Extensions
{
    public static class ServiceExtensions
    {
        public static void ConfigureCors(this IServiceCollection services)
        {
            services.AddCors(options =>
            {
                options.AddPolicy("CORS",
                    builder => builder.AllowAnyOrigin()
                    .AllowAnyMethod()
                    .AllowAnyHeader());
            });
        }

        public static void ConfigureIISIntegration(this IServiceCollection services)
        {
            services.Configure<IISOptions>(options =>
            {

            });
        }
    }
}
Okay, so now we have to register the configurations in the services section in the Startup class. Go to the ConfigureServices method and add the following lines:
using Microsoft.AspNetCore.Builder;
using Microsoft.AspNetCore.Hosting;
using Microsoft.AspNetCore.HttpOverrides;
using Microsoft.Extensions.Configuration;
using Microsoft.Extensions.DependencyInjection;
using Microsoft.Extensions.Hosting;
using Microsoft.OpenApi.Models;
using NetCoreApiServer.Extensions;

namespace NetCoreApiServer
{
    public class Startup
    {
        public Startup(IConfiguration configuration)
        {
            Configuration = configuration;
        }

        public IConfiguration Configuration { get; }

        // This method gets called by the runtime. Use this method to add services to the container.
        public void ConfigureServices(IServiceCollection services)
        {

            services.ConfigureCors();
            services.ConfigureIISIntegration();

            services.AddControllers();
            services.AddSwaggerGen(c =>
            {
                c.SwaggerDoc("v1", new OpenApiInfo { Title = "NetCoreApiServer", Version = "v1" });
            });
        }

        // This method gets called by the runtime. Use this method to configure the HTTP request pipeline.
        public void Configure(IApplicationBuilder app, IWebHostEnvironment env)
        {
            if (env.IsDevelopment())
            {
                app.UseDeveloperExceptionPage();
                app.UseSwagger();
                app.UseSwaggerUI(c => c.SwaggerEndpoint("/swagger/v1/swagger.json", "NetCoreApiServer v1"));
            }

            app.UseHttpsRedirection();

            app.UseStaticFiles();
            app.UseForwardedHeaders(new ForwardedHeadersOptions
            {
                ForwardedHeaders = ForwardedHeaders.All
            });

            app.UseRouting();
            app.UseCors("CORS");

            app.UseAuthorization();

            app.UseEndpoints(endpoints =>
            {
                endpoints.MapControllers();
            });
        }
    }
}
Now the extensions we just implemented have been added to the configuration at startup. Microsoft is recommending that CORS are called between app.UseRouting() and app.UseAuthorization() – as what we have done at line 54 above.
I have also introduced ForwardHEaders and StaticFiles, but haven’t said anything about these. A short explanation of the two is below:
app.UseStaticFiles()allows the use of static files at request time. If you don’t specify a path for the static files, wwwroot will be used as the default path.app.UseForwardedHeaders()is responsible for forwarding proxy headers to the request that has just been made. If you are planning to deploy to a Linux environment this will be your friend.
Summary
We have touched the Startup class, LaunchSettings, and added a new service extension in this short tutorial. Now you know how to configure the basic stuff (but very important though). You have also learned how to make the startup class more readable and maintainable for future changes.
Thank you for reading my tutorial. If you got any questions, please add them below and I will try to answer them as fast as possible.