Creating and Running a MySQL Database with Docker Compose
Learn how to create and configure a MySQL database using Docker Compose and environment variables in this step-by-step tutorial.

If you are a developer or an IT professional, you may have encountered scenarios where you need to create a database for your application or project. Manually creating a database and setting up the environment for it can be a time-consuming and error-prone task. Docker Compose can help simplify this process by allowing you to define and run multi-container Docker applications.
Introduction
In this tutorial, I will show you how to create and run a MySQL database using Docker Compose. I will also show you how to configure the database using environment variables or an environment file. With this approach, you can easily manage and version control your database configuration, and ensure that the same configuration is used across different environments.
Before we dive into the details of how to create and run a MySQL database using Docker Compose, let's briefly discuss what Docker Compose is and why it is useful for managing databases.
What is Docker Compose?
Docker Compose is a tool for defining and running multi-container Docker applications. It allows you to define the services, networks, and volumes required for your application in a YAML file. With Docker Compose, you can easily start, stop, and restart your application with a single command.
When it comes to managing databases, Docker Compose can help you set up the environment required for your database, including defining the database service and its configuration, setting up the ports to access the database, and configuring the volumes to store data. With Docker Compose, you can create, run, and manage your database in a consistent and reproducible way across different environments.
Now that you have a basic understanding of Docker Compose and its benefits for managing databases, let's move on to the next section and see what prerequisites are required to follow this tutorial.
Prerequisites
Before we begin with the tutorial, there are a few prerequisites that you should have on your system to follow along.
Docker and Docker Compose
You should have Docker and Docker Compose installed on your system. If you haven't installed them yet, you can follow the instructions on the official Docker website for your specific operating system.
Here are the links to download Docker and Docker Compose:
- Docker: https://www.docker.com/get-started
- Docker Compose: https://docs.docker.com/compose/install/
Make sure to download and install the appropriate version for your operating system.
Basic knowledge of Docker
You should have a basic understanding of Docker and how it works. Docker is a containerization platform that allows you to package your application and its dependencies into a container. If you are new to Docker, you can check out the Docker documentation to learn more.
A Text Editor
You should have a text editor installed on your system to edit files. You can use any text editor of your choice such as Visual Studio Code, Atom, Sublime Text, etc.
Once you have installed Docker, Docker Compose, and a text editor, you are ready to follow the tutorial. In the next section, we will show you how to create a MySQL database using Docker Compose.
Creating a MySQL database with Docker Compose
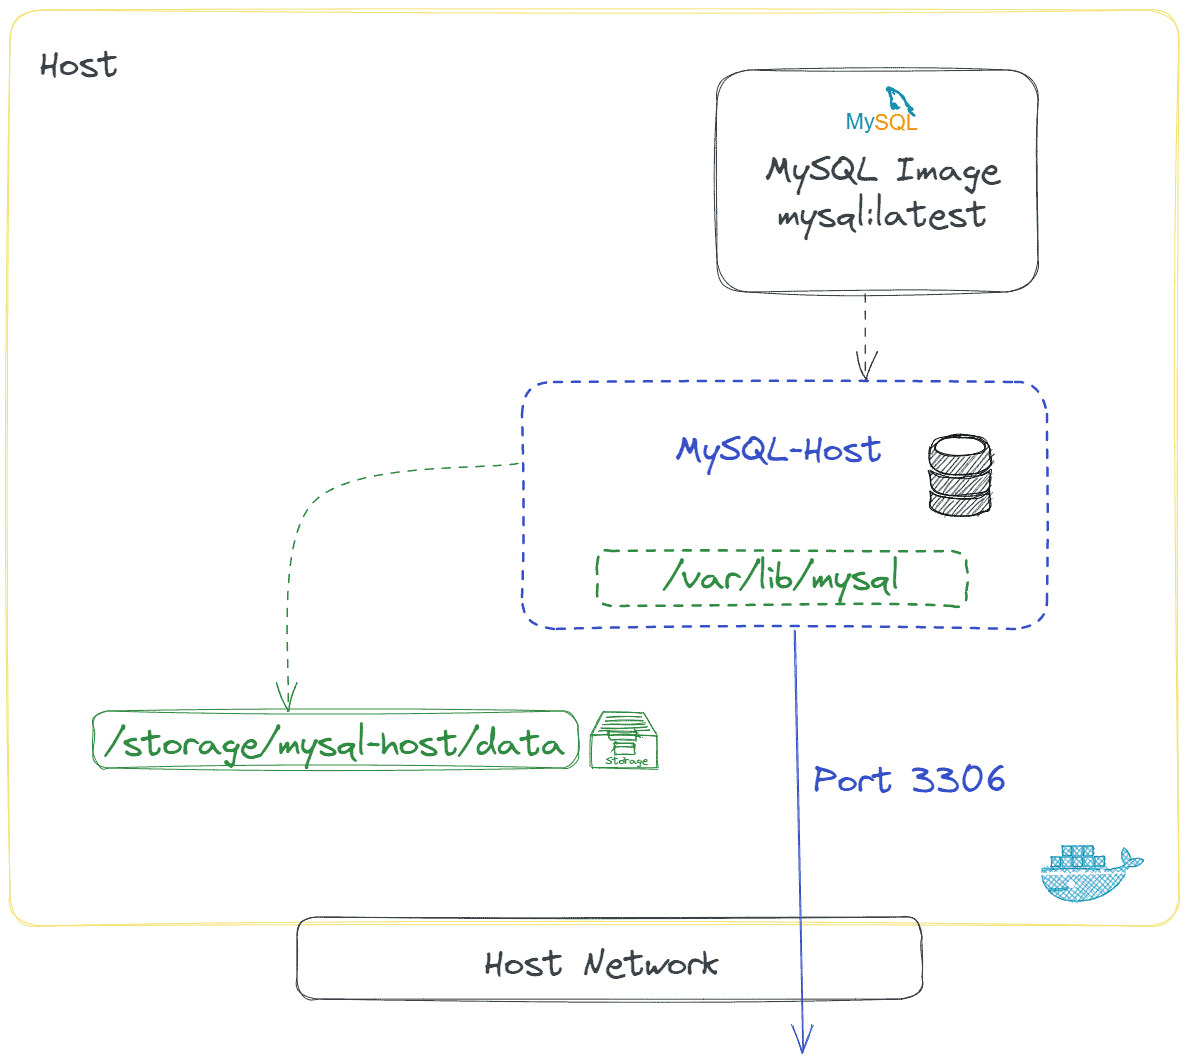
In this section, we will show you how to create a MySQL database with Docker Compose. I will define a simple Docker Compose file that creates a MySQL service and exposes it on port 3306.
Create a new directory for your project
Open your terminal or command prompt and create a new directory for your project using the mkdir command. For example:
mkdir my-mysql-projectNavigate to the new directory using the cd command:
cd my-mysql-projectCreate a new Docker Compose file
Create a new file named docker-compose.yml in your project directory using your text editor:
touch docker-compose.ymlOpen the docker-compose.yml file in your text editor.
Define the MySQL service
Add the following code to the docker-compose.yml file to define the MySQL service:
version: '3.8'

services:
  db:
    image: mysql:8.0
    command: --default-authentication-plugin=mysql_native_password
    restart: always
    environment:
      MYSQL_ROOT_PASSWORD: root_password
    ports:
      - "3306:3306"
This code defines a service named db using the MySQL 8.0 image from Docker Hub. The service is configured to use the mysql_native_password authentication plugin, and the root password is set to root_password. The service is also configured to restart always and expose port 3306 to the host system.
Run the MySQL service
Save the docker-compose.yml file and exit your text editor. Run the following command in your terminal to start the MySQL service:
docker-compose up -dThe -d flag runs the service in the background.
Verify the MySQL service
To verify that the MySQL service is running, run the following command in your terminal:
docker psYou should see a running container for the db service.
Congratulations, you have created a MySQL database using Docker Compose! In the next section, I will show you how to configure the database using environment variables.
Configuring the MySQL database using environment variables
In this section, I will show you how to configure the MySQL database using environment variables. Environment variables provide a way to configure your application without hard-coding values in your code or configuration files. Instead, you can set environment variables that your application can access at runtime.
Define environment variables for the MySQL service
Update the docker-compose.yml file to include environment variables for the MySQL service:
version: '3.8'

services:
  db:
    image: mysql:8.0
    command: --default-authentication-plugin=mysql_native_password
    restart: always
    environment:
      MYSQL_ROOT_PASSWORD: ${MYSQL_ROOT_PASSWORD}
      MYSQL_DATABASE: ${MYSQL_DATABASE}
      MYSQL_USER: ${MYSQL_USER}
      MYSQL_PASSWORD: ${MYSQL_PASSWORD}
    ports:
      - "3306:3306"
In this code, I have defined environment variables for the root password, database name, user, and password. The ${...} syntax allows us to reference environment variables that we will define later.
Create an environment file
Create a new file named .env in your project directory using your text editor:
touch .envOpen the .env file in your text editor and add the following code:
MYSQL_ROOT_PASSWORD=my_root_password
MYSQL_DATABASE=my_database
MYSQL_USER=my_user
MYSQL_PASSWORD=my_password
In this code, I have set the values of the environment variables that we defined in the docker-compose.yml file.
Use environment variables in your application
You can now use the environment variables in your application to connect to the MySQL database. For example, if you are using a MySQL client to connect to the database, you can use the following command:
mysql -h 127.0.0.1 -P 3306 -u $MYSQL_USER -p$MYSQL_PASSWORD $MYSQL_DATABASE
This command uses the environment variables to specify the host, port, user, password, and database name.
Run the MySQL service
Save the .env and docker-compose.yml files and exit your text editor. Run the following command in your terminal to start the MySQL service:
docker-compose up -d
The -d flag runs the service in the background.
Verify the MySQL service
To verify that the MySQL service is running, run the following command in your terminal:
docker ps
You should see a running container for the db service.
Congratulations, you have configured the MySQL database using environment variables! In this section, I showed you how to define environment variables in the docker-compose.yml file, set their values in an environment file, and use them in your application to connect to the database.
Testing the MySQL database
Now that we have created and configured our MySQL database using Docker Compose, it's time to test it out.
Connect to the MySQL database
There are several ways to connect to a MySQL database, but one of the easiest is to use the mysql client. You can connect to the database using the following command:
mysql -h 127.0.0.1 -P 3306 -u root -p
This command connects to the database running on your local machine (127.0.0.1), using port 3306 (the default MySQL port). The -u option specifies the username (root in this case), and the -p option prompts you to enter the password for the root user.
Create a test table
Once you are connected to the database, you can create a test table to make sure everything is working as expected. Here is an example SQL statement to create a simple users table:
CREATE TABLE users (
    id INT(6) UNSIGNED AUTO_INCREMENT PRIMARY KEY,
    first_name VARCHAR(30) NOT NULL,
    last_name VARCHAR(30) NOT NULL,
    email VARCHAR(50),
    created_at TIMESTAMP DEFAULT CURRENT_TIMESTAMP
);
This statement creates a table with columns for id, first_name, last_name, email, and created_at. The id column is set to auto-increment and is also the primary key for the table. The created_at column is set to default to the current timestamp when a new row is inserted.
Insert test data
After you have created the users table, you can insert some test data to make sure everything is working as expected. Here is an example SQL statement to insert a test user:
INSERT INTO users (first_name, last_name, email)
VALUES ('Christian', 'Schou', 'chsc@christian-schou.dk');
This statement inserts a new row into the users table with the values Christian for first_name, Schou for last_name, and chsc@christian-schou.dk for email.
Verify the data
Finally, you can verify that the data was inserted correctly by running a SELECT statement:
SELECT * FROM users;
This statement selects all rows from the users table. If everything is working correctly, you should see the test user that you just inserted.
Congratulations, you have successfully created, configured, and tested a MySQL database using Docker Compose! You can now use this as a starting point for your own MySQL-based applications.
Summary
In this tutorial, you have learned how to create and configure a MySQL database using Docker Compose, and how to configure the database using environment variables or an environment file. You have also seen how to test the database to make sure everything is working as expected.
Using Docker Compose to create and run a MySQL database has several advantages. It allows you to easily manage and version control your database configuration, and it provides a consistent environment for all members of your team to work with.
Additionally, using environment variables to configure your database allows you to keep sensitive information such as passwords out of your codebase, which is important for security reasons.
With this knowledge, you can now apply the concepts you have learned to create and configure your own MySQL databases for your own applications. Happy coding!