How To Build a Blazor Web App + In-depth theory about WASM and Razor (.NET 5)

I recently made a Blazor test where I made a development environment and build my first web app with Blazor, Visual Studio, and C#. I have never touched Blazor before but I quite like the features of the components and the way to bind data and events.
In this tutorial, I will teach you how to configure your local environment for Blazor using Visual Studio, Create a new Blazor project and Add client-side logic to a Blazor web app.
Prerequisites
It's a good idea to have a basic understanding of the following before you carry on with this tutorial. I will be explaining everything throughout the tutorial, so even though you don't have the knowledge you will still be able to make the web app using Blazor:
- Basic knowledge about web app components.
- C# .NET Experience (beginner level).
- Local Installation of .NET SDK and Visual Studio (you can also use Visual Studio Code).
- C# Extension for Visual Studio Code (if you do not go with the IDE).
- Experience using the command line.
Blazor
Normally a company would hire different types of developers. Some would be for implementing the back-end and some others would be for implementing the front-end – normal. The problem with this is that these developers often make use of different programming languages and won’t be able to work across their own “domain”.
C# and Microsoft .NET are both popular choices when it comes to writing back-end logic. But the client-side code is often made with JavaScript and other similar languages, which makes it difficult for the back-end developers to contribute to the front-end. How can we make it easy to transfer and represent data in one language? Let’s have a look at that.
What is Blazor?
Blazor is a tool for C# Developers to make use of their skills to build web apps using C# and Microsoft .NET. Imagine you are a developer and you’re developing a client-side web app and you are a part of a .NET Developer team. One of the requirements from the customer is that you have to deploy your app as a progressive web application. Their customers should be able to download the app and use it offline on their mobile devices.
By using Blazor you can build a front-end and back-end web app with common languages (in this case C#), frameworks, and tools. How awesome is that? At its simplest, you can use Blazor to generate Server-side code that will handle UI interactions through a WebSocket connection and you can also generate a client-side web app that runs directly in the browser via a WebAssembly.
Using Blazor you can:
- Accelerate App Development.
- Reduce the complexity of the build pipeline.
- Simplify maintenance (your developers are going to love you)
- Let developers understand and work on both client- and server-side code at the same time.
What is WebAssembly?
WebAssembly (WASM) is an open binary standard for a stack-based virtual machine. WASM is designed to be a portable compilation target for programming languages, enabling deployment on the web for client and server applications. WASM is designed to be encoded in a size- and load-time-efficient binary format. This gives the user a near-native speed experience at runtime. How awesome is that?!
What is Blazor WebAssembly?
When using Blazor WebAssembly, developers are put in a place where they can run .NET code inside the browser. It is a single-page app framework and uses the WebAssembly open standards without requirements for plugins.
When the application is running the .NET code is executed via WASM inside a JavaScript sandbox in the browser. This way the code can include all security and protection that is provided by the sandbox. By making use of the sandbox we can help prevent malicious actions on the client machine. Great!
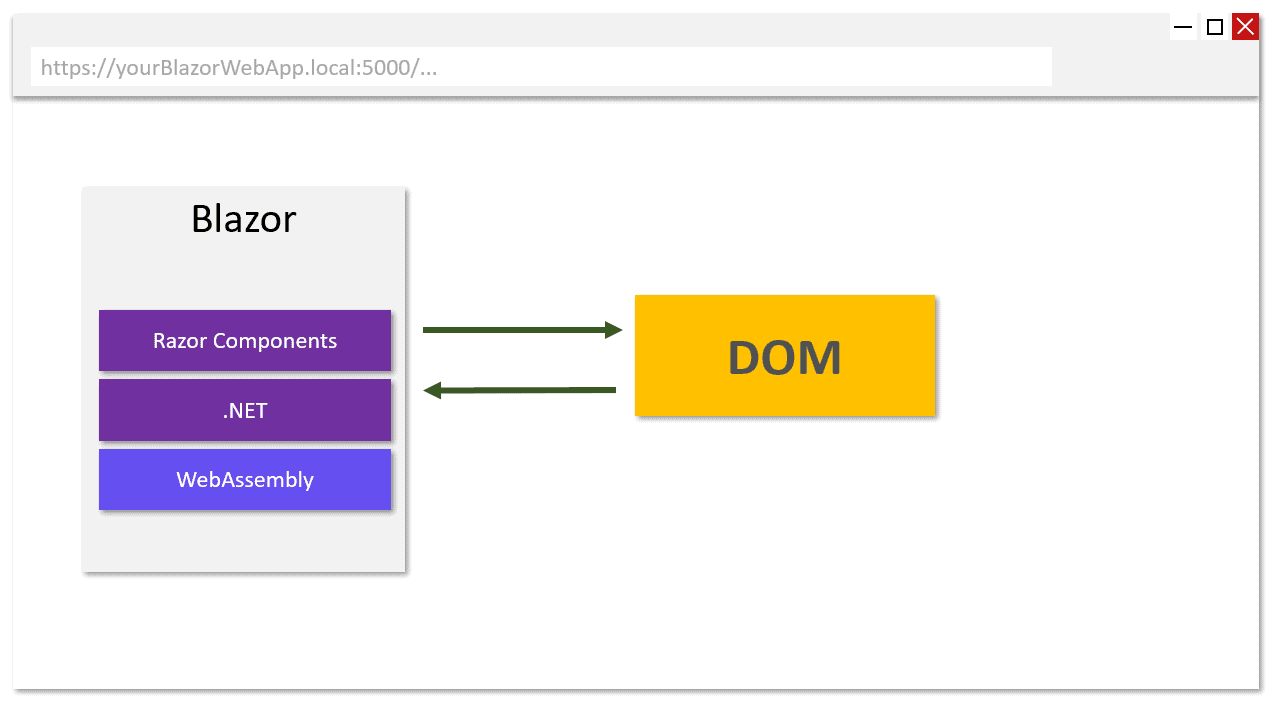
Blazor makes use of a .NET runtime compiled to a WebAssembly module. This module will be downloaded in our app, to be used offline. As you might have guessed, this module is capable of executing .NET code in our Blazor app.
A Blazor app (with WASM) is restricted to the capabilities the selected browser offers. How do we get around that? Well, the app can access all browser functionality via JavaScript interop. Genious!
What browsers offer support for Blazor WebAssembly?
To make use of Blazor WebAssembly your browser needs to be a modern desktop or smartphone. Currently, you can use the Blazor WebAssembly with:
- Microsoft Edge
- Apple Safari
- Google Chrome
- Mozilla Firefox
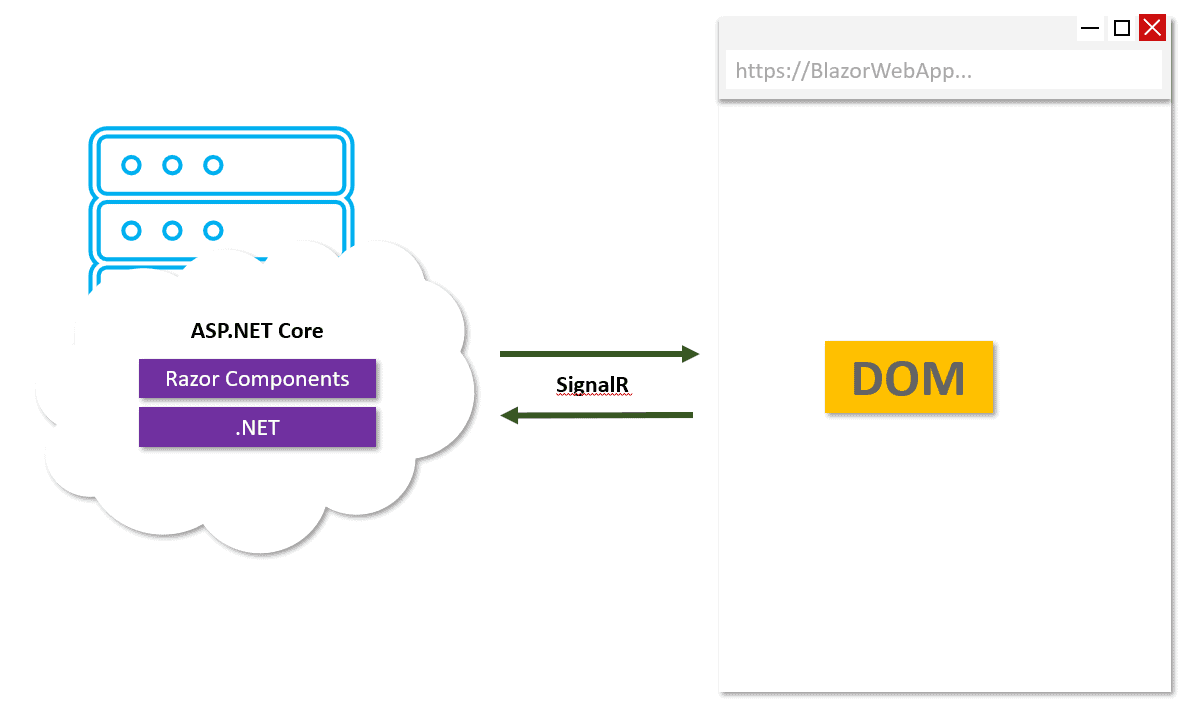
What is a Blazor Server?
A Blazor Server is the one responsible for hosting Razor components in an ASP.NET Core application. All UI interactions made in the app and sent to the server are done through SignalR.
This means that the runtime will stay on the server and is responsible for taking care of:
- Executing C# code in the application.
- UI events from the browser running the Blazor app to the server.
- Applying the updates to the rendered component that is being sent back to the server from the Blazor app.
Below is an illustration to give you an idea of how it’s being carried out.
How to build a Blazor Web App?
To set up a new Blazor project, I will be using Visual Studio 2019 (IDE). Visual Studio includes all the tools we need to get the solution up and running. Follow the steps below to create your Blazor App:
Create the Blazor WebAssembly App
Open Visual Studio -> Create a new project and search for Blazor:
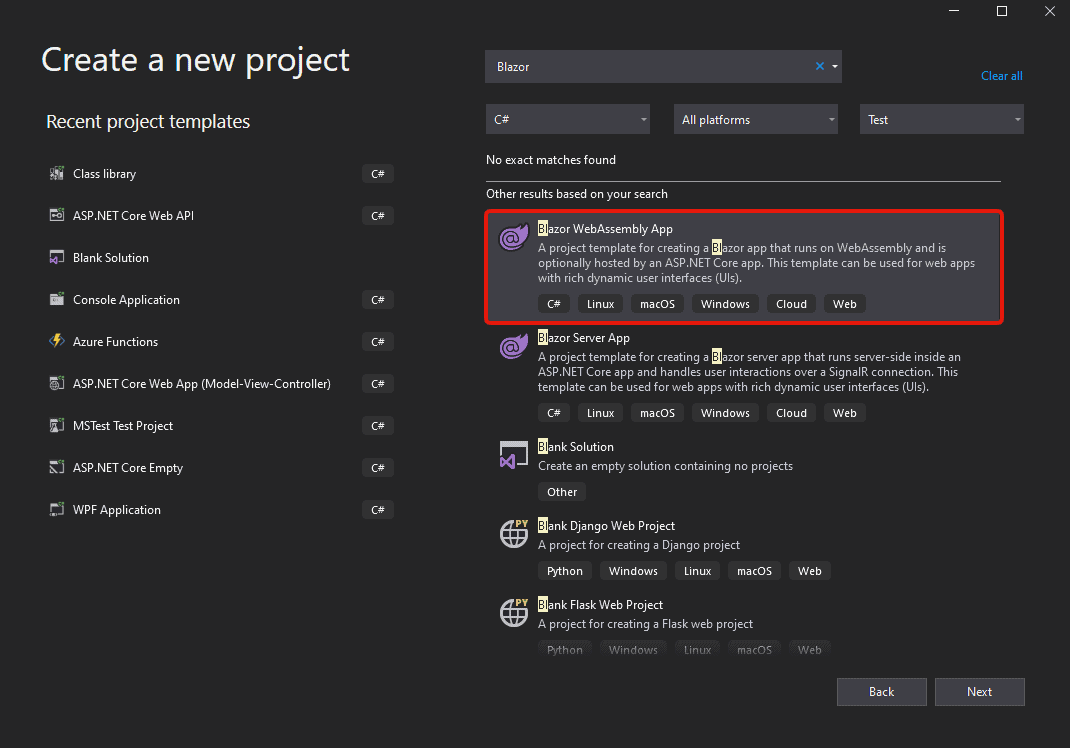
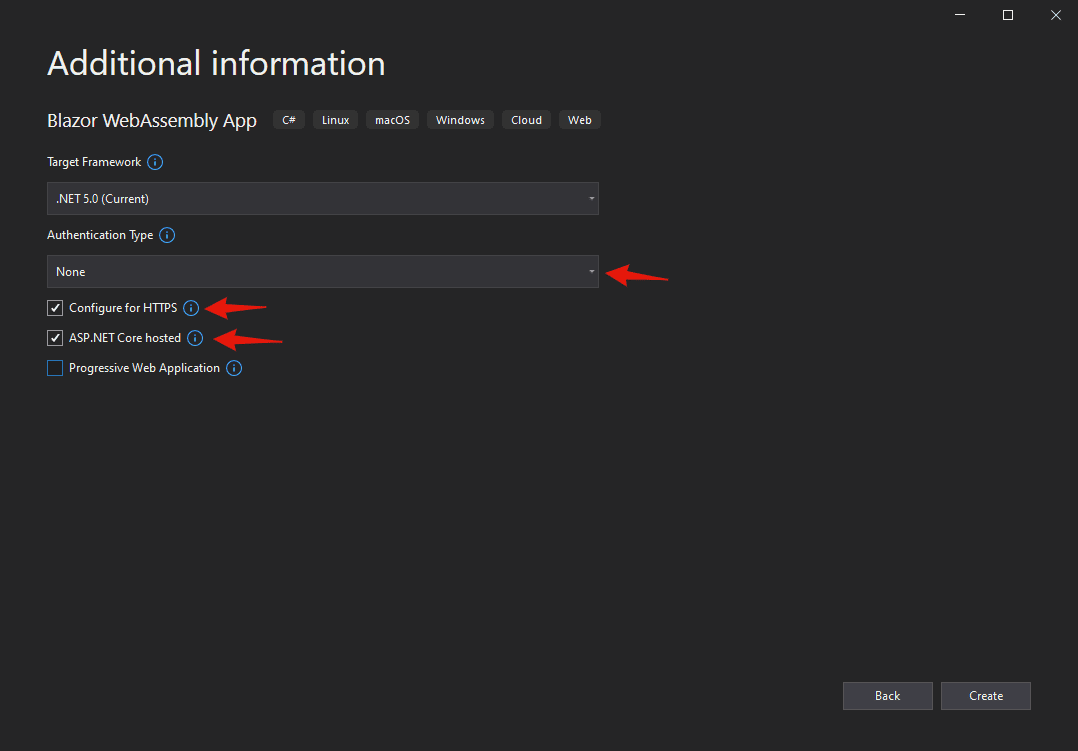
Select Blazor WebAssembly App and click Next. On the following page, select:
- Authentication Type -> None
- Configure for HTTPS -> True
- ASP.NET Core hosted -> True
- Progressive Web Application -> False
Launch your new Blazor Web App
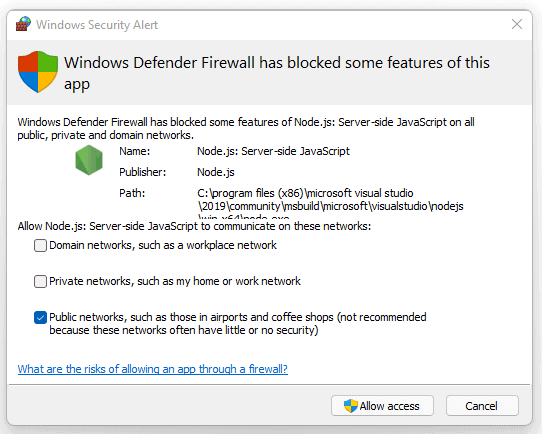
All right – Now we got our Client and Server project. By default the Server project is set to the startup project in Visual Studio – leave this as is. The first time you launch the application with IIS Express, you will be prompted to Allow Access to some features in this app. This is Windows Firewall blocking Node.js and the only thing you have to do is click “Allow Access“.
If you followed my steps above so far, You should have a website that looks similar to this:
When you have clicked around inside the web app, close the site or go to Visual Studio and stop the application.
Blazor Web App Components
That was easy, right? Now we have a fully running Blazor Development Environment configured. Now it’s time to explore the structure and take a look at how we can add new pages to our Blazor project. To do that we first have to take a look at something called Razor.
What is Razor?
This is very brief, but Razor is a markup syntax that makes use of HTML and C# for making UI components of Blazor Web Apps. Razor is totally designer for creating web apps and is based on the well-known ASP.NET framework.
What is a Razor Component?
A Razor component is a part of the app UI and is defined in a Razor file, that can hold multiple components that make up a portion of the application’s UI. A component is analogous to user controls like we know from ASP.NET Web Forms. If you take a look around in the application in Visual Studio, you should see that most of the files are made of .razor files.
When we compile the application in Visual Studio or any other .NET compiler, each Razor component is built into a .NET class. This class includes common elements for the UI, including:
- State
- Rendering Logic
- Lifecycle Methods
- Event Handlers
Test one of the components (The Counter)
If you haven’t already done it, launch the application and test the pre-made counter. The following page should then be displayed and the counter should increment one each time you click it (just like in the good old cookie clicker days).

Have you noticed that you don’t have to refresh the page to see the new counter status? Doing these increments would normally require a webpage to have JavaScript to do this without refreshing the page. In this example we don’t use JavaScript – it’s pure C# – How cool is that?!
If you go to Pages/Counter.razor you can find the implementation of the counter. It’s very simple but makes out for a great example:
@page "/counter"

<h1>Counter</h1>

<p>Current count: @currentCount</p>

<button class="btn btn-primary" @onclick="IncrementCount">Click me</button>

@code {
    private int currentCount = 0;

    private void IncrementCount()
    {
        currentCount++;
    }
}
I have marked the lines above to show you the code needed to make this happen live in the front end. When you request /counter in the browser on the domain for the web app specified by @page "/counter", the component of Counter is rendered. Each time a user is clicking the “Click me” button in the UI, the following is happening in the client application:
- An
onclickevent is fired. - The
IncrementCountmethod is executed. - The
currentCountinteger is incremented by 1 (++) - The component is then rendered to show the updated count of
currentCount.
How to add an existing component to an existing page
In this small example, I will show you how to add an already existing component to a page. Go to your client project and expand the folder with Pages and open the page named Index.razor. Here we will be adding the counter component at the bottom of the page. The only thing we have to do is add the reference <Counter /> at the end of the file like I have done below:
@page "/"

<h1>Hello, world!</h1>

Welcome to your new app.

<SurveyPrompt Title="How is Blazor working for you?" />

<Counter />
Save the file and run the application once again. Your index page “Home” should now contain the counter component from the other razor page.

How to modify an existing component
When you specify a parameter for a component it is done using attributes or child content. By doing this we can set properties on a child component.
Define a new parameter on the Counter component, that will specify how much the counter is incremented with each time:
- Add a public integer property named
IncrementAmountand add the attribute[Parameter]. - Change the currenct
IncrementCountmethod to make use of the new property, when the incrementing is executed.
@page "/counter"

<h1>Counter</h1>

<p>Current count: @currentCount</p>

<button class="btn btn-primary" @onclick="IncrementCount">Click me</button>

@code {
    private int currentCount = 0;

    [Parameter]
    public int IncrementAmount { get; set; } = 1;

    private void IncrementCount()
    {
        currentCount += IncrementAmount;
    }
}
By default, the IncrementAmount property is set to 1, but this can be changed when we add the component to other Razor pages, by specifying it at the parameter.
Open Index.razor and update the <Counter /> element with the newly addedIncrementAmountattribute. Here you can override the default value with what you want the incremented value to be each time the IncrementCount is executed in Counter.razor.
@page "/"

<h1>Hello, world!</h1>

Welcome to your new app.

<SurveyPrompt Title="How is Blazor working for you?" />

<Counter IncrementAmount="20" />
Launch the application when you have finished the above. When clicking the “Click me” button on our Index page “Home” we should now see that our incremented is incrementing the value with what we specified for the attribute. If you have done it correctly, you should have a page and component that behaves like mine below:
Data Binding and Events
Now it’s getting fun! So far we have defined a UI for our web app. Now we are going to explore how to add new logic to our web app. To add new logic to a Blazor app, we can add C# code in separate .cs files or directly inline in our Razor components. Below is a brief explanation of both methods:
C# Code in .cs files (separate from Razor components)
When we use Blazor we can add the C# files directly to our app project as we would do with any other .NET project – nothing new here. This is often referred to as code-behind, where we add separate files to store logic for our app. I tend to say that you should use separate files when you got complex business logic if it’s long or it got multiple classes. If it’s simple logic, simply put it in the .razor file.
C# Inline in Razor Components
As we saw before, it’s very easy to mix C# and HTML in a single .razor component file and it’s very common to do. If you got a simple component(s) where the implementation is light, the approach where we put the logic inside the .razor component file is great. When we add code inside a .razor file we make use of something named directives, and what is that?
Razor Directives – What is that?
A Razor directive is a component markup we can use to add C# inline our HTML. Developers can use these directives to define single statements, and methods or even make larger blocks of code.
The @Code Directives
If you have been developing MVC or Pages using Razor, code directives should not be new to you. We can use @expression() inside our HTML to add a C# statement. If we require more code to be added we can use the @code directive to add multiple statements.
It is also possible to add a @functions section to our template if we would like to have methods and properties. They should be added to the top of the generated class in order for the document to reference them for later usage.
The @Page Directive
This directive is used to identify a component as a page and is special markup. We use this directive to specify a route which then maps to an attribute route. The Blazor engine can then recognize this route and register it in the application and allow access to the page.
Data binding with Razor
A nice feature with Razor components is that you are able to data bind HTML elements to C# fields, properties, and even Razor expressions. When using data binding, we allow for two-way sync between .NET and HTML.
The data is pushed from the HTML to .NET, on rendering. Each component will render itself when the event handler is executed. Remember the instant update of our counter in the UI earlier? This is the reason why. Your property updates are immediately reflected within the Blazor Web App.
If you want to bind a C# variable to an HTML object, you only have to use @bind. The variable can be defined using C# in the HTML – let’s take a look at how this is implemented by building a simple to-do list component inside our Blazor Web App.
Create a new To-Do page in your Blazor Web App
Let’s create our simple to-do list inside the Blazor Client app. The first thing you have to do is go to the Client project, expand Pages and add a new page named ToDo.
Open the new page and add the following code to the page. First-line contains a @page Razor directive, that will allow for access at the relative URL /todo.
@page "/todo"

<h3>To-Do</h3>

@code {

}
Save the file, we will return later to implement some logic.
Add the ToDo Component to The Navigation Menu
In your shared folder inside the client project, you can find NavMenu.razor. This component is used within the app’s layout. In short – Layouts are individual components that allow you to avoid duplication of content in your app (DRY – Don’t Repeat Yourself).
Inside the unordered list of the Navigation Menu component, you have to add a new list item and point it to /todo. You can copy and paste the code from below or type it yourself:
<div class="@NavMenuCssClass" @onclick="ToggleNavMenu">
    <ul class="nav flex-column">
        <li class="nav-item px-3">
            <NavLink class="nav-link" href="" Match="NavLinkMatch.All">
                <span class="oi oi-home" aria-hidden="true"></span> Home
            </NavLink>
        </li>
        <li class="nav-item px-3">
            <NavLink class="nav-link" href="counter">
                <span class="oi oi-plus" aria-hidden="true"></span> Counter
            </NavLink>
        </li>
        <li class="nav-item px-3">
            <NavLink class="nav-link" href="fetchdata">
                <span class="oi oi-list-rich" aria-hidden="true"></span> Fetch data
            </NavLink>
        </li>
        <li class="nav-item px-3">
            <NavLink class="nav-link" href="todo">
                <span class="oi oi-list-rich" aria-hidden="true"></span> To-Do
            </NavLink>
        </li>
    </ul>
</div>
Save and close the file. Start the application once again and check if you are able to navigate to the To-Do page now.

Create a new To-Do Item
Open the <YourProjectName>.Shared Class project and add a new file named ToDoItem.cs. This one will hold a C# class that will represent what a To-Do item should look like. Below is the code for how to implement the ToDoItem.
public class ToDoItem
{
    public string Title { get; set; }
    public bool IsDone { get; set; }
}
Bind ToDoItem to a list
With our ToDoItem in place in the shared project, we can now move on and bind a collection of ToDoItem objects to HTML in our Blazor Web App.
The first thing we do is add a field for the to-do items in the @code block. Our ToDo component will use this field to maintain the state of our to-do list in the browser. Secondly, we will add an unordered list and a foreach loop to render each stored to-do item as a list item.
@page "/todo"

<h3>To-Do</h3>

<ul>
    @foreach (var todo in todos)
    {
        <li>@todo.Title</li>
    }
</ul>

@code {
    private List<BlazorApp.Shared.ToDoItem> todos = new();
}
Build a new form to add to-do elements
In order for this app to be useful, we need to add a form, where the user can input new to-do items. To accomplish this, we will add a text input and a button, below our to-do list.
@page "/todo"

<h3>To-Do</h3>

<ul>
    @foreach (var todo in todos)
    {
        <li>@todo.Title</li>
    }
</ul>

<input placeholder="Something to-do" />
<button>Add to-do</button>

@code {
    private List<BlazorApp.Shared.ToDoItem> todos = new();
}
If you run the application now and test this nice little feature, nothing will happen. This is because we haven’t attached an event handler to the button yet. “To do” this we have to add a method to the ToDo component and then register the method for the button using the @onclick method. Below is the code you need:
@page "/todo"

<h3>To-Do</h3>

<ul>
    @foreach (var todo in todos)
    {
        <li>@todo.Title</li>
    }
</ul>

<input placeholder="Something to-do" />
<button @onclick="AddTodo">Add to-do</button>

@code {
    private List<BlazorApp.Shared.ToDoItem> todos = new();

    private void AddTodo()
    {
        // TODO: Add the todo
    }
}
Now we have to do some data binding in order to get the title of the to-do item from the HTML code. Add a string named todoTitle at the top of the code block:
@code {
    private List<BlazorApp.Shared.ToDoItem> todos = new();
    private string todoTitle;

    private void AddTodo()
    {
        // TODO: Add the todo
    }
}
Go back to line 12 and modify the input element to bind todoTitle using the @bind attribute. Your line 12 should look like the one below:
<input placeholder="Something todo" @bind="todoTitle" />Now we can add the logic to our AddTodo method in order to add the to-do item to the list. To give the user a painless experience, we will be clearing the input field upon each to-do submission to the list, this is done by setting the string to empty when the item has been added to the list.
private void AddTodo()
{
    if (!string.IsNullOrWhiteSpace(todoTitle))
    {
        todos.Add(new BlazorApp.Shared.ToDoItem { Title = todoTitle });
        todoTitle = string.Empty;
    }
}
The final ToDo Component file should look like this:
@page "/todo"

<h3>To-Do</h3>

<ul>
    @foreach (var todo in todos)
    {
        <li>@todo.Title</li>
    }
</ul>

<input placeholder="Something to-do" @bind="todoTitle"/>
<button @onclick="AddTodo">Add to-do</button>

@code {
    private List<BlazorApp.Shared.ToDoItem> todos = new();
    private string todoTitle;

    private void AddTodo()
    {
        if (!string.IsNullOrWhiteSpace(todoTitle))
        {
            todos.Add(new BlazorApp.Shared.ToDoItem { Title = todoTitle });
            todoTitle = string.Empty;
        }
    }
}
To help the user keep track of their to-do items, we have to add a checkbox for each to-do item and bind its value to the IsDone property in our ToDoItem class. Go to your foreach and add an input to the <li></li> section along with your current todo.Title item. You should end up with a component file like this:
@page "/todo"

<h3>To-Do</h3>

<ul>
    @foreach (var todo in todos)
    {
        <li>
            <input type="checkbox" @bind="todo.IsDone" />
            <span>@todo.Title</span>
        </li>
    }
</ul>

<input placeholder="Something to-do" @bind="todoTitle"/>
<button @onclick="AddTodo">Add to-do</button>

@code {
    private List<BlazorApp.Shared.ToDoItem> todos = new();
    private string todoTitle;

    private void AddTodo()
    {
        if (!string.IsNullOrWhiteSpace(todoTitle))
        {
            todos.Add(new BlazorApp.Shared.ToDoItem { Title = todoTitle });
            todoTitle = string.Empty;
        }
    }
}
If you want to you can also append the number of to-do items that are not complete in the header of the page. You can make a lambda to show the number of these items like the one below – and replace the H3 on line 3:
<h3>Unfinished To-Do's (@todos.Count(todo => !todo.IsDone))</h3>Save the ToDo component and start the application. Navigate to the To-Do section in the menu and try the newly added logic on the page. If you follow my instructions, you should now end up with an application like the one shown below:
Summary
In this tutorial, you have learned to set up your own development environment to create and build Blazor Web Apps. I know there is a lot of theory but it’s necessary to understand the basics of how Blazor is working and how the components work in collaboration. You should now have an understanding of the fundamentals of building a Blazor Web App.
Throughout the tutorial, you have learned to re-use Razor components, add HTML and C# to a Razor file (component) and do data binding to sync user input to the logic in the application. I hope you have learned some new stuff in this tutorial, you should now be able to use HTML and C# to build more complex web apps. If you got any questions, please let me know in the comments. Happy coding!