How to build a RESTful Web API using ASP.NET Core and Entity Framework Core (.NET 6)
Learn how to build your own RESTful Web API with ASP.NET Core and Entity Framework Core (.NET 6) with auto data seeding to MS SQL.
I have noticed many people searching for REST (Representational State Transfer) on my blog, but I haven't made any tutorials on how to build a RESTful Web API until now. Because of the increasing search volume on this topic, I have created a new tutorial on building a RESTful Web API using C#, ASP.NET Core, and Entity Framework Core 6.
When you are done watching my tutorial or reading this article you will be able to build your REST API using ASP.NET Core and EF Core. The RESTful Web API we will be building in this article is based on authors and their books.
Before you begin this tutorial I assume you got some basic knowledge of HTTP, REST, Entity Framework, and of course C# and ASP.NET Core. If you have been working with ASP.NET before, it’s perfect, but not something required to follow along in this tutorial.
If you are ready then let’s get started creating a RESTful Web API about books using ASP.NET Core Web API (.NET 6) and Entity Framework Core 6 to store our books in the database with relations.
Prerequisites
To complete this tutorial you will need the following:
- Visual Studio IDE or similar
- Microsoft SQL Express with SQL Server Management Studio
- .NET 6 SDK installed
- Previous knowledge about .NET and C#
Build a RESTful Web API
I have divided this tutorial into several small sections to make it easier for you to navigate in the tutorial. This could be handy if you only need a small part of the article to solve your own issue.
The database will be created using the EF Core Code-First approach and data will be seeded by the application. We will be connecting to an MS SQL database engine. I will make use of SQL Server Management Studio (SSMS) throughout this article to verify data has been migrated and seeded by the application. You can download a copy of SQL Server Express and SQL Server Management Studio if you not already have done so.
Create and Configure a new API project in Visual Studio
I will not be introducing how you can create a new ASP.NET Core Web API in Visual Studio. I have included an image of my settings below, for your reference.

Create the database
I like to create the database from SSMS, while it is possible to do it from the application though through migrations. This just gives me the option to configure security settings, etc… If this were an application running in a Docker Container, I would do it all from the application itself. If you would like to see how you can spin up a Dockerized ASP.NET Core Web API with an MS SQL Server you can check that out here on my blog as well.
I assume you have already installed SSMS and SQL Express on your computer and everything is running smoothly. Now connect to the database using the credentials you specified during the setup of the database engine or use Windows Authentication.
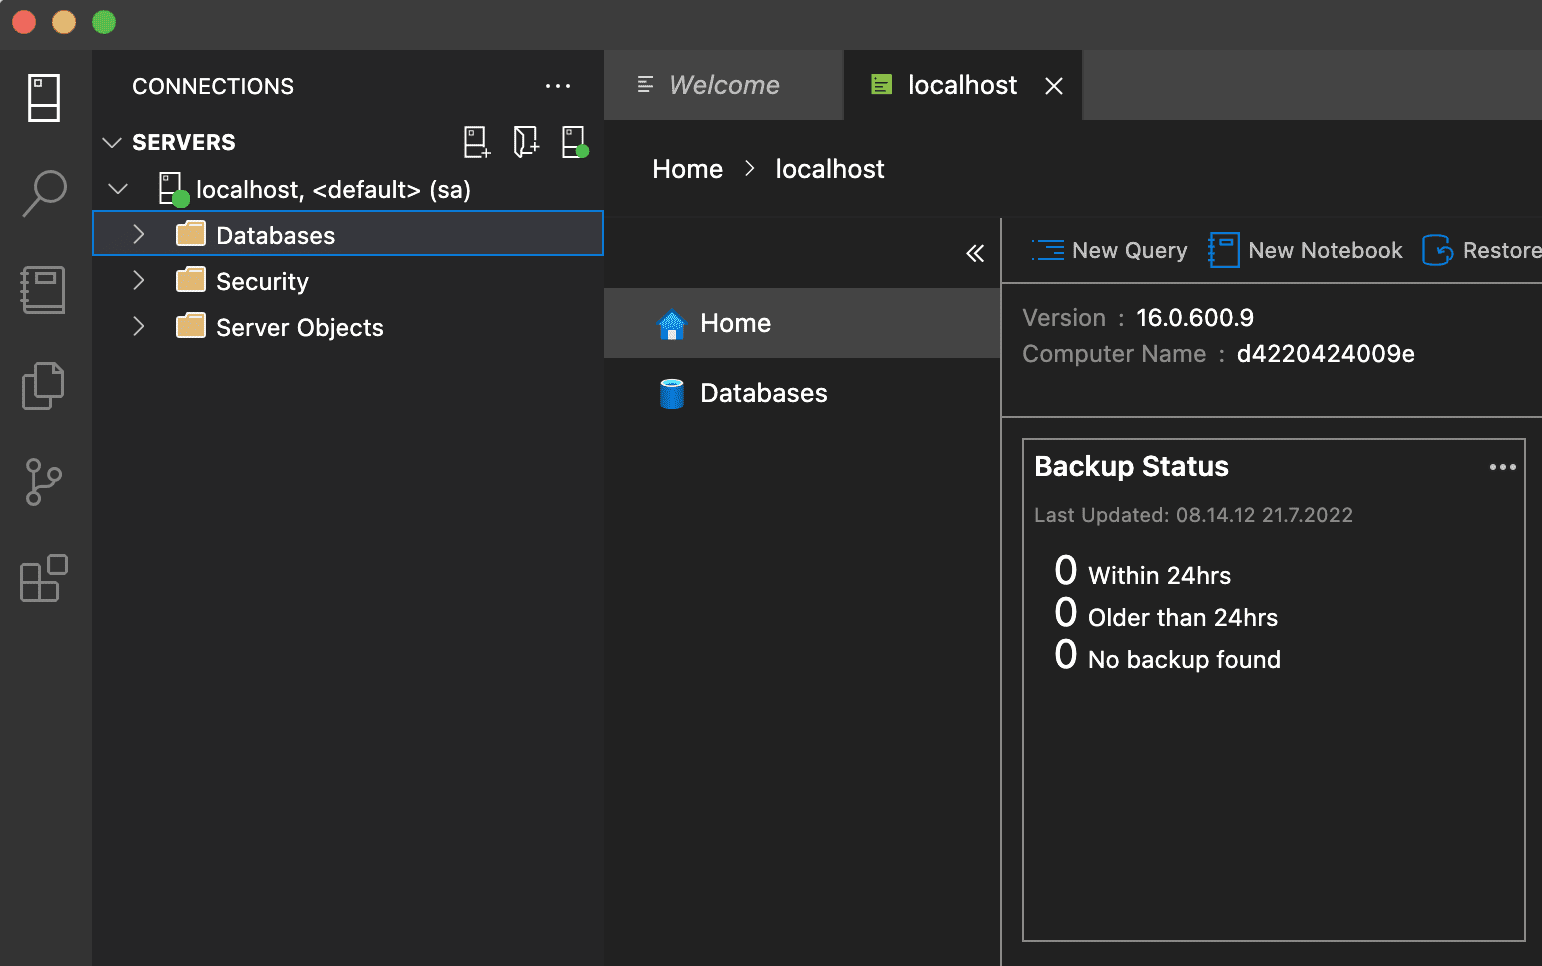
Now we are connected to the database engine, let’s go ahead and create a new database for our RESTful Web API.
I have named my database Restful, but you can pick a name that you would like for your database. If you are using SSMS you can right-click on the database explorer and create a new database. If you prefer to do it through a query, you can do so as I have done below:

CREATE DATABASE RestfulAdding required dependencies for the Web API
As we are building a REST API we need to have some sort of communication with a database to serve and store data. In order to communicate with the MS SQL Server Database we created before, we have to install two NuGet packages into our project.
In Visual Studio you have to right-click on your project title and select Manage NuGet Packages…
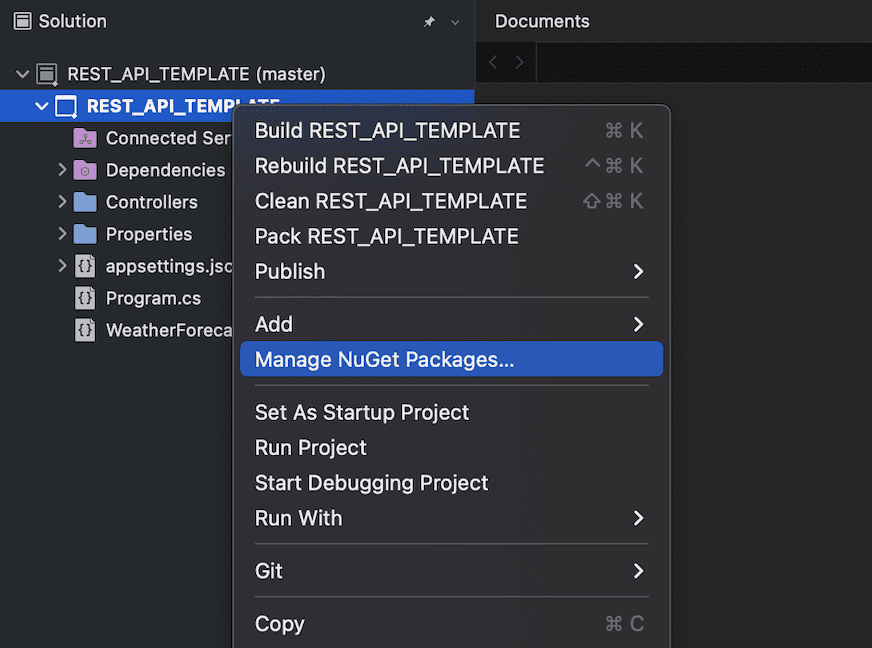
Navigate to the Browse tab and search for these two packages:
Install them in your project as I have done below:
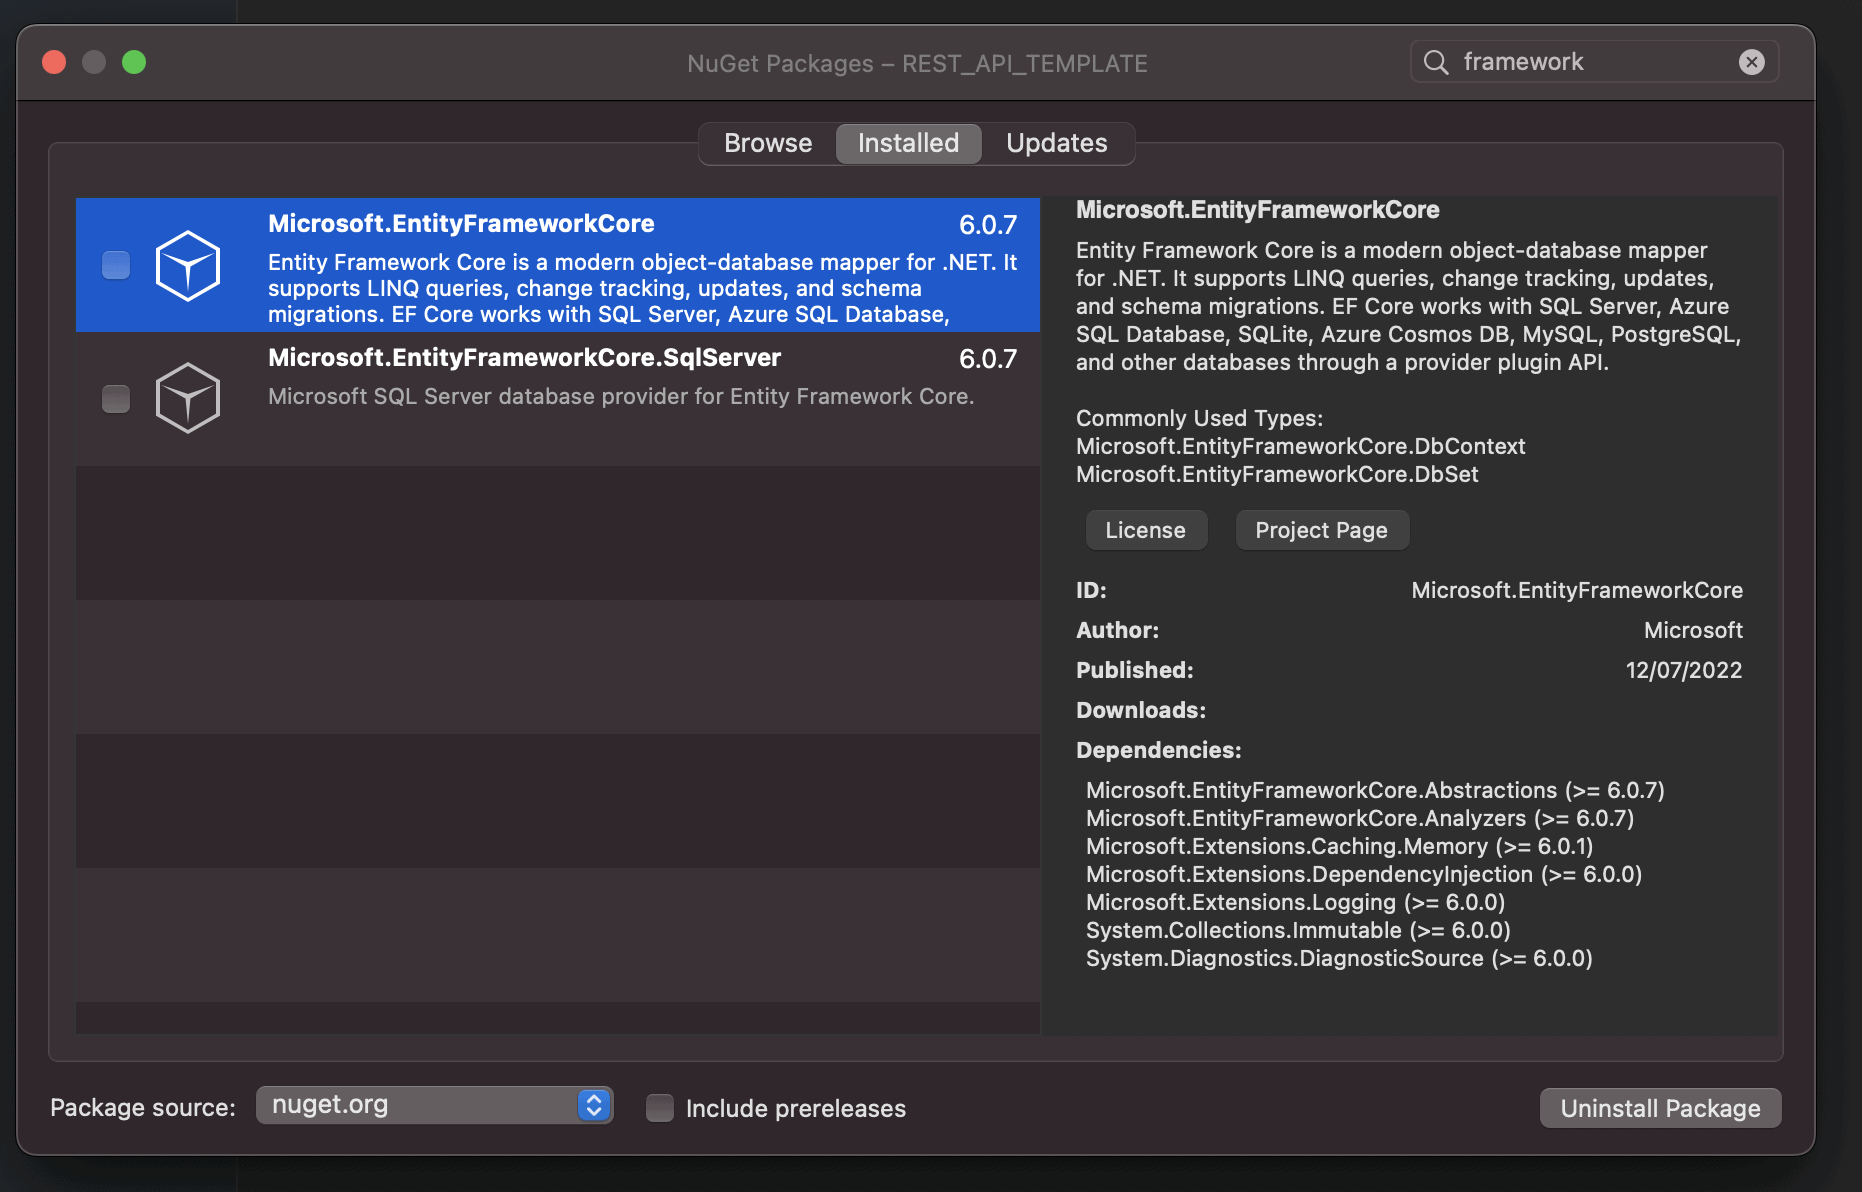
That’s it for the dependencies. Now we can move on to defining our data models for the project.
Create data models
We will be building the whole API within the same project for this demo. If this was a large project I would go with clean architecture and build the solution in another way.
The first thing we have to do is create a new folder named Models. This folder will be responsible for holding our data models for the books and their authors. The books will not have multiple authors in this project.
Right-click the Models folder and add a new enum file named Genre.cs and add the following genres to it:
namespace REST_API_TEMPLATE.Models
{
    public enum Genre
    {
        Fantasy,
        Adventure,
        Romance,
        Contemporary,
        Dystopian,
        Mystery,
        Horror,
        Thriller,
        Paranormal,
        Historical_fiction,
        Science_Fiction,
        Childrens,
        Memoir,
        Cooking,
        Art,
        Self_help,
        Personal,
        Development,
        Motivational,
        Health,
        History,
        Travel,
        How_to,
        Families_Relationships,
        Humor,
        Biography
    }
}
Right-click on Models and create a new class named Book.cs. Inside Book.cs we will add the following line of codes to define what a book “looks like” in our system.
using System.ComponentModel.DataAnnotations;

namespace REST_API_TEMPLATE.Models
{
    public class Book
    {
        [Key]
        public Guid Id { get; set; }
        public string? Title { get; set; }
        public string? Subtitle { get; set; }
        public string? Description { get; set; }
        public Genre? Genre { get;set; }
        public string? Publisher { get; set; }
        public string? ISBN { get; set; }
        public double? Rating { get; set; }
        public DateTime ReleaseDate { get; set; }

        // One-to-many relation with author
        public Guid? AuthorId { get; set; }
        public Author? Author { get; set; }
    }
}
In the book’s model, we have a one-to-one relationship with an Author. To create this connection, we have to reference an Author class, so let’s create that one as well:
using System.ComponentModel.DataAnnotations;

namespace REST_API_TEMPLATE.Models
{
    public class Author
    {
        [Key]
        public Guid Id { get; set; }
        public string? Name { get; set; }
        public DateTime? DateOfBirth { get; set; }

        // One-to-many relationship with books
        public List<Book>? Books { get; set; }
    }
}
You should now have three new .cs files in the Models folder named:
- Author.cs
- Book.cs
- Genre.cs
Create AppDbContext to communicate with SQL Database
A RESTful API is not that fun without the option to store data and serve them again. In order for our application to communicate with the SQL Server Database we created earlier, we have to use DbContext. We will create a new folder named Data and add a new file named AppDbContext.cs that will inherit DbContext.
AppDbContext.cs is responsible for holding our entities in the database (DbSets) as well as the configurations we want to configure along with the mapping between our application and the database. Inside AppDbContext.cs you have to add the following code:
using Microsoft.EntityFrameworkCore;
using REST_API_TEMPLATE.Models;

namespace REST_API_TEMPLATE.Data
{
    public class AppDbContext : DbContext
    {
        public AppDbContext(DbContextOptions<AppDbContext> options) : base(options)
        {
        }

        public DbSet<Author> Authors { get; set; }
        public DbSet<Book> Books { get; set; }

        protected override void OnModelCreating(ModelBuilder builder)
        {

            // Define relationship between books and authors
            builder.Entity<Book>()
                .HasOne(x => x.Author)
                .WithMany(x => x.Books);

            // Seed database with authors and books for demo
            new DbInitializer(builder).Seed();
        }
    }
}
What is going on here?
- Line 6: We inherit
DbContext. - Line 8 – 9: We initialize a new instance of DbContext using the specified options from
AppDbContext. - Line 12 and 13: We add our data models as entities for the database.
- Line 15 – 25: We define the relationship between the authors and books in the database. On the book data model, we have added
AuthorId. This is actually the foreign key (it’s not necessary but I like it as I can navigate data easier). In line 24 we call aDbInitializer(we will create this in a moment) to seed the database with some demo data.
Add DbInitializer to seed demo data
An API without data is pretty boring to request data from. To avoid us having to enter data manually every time we wipe the database, we can seed data during a database update.
To seed data, I have created a new class named DbInitializer.cs and placed it in the Data folder along with AppDbContext.cs. It got the following code:
using Microsoft.EntityFrameworkCore;
using REST_API_TEMPLATE.Models;

namespace REST_API_TEMPLATE.Data
{
    public class DbInitializer
    {
        private readonly ModelBuilder _builder;

        public DbInitializer(ModelBuilder builder)
        {
            _builder = builder;
        }

        public void Seed()
        {
            _builder.Entity<Author>(a =>
            {
                a.HasData(new Author
                {
                    Id = new Guid("90d10994-3bdd-4ca2-a178-6a35fd653c59"),
                    Name = "J.K. Rowling",
                    DateOfBirth = new DateTime(1965, 07, 31),
                });
                a.HasData(new Author
                {
                    Id = new Guid("6ebc3dbe-2e7b-4132-8c33-e089d47694cd"),
                    Name = "Walter Isaacson",
                    DateOfBirth = new DateTime(1952, 05, 20),
                });
            });

            _builder.Entity<Book>(b =>
            {
                b.HasData(new Book
                {
                    Id = new Guid("98474b8e-d713-401e-8aee-acb7353f97bb"),
                    Title = "Harry Potter and the Sorcerer's Stone",
                    Description = "Harry Potter's life is miserable. His parents are dead and he's stuck with his heartless relatives, who force him to live in a tiny closet under the stairs.",
                    Genre = Genre.Fantasy,
                    Publisher = "Scholastic; 1st Scholastic Td Ppbk Print., Sept.1999 edition (September 1, 1998)",
                    ISBN = "978-0439708180",
                    Rating = 5,
                    AuthorId = new Guid("90d10994-3bdd-4ca2-a178-6a35fd653c59")
                });
                b.HasData(new Book
                {
                    Id = new Guid("bfe902af-3cf0-4a1c-8a83-66be60b028ba"),
                    Title = "Harry Potter and the Chamber of Secrets",
                    Description = "Ever since Harry Potter had come home for the summer, the Dursleys had been so mean and hideous that all Harry wanted was to get back to the Hogwarts School for Witchcraft and Wizardry. ",
                    Genre = Genre.Fantasy,
                    Publisher = "Scholastic Paperbacks; Reprint edition (September 1, 2000)",
                    ISBN = "978-0439064873",
                    Rating = 5,
                    AuthorId = new Guid("90d10994-3bdd-4ca2-a178-6a35fd653c59")
                });
                b.HasData(new Book
                {
                    Id = new Guid("150c81c6-2458-466e-907a-2df11325e2b8"),
                    Title = "Steve Jobs",
                    Description = "Walter Isaacson’s “enthralling” (The New Yorker) worldwide bestselling biography of Apple cofounder Steve Jobs.",
                    Genre = Genre.Biography,
                    Publisher = "Simon & Schuster; 1st edition (October 24, 2011)",
                    ISBN = "978-1451648539",
                    Rating = 4.5,
                    AuthorId = new Guid("6ebc3dbe-2e7b-4132-8c33-e089d47694cd")
                });
            });
        }
    }
}
It is basically just a class with two authors and a few books to be added inside the database when running the initial database update from the migration, which we will do in a moment.
Register database context in Program.cs
We have to provide appsettings.json with a connection string to our database before we can transfer any data between our application and the database. Open appsettings.json and add a few lines at the top of the file, as I have done below. Remember to replace your credentials in the connection string. If you need a reference, you can check out connectionstrings.com.
{
  "ConnectionStrings": {
    "DefaultConnection": "Server=localhost,1433;Database=Restful;User Id=sa;Password=Welcome2022;"
  },
  "Logging": {
    "LogLevel": {
      "Default": "Information",
      "Microsoft.AspNetCore": "Warning"
    }
  },
  "AllowedHosts": "*"
}
This is just a demo database I have running inside a Docker container – it will be removed after this tutorial, hence the public showing of the password.
Inside Program.cs we have to register our database during the startup of the application.
using Microsoft.EntityFrameworkCore;
using REST_API_TEMPLATE.Data;

var builder = WebApplication.CreateBuilder(args);

// Add services to the container.

builder.Services.AddControllers();
// Learn more about configuring Swagger/OpenAPI at https://aka.ms/aspnetcore/swashbuckle
builder.Services.AddEndpointsApiExplorer();
builder.Services.AddSwaggerGen();

// Register database
builder.Services.AddDbContext<AppDbContext>(options =>
    options.UseSqlServer(builder.Configuration.GetConnectionString("DefaultConnection")));

var app = builder.Build();

// Configure the HTTP request pipeline.
if (app.Environment.IsDevelopment())
{
    app.UseSwagger();
    app.UseSwaggerUI();
}

app.UseHttpsRedirection();

app.UseAuthorization();

app.MapControllers();

app.Run();
Okay, now we got our database context (AppDbContext) registered with the connection string from appsettings.json. Let’s add an initial migration and update the database.
Migrate and Update the Database with demo data
Now it’s time to do our migrations and update the database. To create migrations, we have to install one extra package/dependency. It is named Microsoft.EntityFrameworkCore.Design and is required for Entity Framework Core Tools to work. Please install it in your project and run the following command in your terminal:
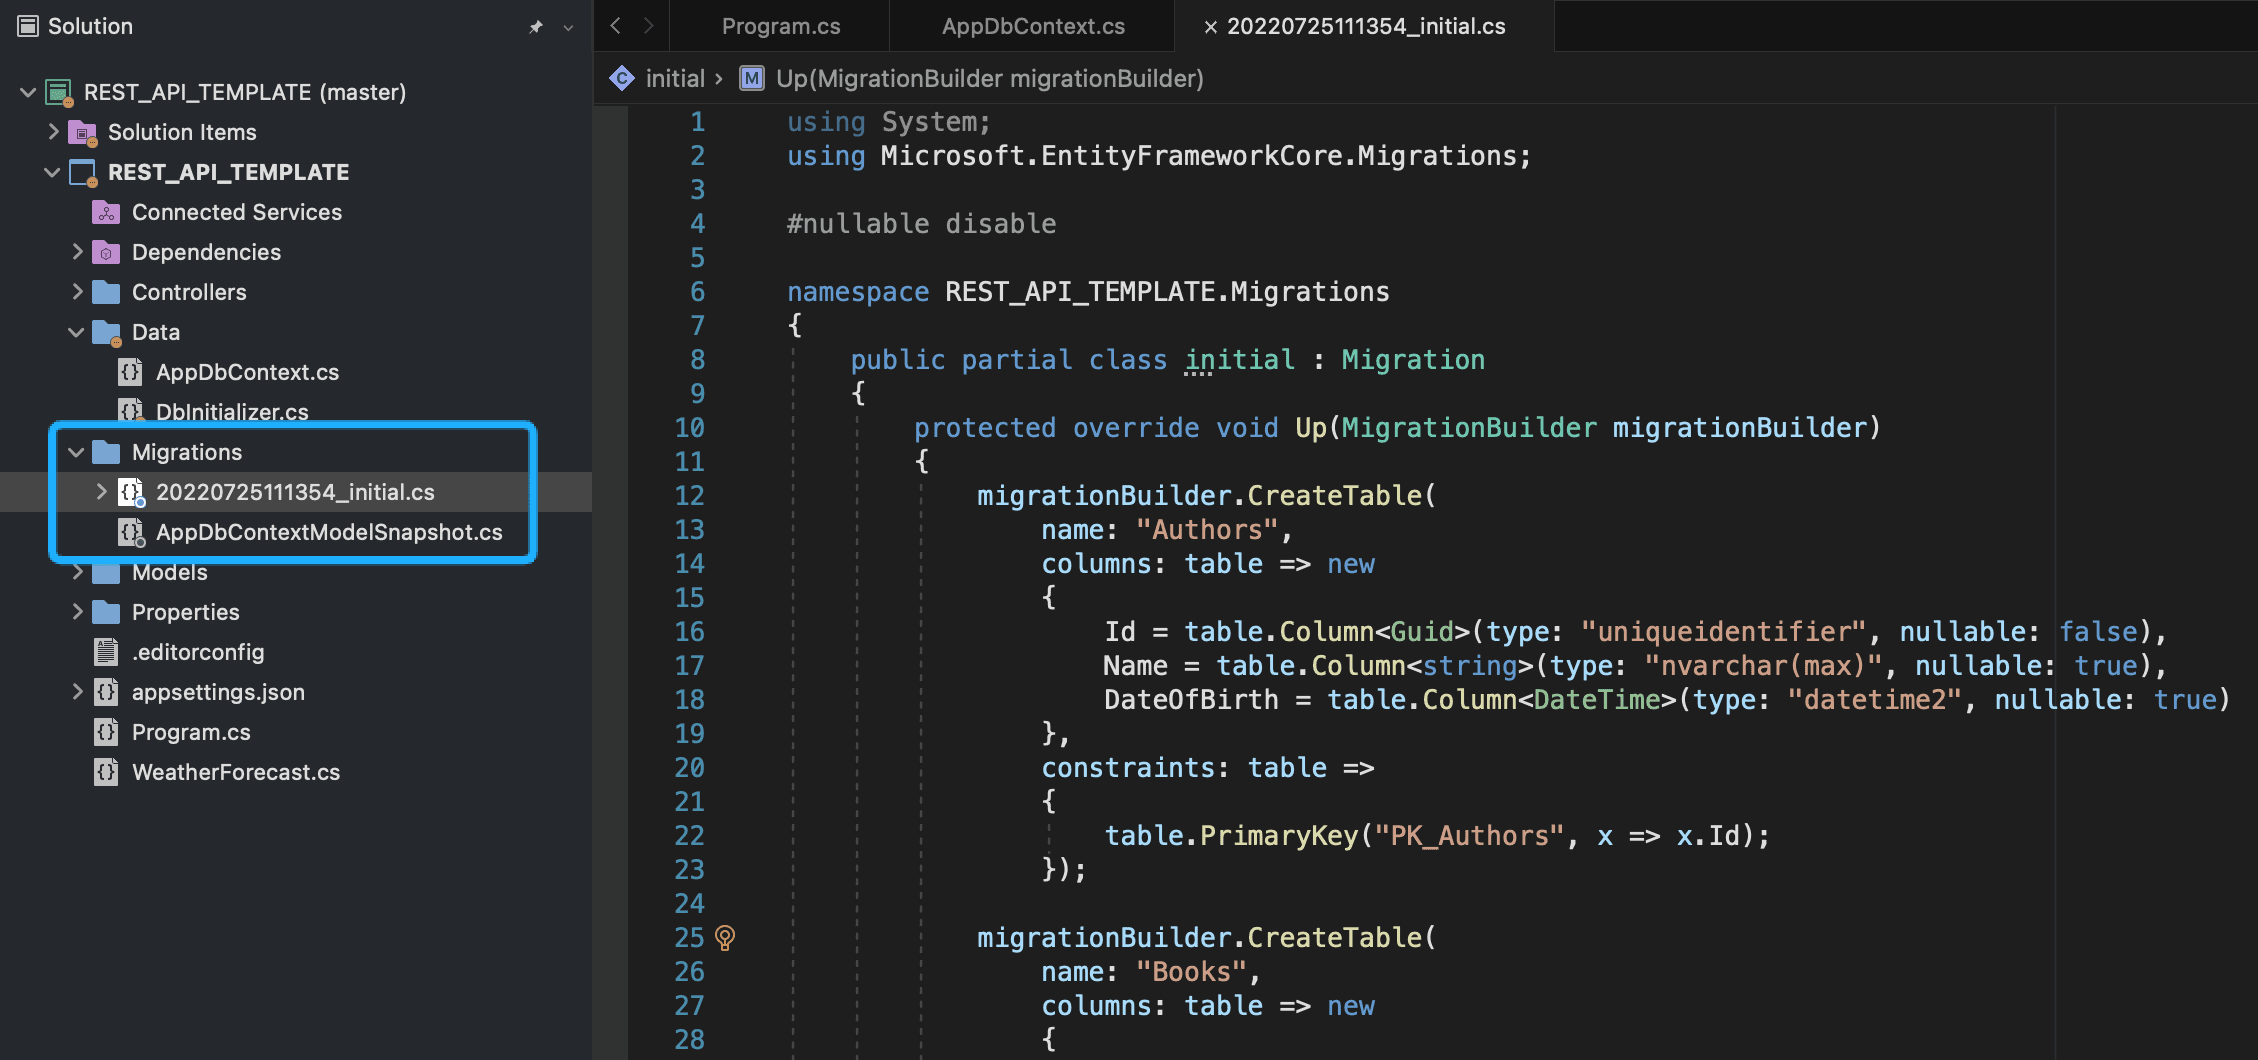
$ dotnet ef migrations add initialThis will generate a new folder named Migrations with a migration file and snapshot of AppDbcontext.
Now we only have to update our database. This is accomplished using the following command in your Terminal.
$ dotnet ef database update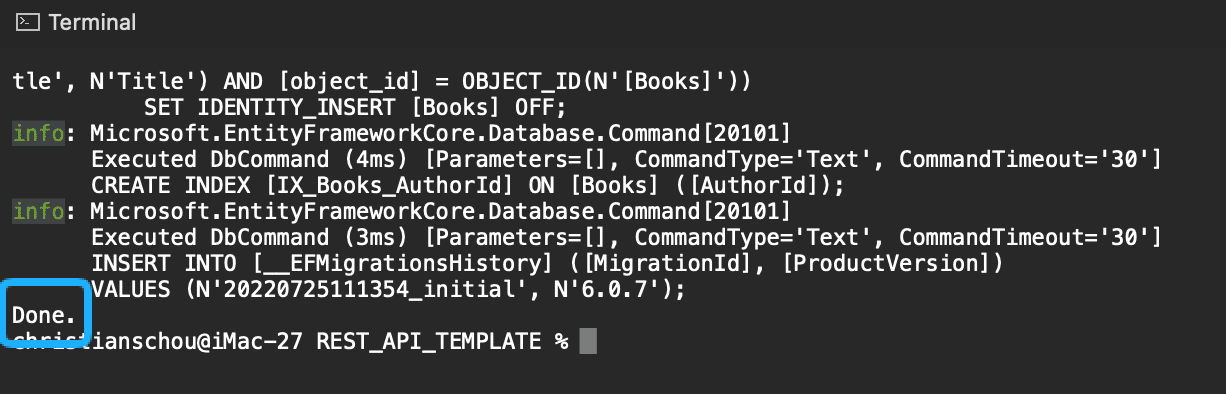
Let’s check up on our database and verify that we are able to see the author and book values in the database.

Awesome! We now got some demo data inside our database to work with on our repository. (we will make a repository in a moment).
Create a repository for Authors and Books
To make our controllers as clean as possible, we will be implementing a repository pattern to separate logic from the controllers. The first thing you have to do is add a new folder named Services and add a new interface named ILibraryService.cs.
The interface named ILibraryService will be responsible for the contracts with both the author- and book services. By the end, we will have two controllers. The first one will be responsible for Authors and the second one is responsible for Books. Now open up ILibraryService and add the following code inside it:
using REST_API_TEMPLATE.Models;

namespace REST_API_TEMPLATE.Services
{
    public interface ILibraryService
    {
        // Author Services
        Task<List<Author>> GetAuthorsAsync(); // GET All Authors
        Task<Author> GetAuthorAsync(Guid id, bool includeBooks = false); // GET Single Author
        Task<Author> AddAuthorAsync(Author author); // POST New Author
        Task<Author> UpdateAuthorAsync(Author author); // PUT Author
        Task<(bool, string)> DeleteAuthorAsync(Author author); // DELETE Author

        // Book Services
        Task<List<Book>> GetBooksAsync(); // GET All Books
        Task<Book> GetBookAsync(Guid id); // Get Single Book
        Task<Book> AddBookAsync(Book book); // POST New Book
        Task<Book> UpdateBookAsync(Book book); // PUT Book
        Task<(bool, string)> DeleteBookAsync(Book book); // DELETE Book
    }
}
We have the standard REST methods for both authors and books in this library service interface. Let’s make the implementation for both Authors and Books as well. Create a new file named LibraryService.cs and paste in the following code:
using Microsoft.EntityFrameworkCore;
using REST_API_TEMPLATE.Data;
using REST_API_TEMPLATE.Models;

namespace REST_API_TEMPLATE.Services
{
    public class LibraryService : ILibraryService
    {
        private readonly AppDbContext _db;

        public LibraryService(AppDbContext db)
        {
            _db = db;
        }

        #region Authors

        public async Task<List<Author>> GetAuthorsAsync()
        {
            try
            {
                return await _db.Authors.ToListAsync();
            }
            catch (Exception ex)
            {
                return null;
            }
        }

        public async Task<Author> GetAuthorAsync(Guid id, bool includeBooks)
        {
            try
            {
                if (includeBooks) // books should be included
                {
                    return await _db.Authors.Include(b => b.Books)
                        .FirstOrDefaultAsync(i => i.Id == id);
                }

                // Books should be excluded
                return await _db.Authors.FindAsync(id);
            }
            catch (Exception ex)
            {
                return null;
            }
        }

        public async Task<Author> AddAuthorAsync(Author author)
        {
            try
            {
                await _db.Authors.AddAsync(author);
                await _db.SaveChangesAsync();
                return await _db.Authors.FindAsync(author.Id); // Auto ID from DB
            }
            catch (Exception ex)
            {
                return null; // An error occured
            }
        }

        public async Task<Author> UpdateAuthorAsync(Author author)
        {
            try
            {
                _db.Entry(author).State = EntityState.Modified;
                await _db.SaveChangesAsync();

                return author;
            }
            catch (Exception ex)
            {
                return null;
            }
        }

        public async Task<(bool, string)> DeleteAuthorAsync(Author author)
        {
            try
            {
                var dbAuthor = await _db.Authors.FindAsync(author.Id);

                if (dbAuthor == null)
                {
                    return (false, "Author could not be found");
                }

                _db.Authors.Remove(author);
                await _db.SaveChangesAsync();

                return (true, "Author got deleted.");
            }
            catch (Exception ex)
            {
                return (false, $"An error occured. Error Message: {ex.Message}");
            }
        }

        #endregion Authors

        #region Books

        public async Task<List<Book>> GetBooksAsync()
        {
            try
            {
                return await _db.Books.ToListAsync();
            }
            catch (Exception ex)
            {
                return null;
            }
        }

        public async Task<Book> GetBookAsync(Guid id)
        {
            try
            {
                return await _db.Books.FindAsync(id);
            }
            catch (Exception ex)
            {
                return null;
            }
        }

        public async Task<Book> AddBookAsync(Book book)
        {
            try
            {
                await _db.Books.AddAsync(book);
                await _db.SaveChangesAsync();
                return await _db.Books.FindAsync(book.Id); // Auto ID from DB
            }
            catch (Exception ex)
            {
                return null; // An error occured
            }
        }

        public async Task<Book> UpdateBookAsync(Book book)
        {
            try
            {
                _db.Entry(book).State = EntityState.Modified;
                await _db.SaveChangesAsync();

                return book;
            }
            catch (Exception ex)
            {
                return null;
            }
        }

        public async Task<(bool, string)> DeleteBookAsync(Book book)
        {
            try
            {
                var dbBook = await _db.Books.FindAsync(book.Id);

                if (dbBook == null)
                {
                    return (false, "Book could not be found.");
                }

                _db.Books.Remove(book);
                await _db.SaveChangesAsync();

                return (true, "Book got deleted.");
            }
            catch (Exception ex)
            {
                return (false, $"An error occured. Error Message: {ex.Message}");
            }
        }

        #endregion Books
    }
}
We could have made a generic repository and inherited that, but for demo/tutorial purposes I would like to keep it simple and write every action in the service implementation for ILibraryService.
The code is quite self-explanatory. We are relying heavily on Entity Framework Core to do all the database operations between the application and the database. If you got any questions in regards to this, please let me know in the comments and I will get back to you ASAP.
Before we can use the service in our controllers, we have to register the service in our Program.cs file as a transient. Navigate to Program.cs and add the following line of code:
using System.Text.Json.Serialization;
using Microsoft.EntityFrameworkCore;
using REST_API_TEMPLATE.Data;
using REST_API_TEMPLATE.Services;

var builder = WebApplication.CreateBuilder(args);

// Add services to the container.

builder.Services.AddControllers();
// Learn more about configuring Swagger/OpenAPI at https://aka.ms/aspnetcore/swashbuckle
builder.Services.AddEndpointsApiExplorer();
builder.Services.AddSwaggerGen();

// Register Library Service to use it with Dependency Injection in Controllers
builder.Services.AddTransient<ILibraryService, LibraryService>();

// Register database
builder.Services.AddDbContext<AppDbContext>(options =>
    options.UseSqlServer(builder.Configuration.GetConnectionString("DefaultConnection")));

var app = builder.Build();

// Configure the HTTP request pipeline.
if (app.Environment.IsDevelopment())
{
    app.UseSwagger();
    app.UseSwaggerUI();
}

app.UseHttpsRedirection();

app.UseAuthorization();

app.MapControllers();

app.Run();
Add Controllers
Now we have to use our Library Service to move data back and forth in our RESTful Web API. they are gonna look very similar, but let’s take off with the Authors Controller.
Each controller should offer the client the following endpoints:
- GetAll
- Get
- Add
- Update
- Delete
Let’s implement just that. Start by deleting the WeatherForecastController.cs from the project as we won’t be needing that one.
Create Author Controller
Create a new empty API controller in the Controller folder at the root of your project and name it AuthorController.cs. The Author controller looks like this:
using Microsoft.AspNetCore.Mvc;
using REST_API_TEMPLATE.Models;
using REST_API_TEMPLATE.Services;

namespace REST_API_TEMPLATE.Controllers
{
    [ApiController]
    [Route("api/[controller]")]
    public class AuthorController : ControllerBase
    {
        private readonly ILibraryService _libraryService;

        public AuthorController(ILibraryService libraryService)
        {
            _libraryService = libraryService;
        }

        [HttpGet]
        public async Task<IActionResult> GetAuthors()
        {
            var authors = await _libraryService.GetAuthorsAsync();

            if (authors == null)
            {
                return StatusCode(StatusCodes.Status204NoContent, "No authors in database");
            }

            return StatusCode(StatusCodes.Status200OK, authors);
        }

        [HttpGet("id")]
        public async Task<IActionResult> GetAuthor(Guid id, bool includeBooks = false)
        {
            Author author = await _libraryService.GetAuthorAsync(id, includeBooks);

            if (author == null)
            {
                return StatusCode(StatusCodes.Status204NoContent, $"No Author found for id: {id}");
            }

            return StatusCode(StatusCodes.Status200OK, author);
        }

        [HttpPost]
        public async Task<ActionResult<Author>> AddAuthor(Author author)
        {
            var dbAuthor = await _libraryService.AddAuthorAsync(author);

            if (dbAuthor == null)
            {
                return StatusCode(StatusCodes.Status500InternalServerError, $"{author.Name} could not be added.");
            }

            return CreatedAtAction("GetAuthor", new { id = author.Id }, author);
        }

        [HttpPut("id")]
        public async Task<IActionResult> UpdateAuthor(Guid id, Author author)
        {
            if (id != author.Id)
            {
                return BadRequest();
            }

            Author dbAuthor = await _libraryService.UpdateAuthorAsync(author);

            if (dbAuthor == null)
            {
                return StatusCode(StatusCodes.Status500InternalServerError, $"{author.Name} could not be updated");
            }

            return NoContent();
        }

        [HttpDelete("id")]
        public async Task<IActionResult> DeleteAuthor(Guid id)
        {
            var author = await _libraryService.GetAuthorAsync(id, false);
            (bool status, string message) = await _libraryService.DeleteAuthorAsync(author);

            if (status == false)
            {
                return StatusCode(StatusCodes.Status500InternalServerError, message);
            }

            return StatusCode(StatusCodes.Status200OK, author);
        }
    }
}
In the controller above we use all the services related to the Author in the ILibraryService to offer a RESTful Web API only for authors in our application.
Let’s implement the last one for our books.
Create Book Controller
The Book Controller is almost the same as the author controller as we rely on our Library Service. It offers the same amount and types of endpoints to the consumer. Create a new empty API controller in the Controllers folder at the root of your project and name it BookController.cs. Now you have to add the following code inside it:
using Microsoft.AspNetCore.Mvc;
using REST_API_TEMPLATE.Models;
using REST_API_TEMPLATE.Services;

namespace REST_API_TEMPLATE.Controllers
{
    [ApiController]
    [Route("api/[controller]")]
    public class BookController : ControllerBase
    {
        private readonly ILibraryService _libraryService;

        public BookController(ILibraryService libraryService)
        {
            _libraryService = libraryService;
        }

        [HttpGet]
        public async Task<IActionResult> GetBooks()
        {
            var books = await _libraryService.GetBooksAsync();
            if (books == null)
            {
                return StatusCode(StatusCodes.Status204NoContent, "No books in database.");
            }

            return StatusCode(StatusCodes.Status200OK, books);
        }

        [HttpGet("{id}")]
        public async Task<IActionResult> GetBooks(Guid id)
        {
            Book book = await _libraryService.GetBookAsync(id);

            if (book == null)
            {
                return StatusCode(StatusCodes.Status204NoContent, $"No book found for id: {id}");
            }

            return StatusCode(StatusCodes.Status200OK, book);
        }

        [HttpPost]
        public async Task<ActionResult<Book>> AddBook(Book book)
        {
            var dbBook = await _libraryService.AddBookAsync(book);

            if (dbBook == null)
            {
                return StatusCode(StatusCodes.Status500InternalServerError, $"{book.Title} could not be added.");
            }

            return CreatedAtAction("GetBook", new { id = book.Id }, book);
        }

        [HttpPut("{id}")]
        public async Task<IActionResult> UpdateBook(Guid id, Book book)
        {
            if (id != book.Id)
            {
                return BadRequest();
            }

            Book dbBook = await _libraryService.UpdateBookAsync(book);

            if (dbBook == null)
            {
                return StatusCode(StatusCodes.Status500InternalServerError, $"{book.Title} could not be updated");
            }

            return NoContent();
        }

        [HttpDelete("{id}")]
        public async Task<IActionResult> DeleteBook(Guid id)
        {
            var book = await _libraryService.GetBookAsync(id);
            (bool status, string message) = await _libraryService.DeleteBookAsync(book);

            if (status == false)
            {
                return StatusCode(StatusCodes.Status500InternalServerError, message);
            }

            return StatusCode(StatusCodes.Status200OK, book);
        }
    }
}
As you probably have noticed, this controller is almost identical to the AuthorController.cs. If we were to spin up the RESTful Web API now and ask for an author with books included, we would get a reference loop error from EF. Let’s fix that first.
Fix “A possible object cycle was detected” error
If you tried to run the application by now, you would probably have gotten this error:
System.Text.Json.JsonException: A possible object cycle was detected. This can either be due to a cycle or if the object depth is larger than the maximum allowed depth of 32. Consider using ReferenceHandler.Preserve on JsonSerializerOptions to support cycles.Because we return the entities directly and not a set of DTOs to our consumer/client, we have a relationship fixup and there isn’t much we can do about it. We could use AsNoTracking to help a little, but not when we are using Include in our EF logic. I would always prefer to use DTOs and return them.
To fix it we can add the following line to our Program.cs file at line 18-19. This will handle reference loops.
using System.Text.Json.Serialization;
using Microsoft.EntityFrameworkCore;
using REST_API_TEMPLATE.Data;
using REST_API_TEMPLATE.Services;

var builder = WebApplication.CreateBuilder(args);

// Add services to the container.

builder.Services.AddControllers();
// Learn more about configuring Swagger/OpenAPI at https://aka.ms/aspnetcore/swashbuckle
builder.Services.AddEndpointsApiExplorer();
builder.Services.AddSwaggerGen();

// Register Library Service to use it with Dependency Injection in Controllers
builder.Services.AddTransient<ILibraryService, LibraryService>();

builder.Services.AddControllers().AddJsonOptions(x =>
    x.JsonSerializerOptions.ReferenceHandler = ReferenceHandler.IgnoreCycles);

// Register database
builder.Services.AddDbContext<AppDbContext>(options =>
    options.UseSqlServer(builder.Configuration.GetConnectionString("DefaultConnection")));

var app = builder.Build();

// Configure the HTTP request pipeline.
if (app.Environment.IsDevelopment())
{
    app.UseSwagger();
    app.UseSwaggerUI();
}

app.UseHttpsRedirection();

app.UseAuthorization();

app.MapControllers();

app.Run();
What happens is that the reference handler is ignoring cycles at runtime. This is a bit more inefficient as we rely on Newtonsoft.Json and not System.Text.Json to solve the problem.
Testing time
Now for the moment, you have been waiting for. It’s time to spin up our RESTful Web API and test the endpoints.
I will be testing out the endpoints using Swagger, but you can use any tool you prefer, eg. Postman. Launch the application and you should get presented with the following by Swagger:
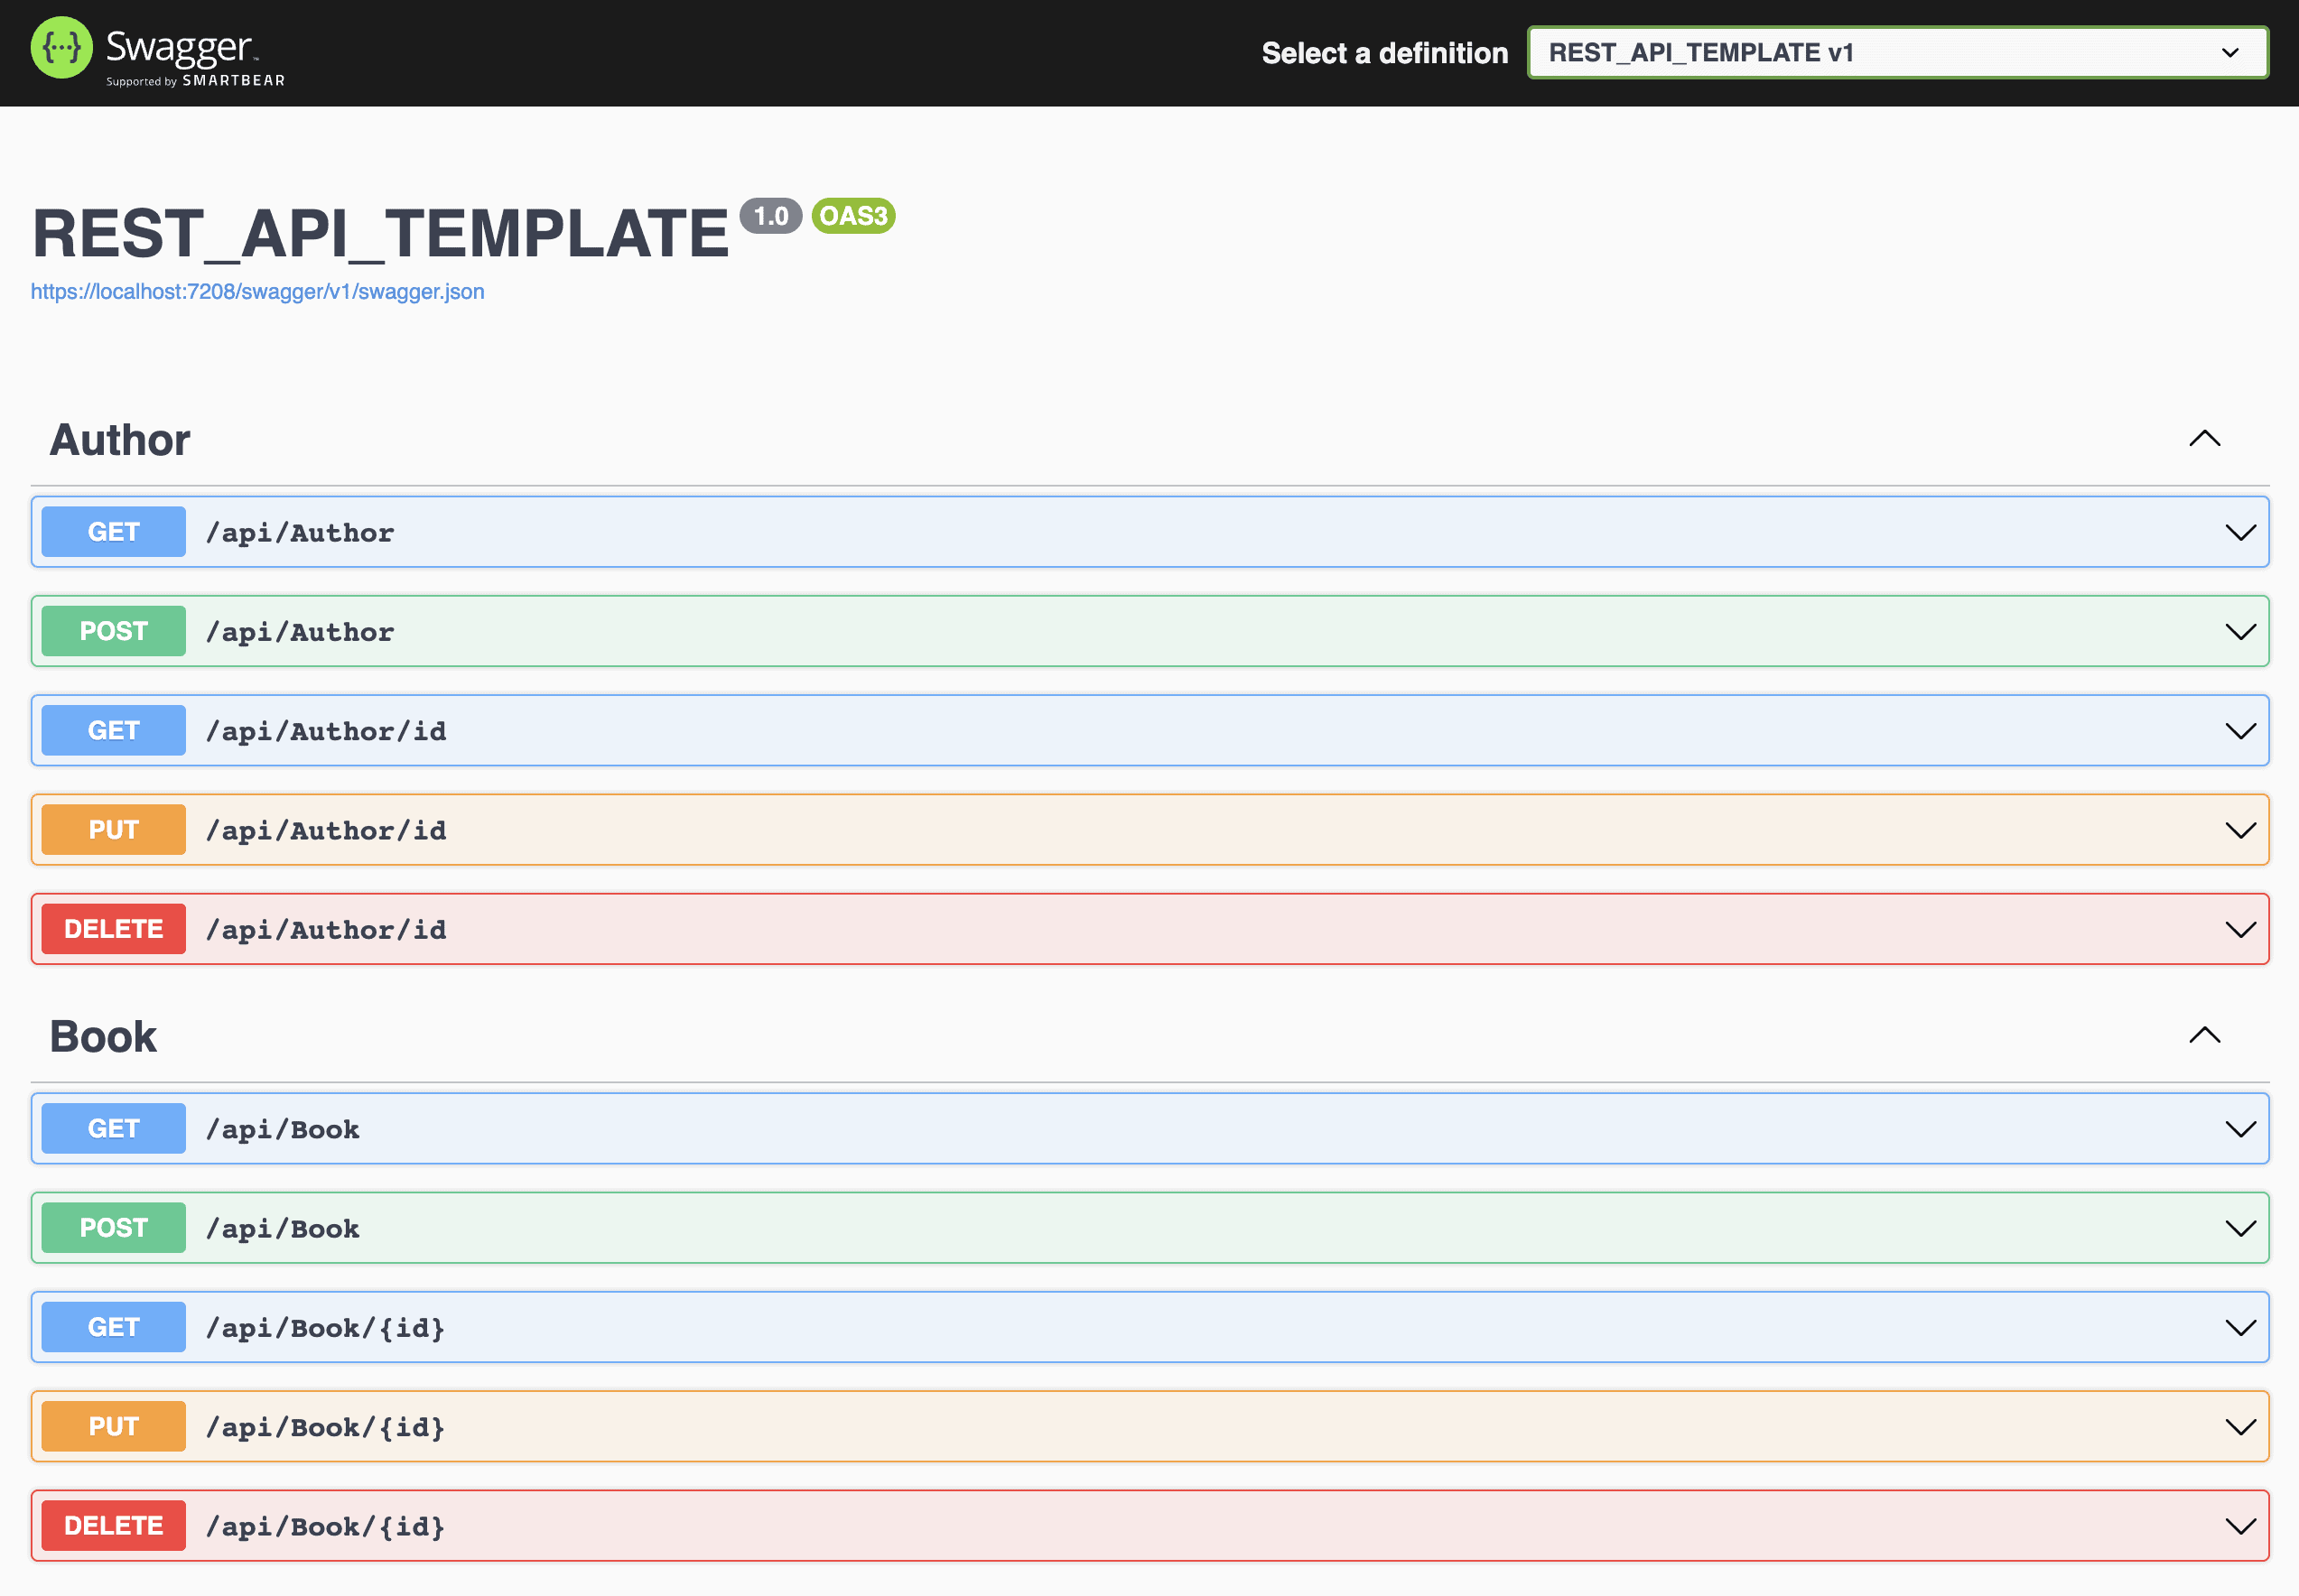
Awesome, let’s see if we can get some Author data.
Get all Authors /api/Author
Let’s retrieve all authors in our database.
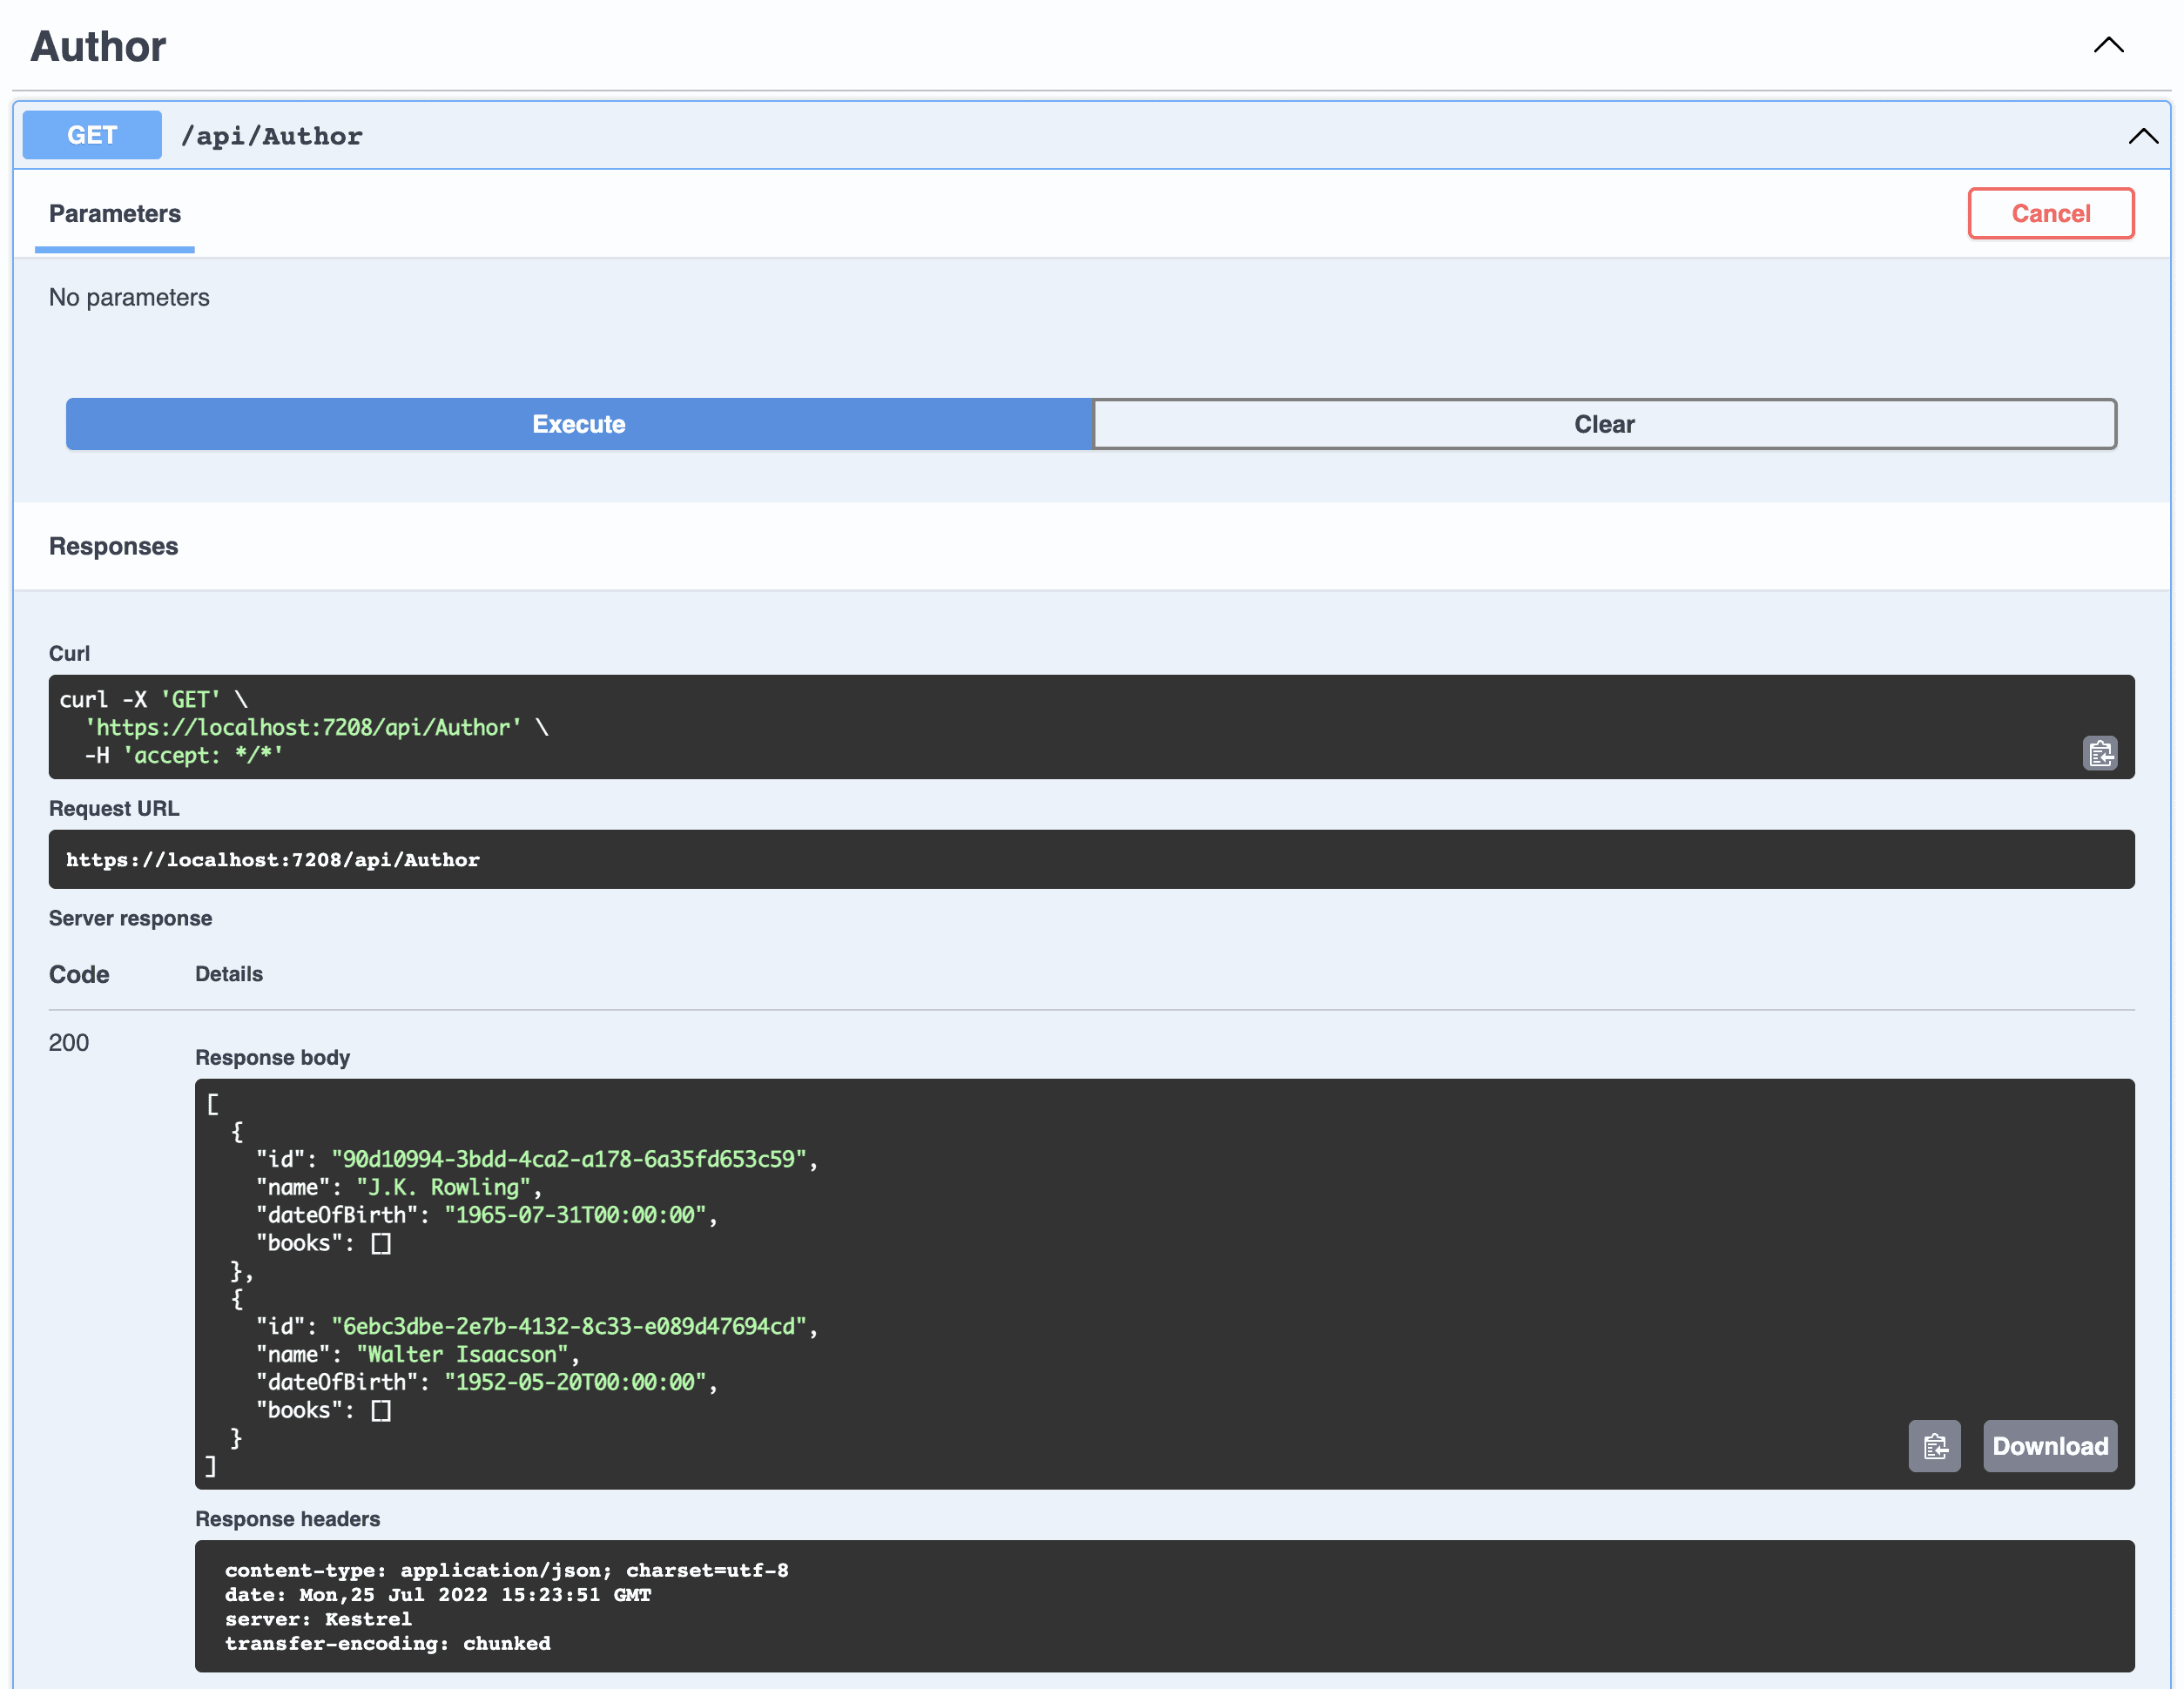
The expected result was to get two authors with no books – and we definitely got that.
Get single Author /api/Author/id
Let’s copy the id of our first author and see if we can get that author including the books.
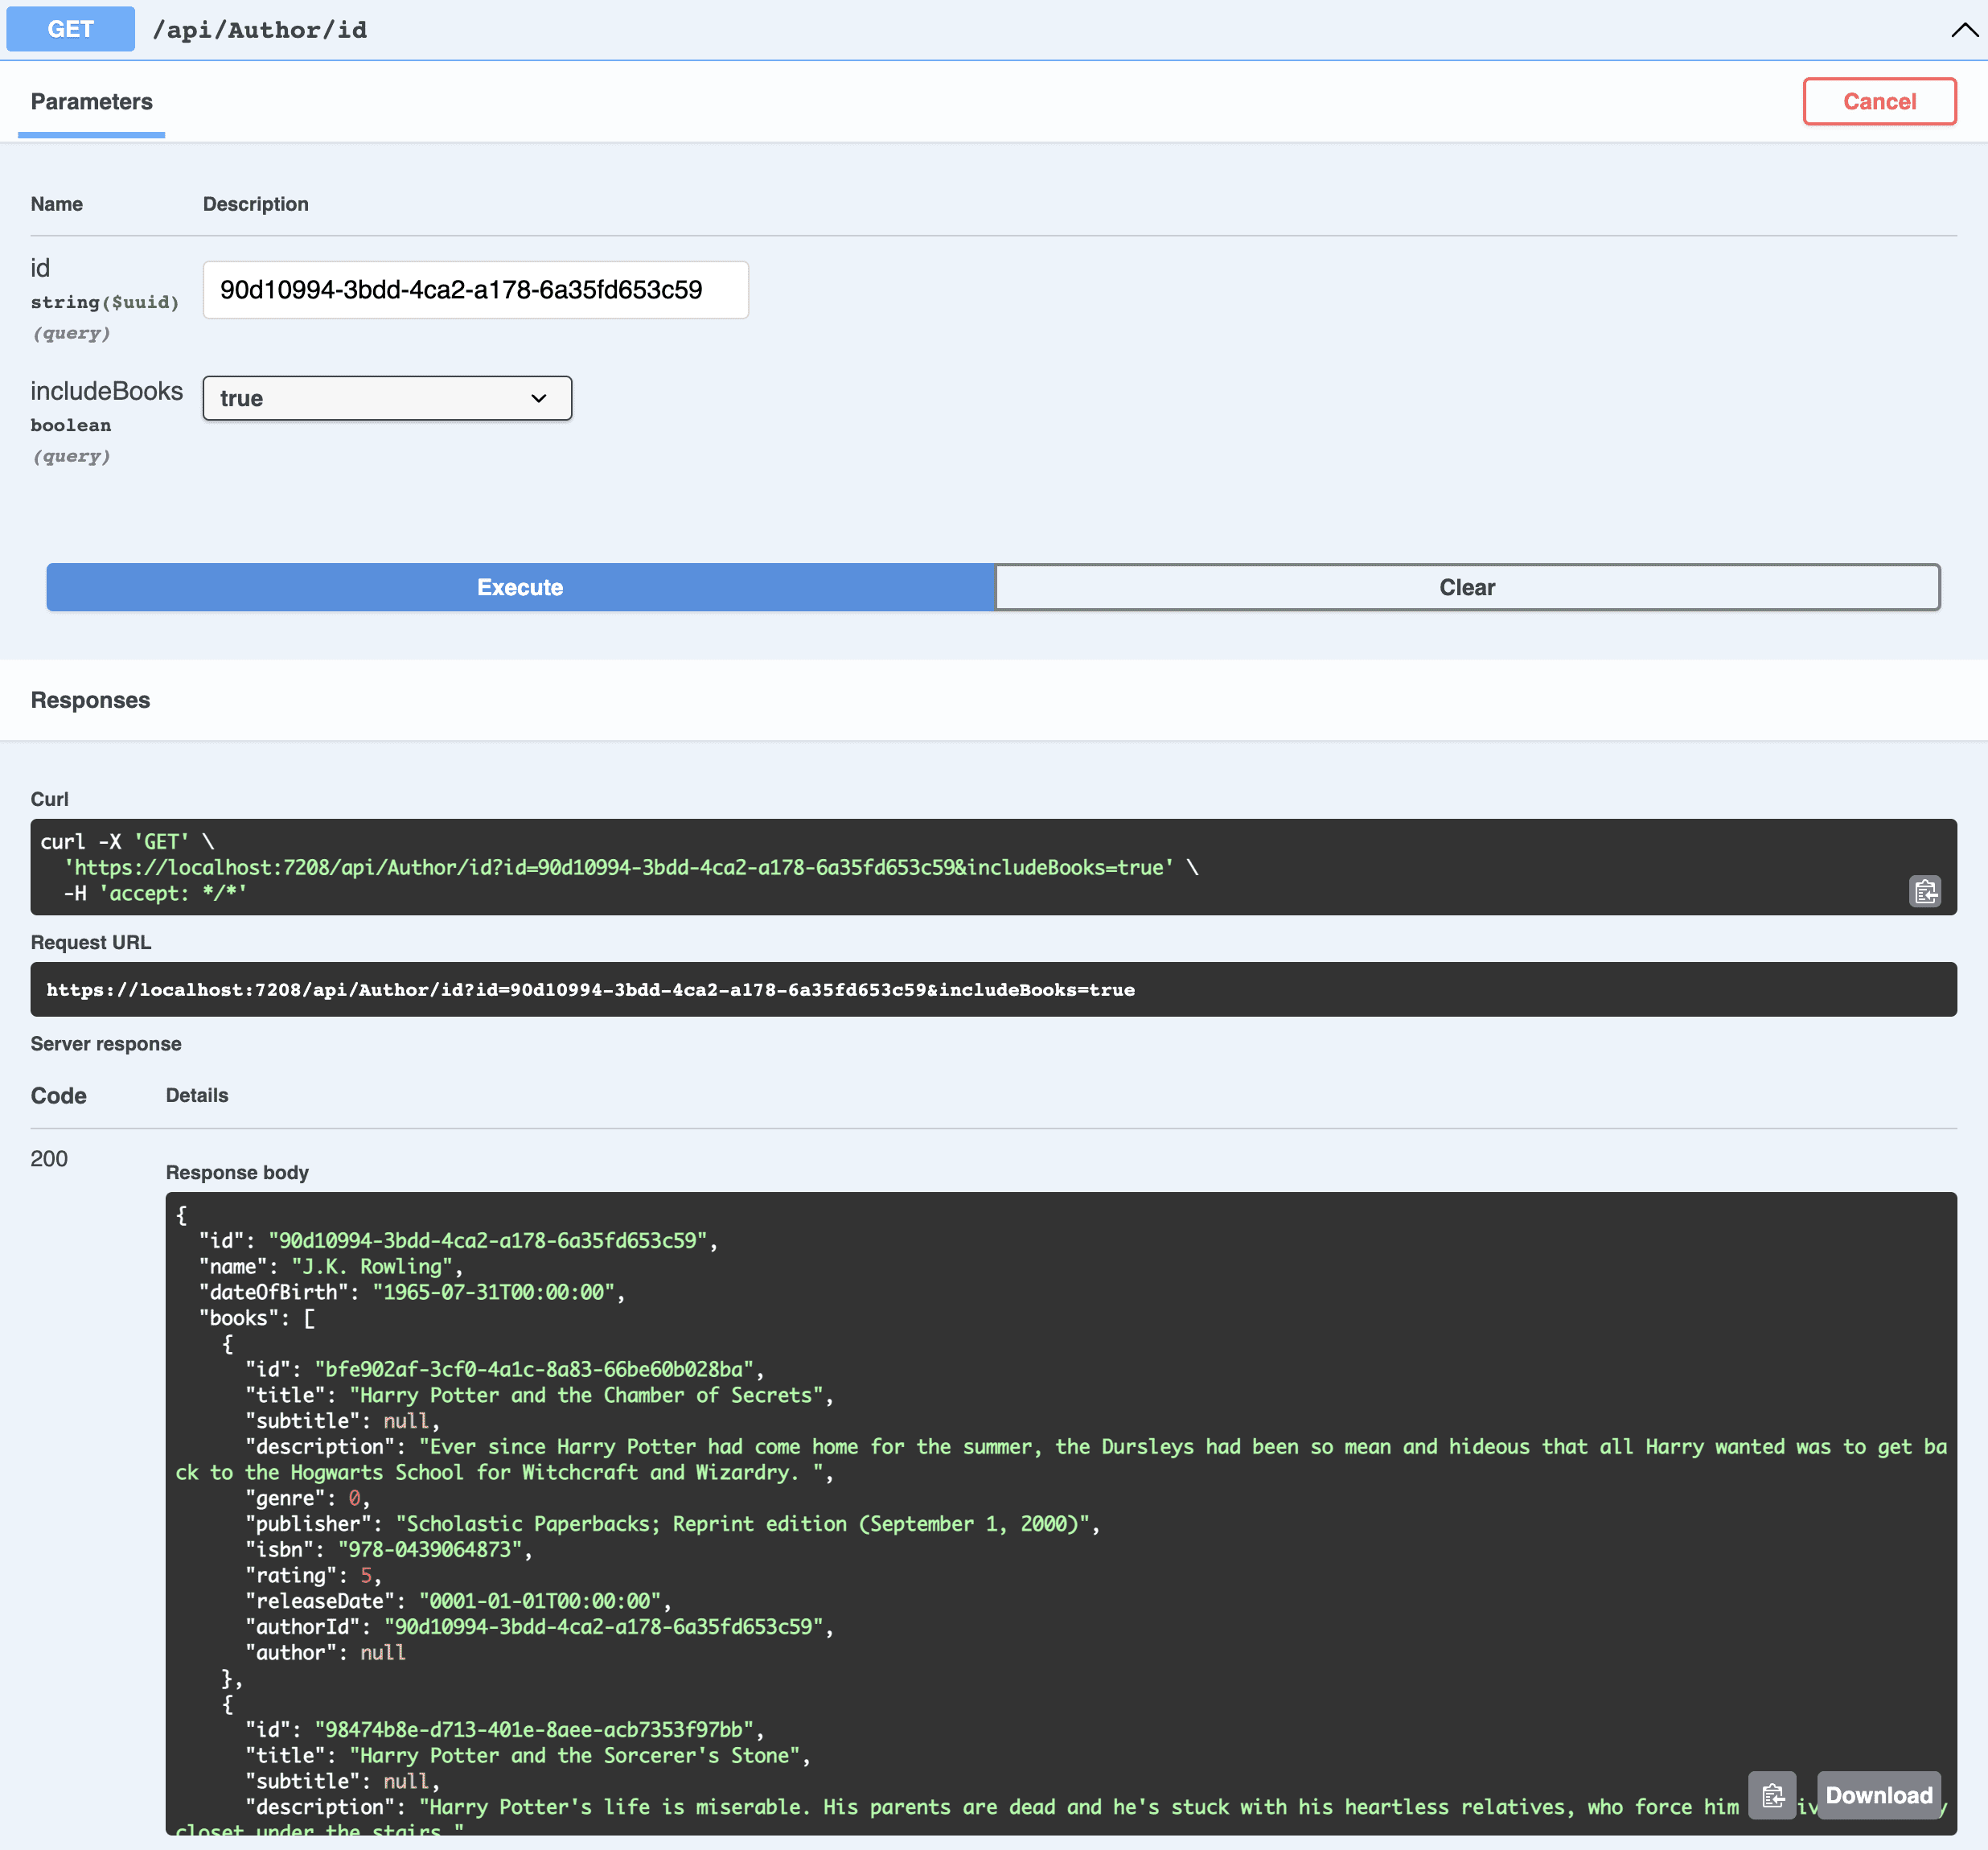
All books and their values got returned as expected. Perfect! If we set includeBooks to false, they are also excluded as we wanted to.
Add new Author
Let’s add a new author to our database. I have looked up a famous writer on Google named Stephen King (an American writer known for horror books). Let’s prepare some data and add him. The GUID (ID) is automatically generated by the database, no need to include that and at the moment, we won’t add any books either.
{
  "name": "Stephen King",
  "dateOfBirth": "1947-09-21T15:34:05.481Z"
}
You are welcome to copy that and paste it in or create your own writer.
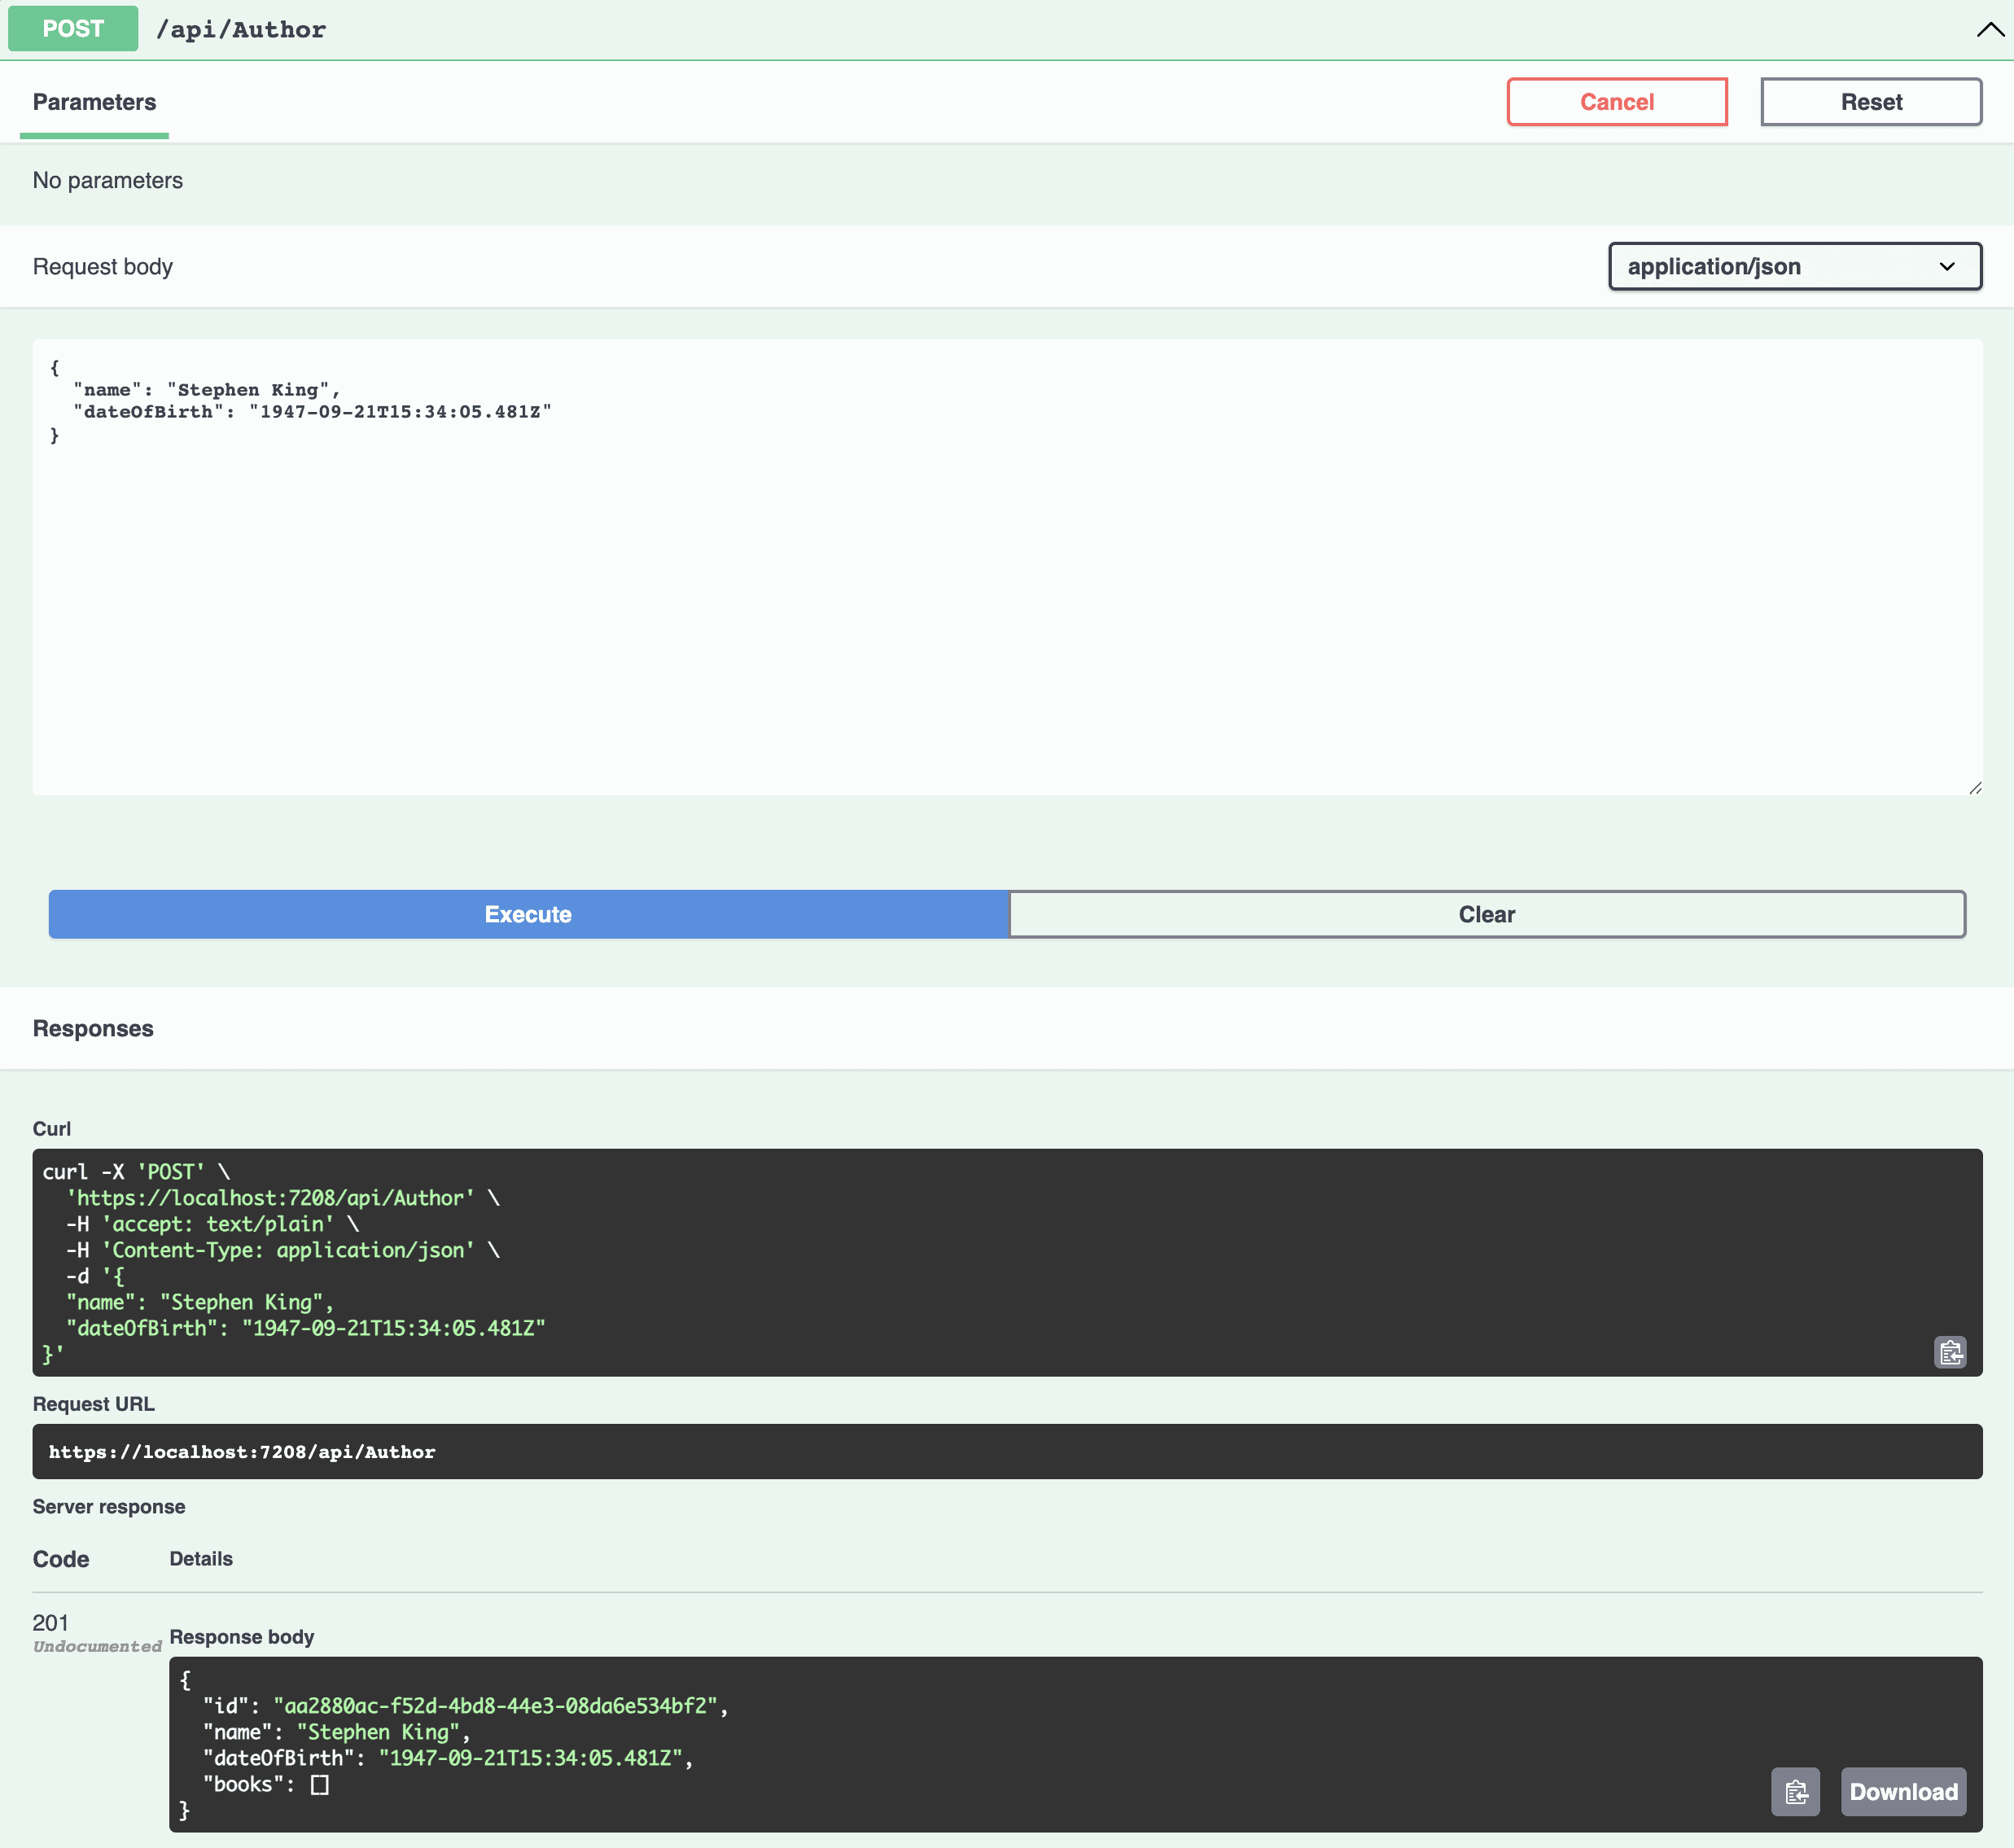
If you take a look in the response body, you can see that we got an auto-generated id returned and no books. This works as expected. Let’s see if we can update Stephen.
Update Author /api/Author/id
I would like to change Stephens’s date of birth time to 00.00. I will post the following to the API:
{
  "id": "aa2880ac-f52d-4bd8-44e3-08da6e534bf2",
  "name": "Stephen King",
  "dateOfBirth": "1947-09-21T00:00:00.000Z"
}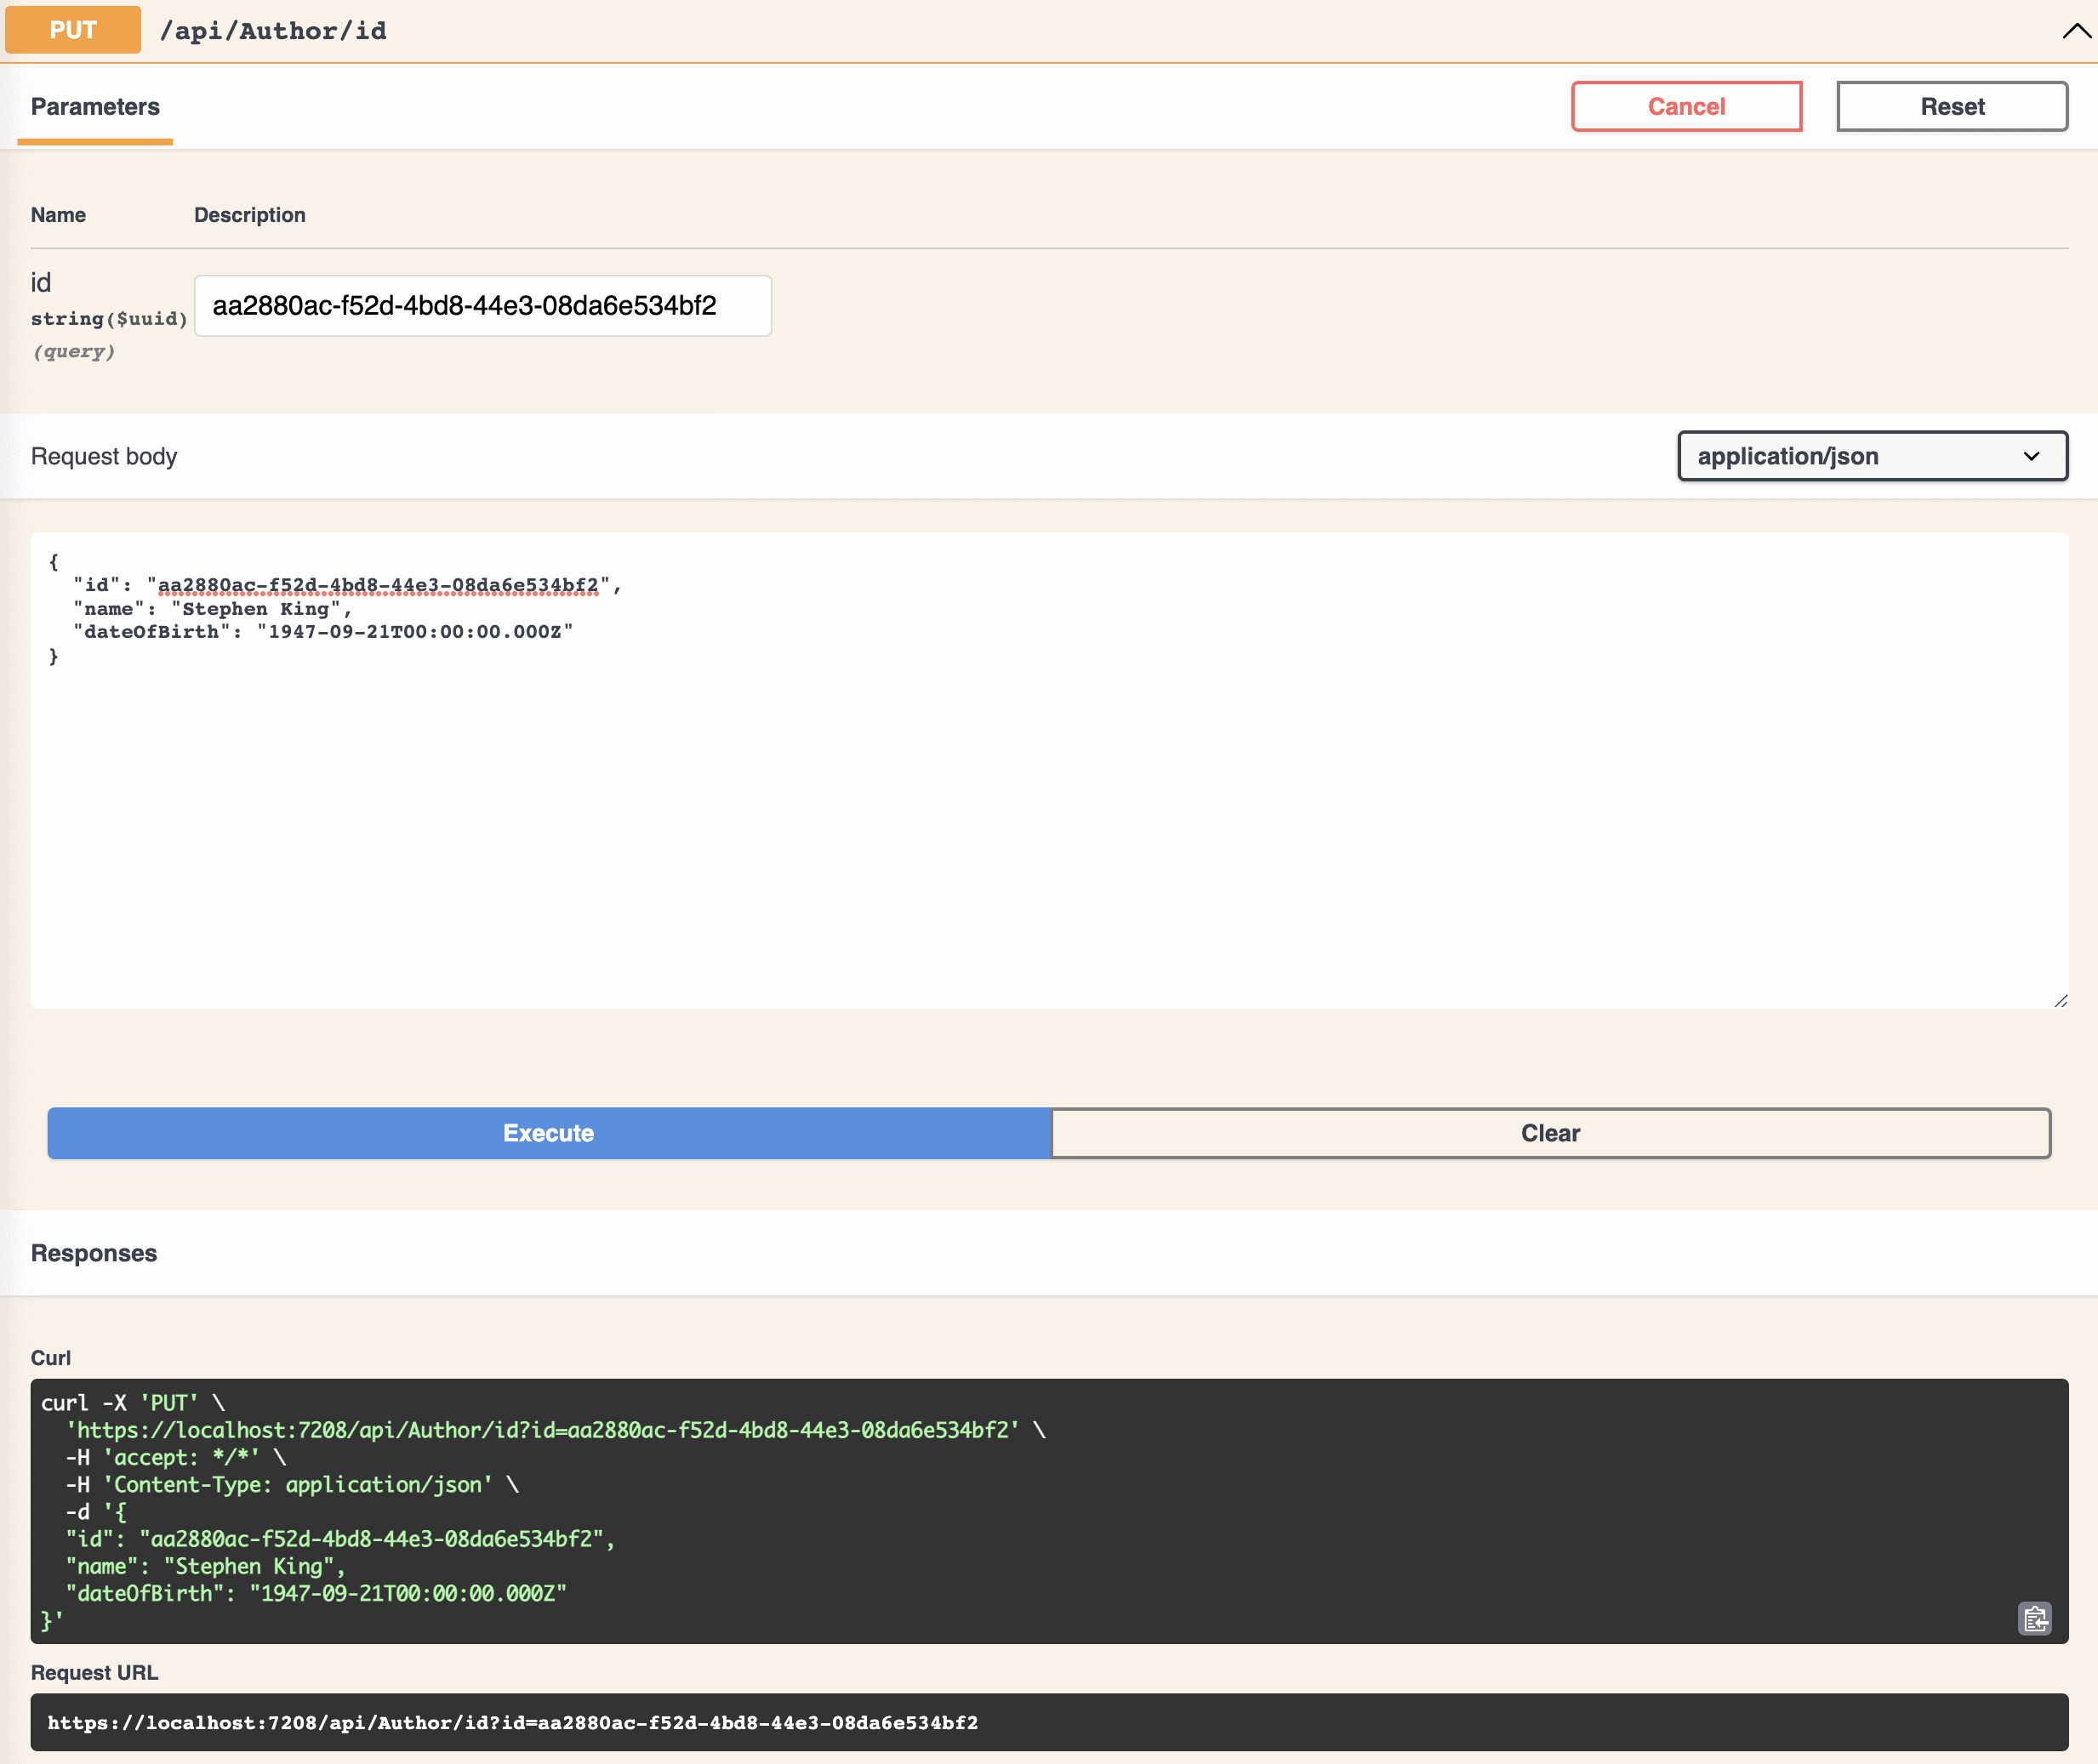
I got status 200 in return, which means Stephen’s data got updated in the database. Perfect!
Delete Author
Finally, we can test if it is possible to delete an author. Let’s delete Stephen from the database.
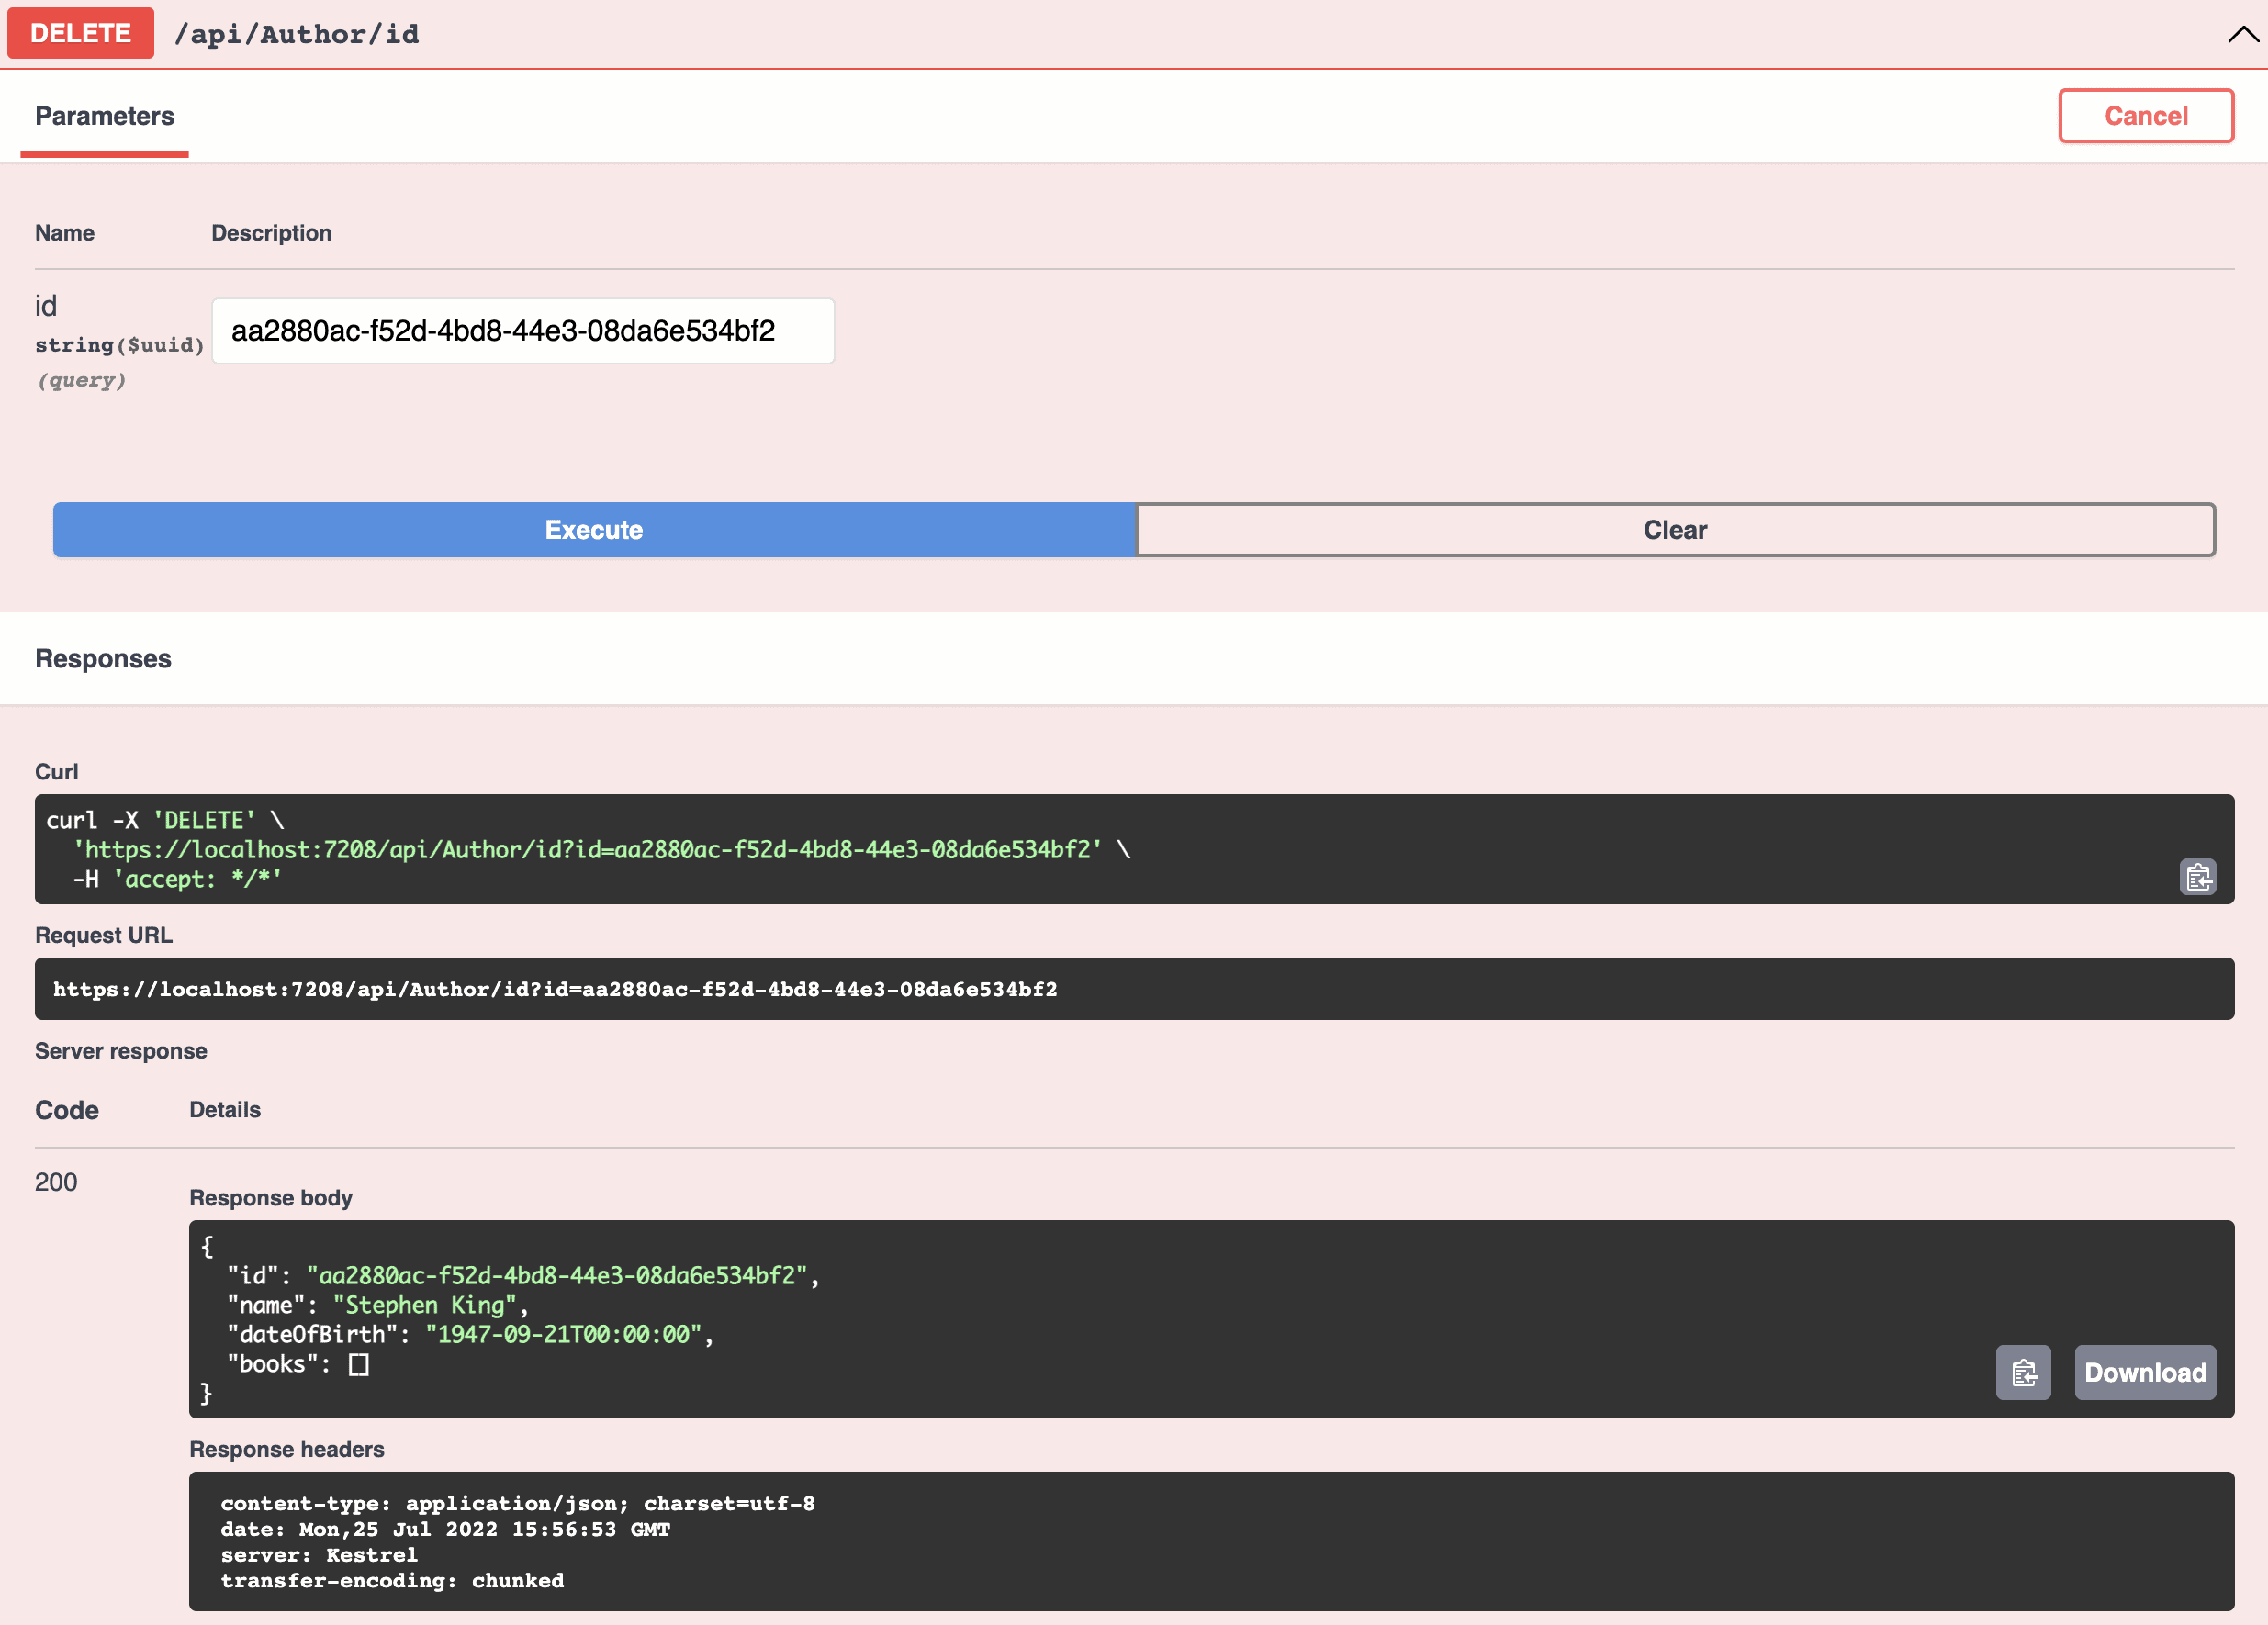
We get the returned author in the response body along with a status 200 – this means that the API was able to find Stephen in the database and delete his records.
I have tested all endpoints for the books as well. You are welcome to try them out if you want to – they work.
Summary
I hope you enjoyed this tutorial about how you can make a RESTful Web API with ASP.NET Core and Entity Framework Core on .NET 6. I know it has gotten into a pretty long article, but that was necessary in order to get all the details you need to be fully able to follow along.
You are now able to create your own REST API and implement a simple repository behind it to communicate with the database. In a larger solution, I would add a Mediator using the CQRS pattern to decouple the logic even more. If you got any questions, please let me know in the comments below. Until next time – Happy coding!
Resources
 Christian-Schou
Extra