How to create a new .NET Core Web API with Clean Architecture in a snap using the .NET CLI?
Learn how to create a new .NET Core project with clean architecture implemented from the beginning without you having to configure layers and references.

Onion architecture is a software architecture we use to achieve clean code in our solutions/projects. As software developers, we always want to have clean code that makes our code maintainable and extensible in the future. By implementing a clean architecture using onion architecture we can create an application that is loosely coupled and easy to extend in the future.
However, every time we have to go through the process of creating an extra project in a solution or in a brand new solution that has a clean architecture, we have to make so many steps. This can be done using a few simple commands.
Introduction
Before we go to the script I would like to give an introduction to onion/clean architecture.
What is Clean Architecture?
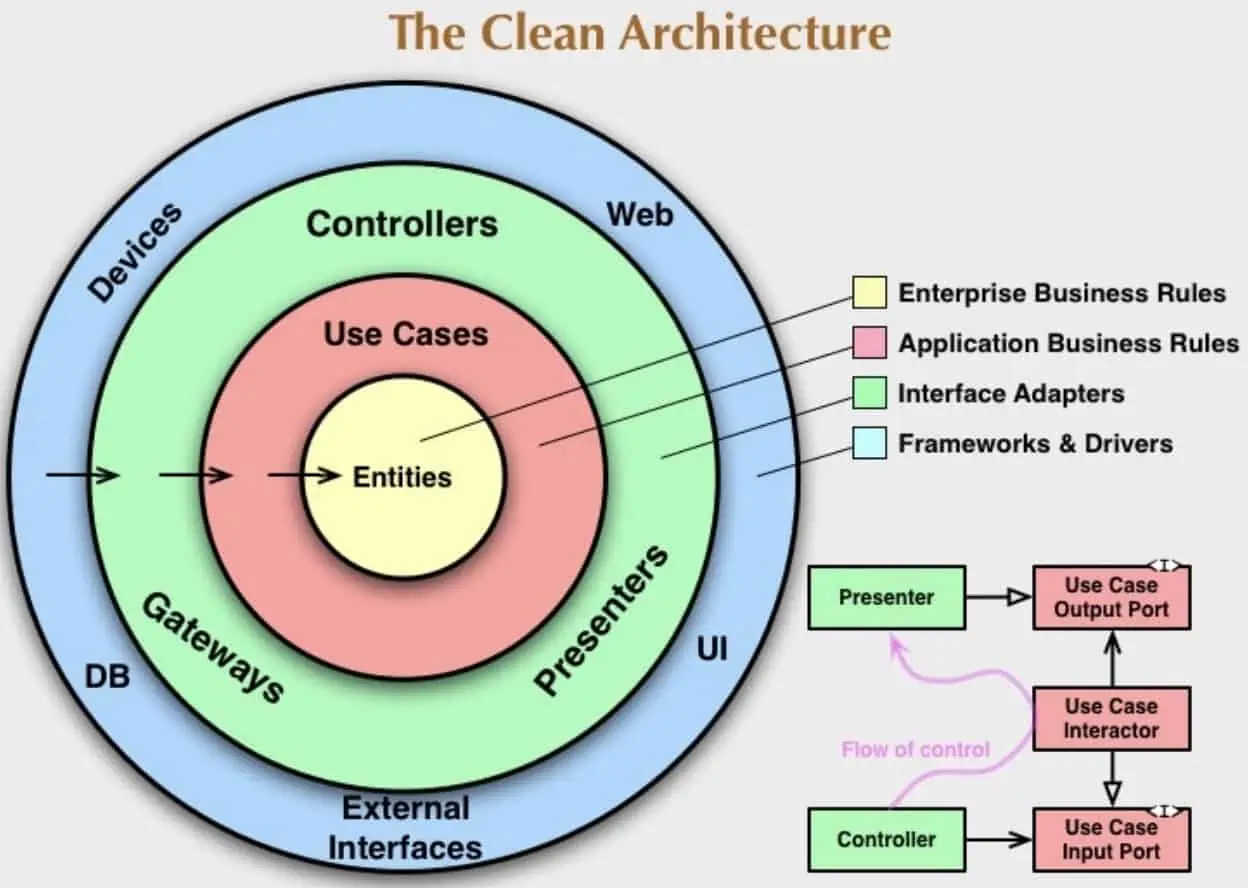
The Clean Architecture pattern is a variant of the Onion Architecture pattern, also known as the Hexagonal Architecture or Ports and Adapters Architecture. The Onion Architecture is a layered architecture pattern that provides a clear separation of concerns between the different components of an application. In this pattern, the application's core domain is at the center and is surrounded by layers of increasingly abstract and generic code.
The Onion Architecture has four layers, which are:
- Domain Layer: This layer represents the core business logic and domain models of the application. It contains the application's entities, value objects, and business rules.
- Application Layer: This layer is responsible for the application's use cases and orchestrating the domain layer. It contains the services, commands, and queries that interact with the domain layer.
- Infrastructure Layer: This layer is responsible for providing the application with the technical services it needs, such as data access, email, logging, and security. It contains the adapters that implement the ports required by the application and the infrastructure-specific details.
- Presentation/API Layer: This layer displays the application's data and user interface. It contains the user interfaces, controllers, and views that interact with the application.
Benefits of using the Onion Architecture
The Onion Architecture provides several benefits, including:
- Modular and flexible design - The architecture is highly modular, and each layer can be developed independently, allowing for greater flexibility and scalability.
- Testability - The architecture promotes testability by making it easier to isolate and test the components of the application.
- Separation of concerns - The architecture provides a clear separation of concerns between the different components of the application, making it easier to maintain and extend the application over time.
By implementing the Clean Architecture pattern, you are effectively using the Onion Architecture pattern, which can result in a more maintainable and scalable application. What's not to like here!?
Benefits of Using the .NET CLI for Creating Projects
The .NET Command-Line Interface (CLI) is a powerful tool for creating .NET projects in a fast and efficient way. Here are some of the benefits of using the .NET CLI for creating projects. Below are a few reasons why I personally think it's an awesome tool!
- Cross-platform - The .NET CLI is cross-platform and can be used on Windows, macOS, and Linux operating systems. This makes it easy for developers to create projects on their preferred platforms.
- Time-saving - The .NET CLI automates the process of creating a new project by generating the project structure and adding the necessary files and dependencies. This saves a considerable amount of time compared to manually setting up a project.
- Consistency - The .NET CLI enforces a predefined structure for the project, which ensures consistency across projects. This makes it easier for developers to navigate and understand the project.
- Customization - The .NET CLI provides a high degree of customization for project setup. Developers can choose from a wide range of templates and options, and also modify the default settings to meet their specific requirements.
- Integration with IDEs - The .NET CLI can be integrated with popular Integrated Development Environments (IDEs) such as Visual Studio Code, which makes it easy to create and manage projects from within the IDE.
- Standardization - Using the .NET CLI for creating projects promotes standardization and best practices in the development process. The .NET CLI templates are designed to follow industry-standard practices, making it easier for developers to create projects that are maintainable and scalable.
In summary, using the .NET CLI for creating projects can save us time, improve consistency, promote standardization, and enhance customizability. These benefits make it an essential tool for developers looking to create robust and scalable .NET applications, and that is exactly what I would like to do every time I create a new project and would like to make use of the clean architecture pattern. You can read more about the .NET CLI on the link below.
Prerequisites
To follow along in this tutorial about creating a new project with Clean Architecture using the .NET CLI, you will need the following:
- .NET CLI installed.
- Basic knowledge of the .NET Core CLI.
- Visual Studio, Visual Studio Code, or a similar IDE/code editor.
- Basic knowledge about the clean architecture pattern.
Step-by-Step Guide for Creating a New .NET Core Project with Clean Architecture using the .NET CLI
For this demo of the Clean Architecture .NET Script, I will name the project CleanArchitectureDemo. By the end of this article, you will get the full script and, it is also available at Tech with Christian on GitHub.


Step 1 - Create The New Solution
The first thing we have to do is create a new solution where our project will reside. Open up your terminal (Linux/macOS) or Command Prompt (Windows) and run the following commands:
mkdir CleanArchitectureDemo
cd CleanArchitectureDemo
dotnet new sln
dotnet sln CleanArchitectureDemo.sln list
Now we have created a new folder for our solution and used the dotnet new sln command to create a new solution that should contain our project. By using the dotnet <sln_name>.sln list command we can check to see if any projects have been created in the solution.
Step 2 - Create The Core/Domain Layer
The Domain layer is the core of the application, where the business logic and rules are defined. The Domain layer represents the domain model of the application, which consists of entities, value objects, and business logic. Let's fire off some commands to create the domain layer in our project.
dotnet new classlib -o Core/Domain
rm Core/Domain/Class1.cs
dotnet sln CleanArchitectureDemo.sln add Core/Domain
The Domain layer has now been created and this is very important as this is a critical component of Clean Architecture, as it defines the core business concepts and rules of the application. By separating the domain model from the application and infrastructure layers, the Domain layer enables us to create more modular, testable, and maintainable software applications.
With the domain in place, let's add the next part of our Core, the Application Layer.
Step 3 - Create The Core/Application Layer
The Application layer is responsible for implementing the application's business logic and coordinating the work of the domain entities and services. This layer acts as a mediator between the user interface (UI) and the domain layer (the one we just created) and is responsible for interpreting user input, invoking domain logic, and returning the results to the UI.
Overall, the Application layer is a key component of Clean Architecture, as it provides a clear separation between the business logic and the infrastructure, and makes the application more modular, testable, and maintainable. Let's create the Application layer using these commands in our terminal/CLI.
dotnet new classlib -o Core/Application
rm Core/Application/Class1.cs
dotnet sln CleanArchitectureDemo.sln add Core/Application
Awesome, let's move on to the Infrastructure layer.
Step 4 - Create The Infrastructure Layer
The Infrastructure layer is responsible for implementing the technical details of the application, such as databases, web services, messaging systems, and user interfaces. The Infrastructure layer is where the application interacts with external systems and services, and where the details of the application's implementation are managed.
The Infrastructure layer is an essential component of Clean Architecture, as it provides the technical implementation of the application while keeping it separate from the business logic and the domain model. Let's add the Infrastructure project to our solution.
dotnet new classlib -o Infrastructure/Infrastructure
rm Infrastructure/Infrastructure/Class1.cs
dotnet sln CleanArchitectureDemo.sln add Infrastructure/Infrastructure
The reason I added Infrastructure inside an Infrastructure folder is that I like to separate my Persistence layer into another project apart from the Infrastructure. This makes the application clean and you can keep all migrations, etc... inside the persistence project.
Step 5 - Create The Persistence Layer
As I just mentioned above, we will add the persistence layer in a separate layer. The Persistence layer is a specific type of Infrastructure layer that is responsible for managing the storage and retrieval of data from a database or other persistent data store. The Persistence layer includes the data access objects (DAOs) and repositories that implement the data access logic for the application.
Let's add the Persistence layer to our infrastructure folder and add it to our solution.
dotnet new classlib -o Infrastructure/Persistence
rm Infrastructure/Persistence/Class1.cs
dotnet sln CleanArchitectureDemo.sln add Infrastructure/Persistence
Step 6 - Create The API/Host Layer
The API layer is the interface between the application and external clients, such as web or mobile applications, other services, or third-party integrations. The API layer is responsible for handling incoming requests, translating them into the appropriate use cases, and returning the response in the appropriate format.
To add the API layer to our application, we can use the following commands:
dotnet new webapi -o Presentation/API
dotnet sln CleanArchitectureDemo.sln add Presentation/API
Now all the projects have been added to the solution, we can list them all using the list command in the .NET CLI.
dotnet sln CleanArchitectureDemo.sln list

Project(s)
----------
Core/Domain/Domain.csproj
Core/Application/Application.csproj
Infrastructure/Infrastructure/Infrastructure.csproj
Infrastructure/Persistence/Persistence.csproj
Presentation/API/API.csproj
Step 7 - Wire Up The References Between The Projects
In order for the projects to work when we start the development of the application, we have to add some references between them. Below are the commands you should use to wire them together.