In this .NET tutorial, I will teach you how to implement Azure Cache for Redis / Azure Redis Cache in your .NET Core Web API. Redis is the perfect choice if you want a distributed cache solution for your application.
Why should you implement a cache solution? Are you struggling to keep up with incoming requests to your API? Is your API working to serve the same request over and over again fast enough? Or are you just planning to integrate a cache in your API before any of the before mentioned will happen? Redis is a perfect choice but it can be challenging to host yourself.
Caching has become a very popular tool to implement in applications to serve requests faster. By implementing a cache you will be able to improve the overall performance and scalability of your application. Caching will improve the user experience by making the application serve requests in a snap resulting in a better experience.
By the end of this tutorial, you will know how to set up and configure Azure Redis Cache and how you can use it in combination with your ASP.NET Core Web API easily. If you are ready, then let's dive in!
Below is a link for the service description at Microsoft.

Prerequisites
In order to follow along with me in this tutorial, you will need the following tools and services.
- Visual Studio 2022.
- .NET 7 SDK installed (.NET 6 SDK will also do the job).
- An Azure Account with an active subscription.
- Intermediate .NET and C# knowledge.
What are we going to cover in this Azure Redis Cache Tutorial?
Before we start, let's cover what we will go through in this Azure Redis Cache guide for .NET Core. You can expect the following.
- An introduction to what a cache is and different types of caches.
- Why you should use a cache in your application?
- High-Level View of Redis Cache.
- How to configure an Azure Cache for Redis in the cloud. (Redis cache in the cloud)
- How to implement Azure Redis Cache in a simple .NET Core Web API. You can use .NEt 6 and 7 for this tutorial.
What is a Cache?
Maybe you already know what a cache is, then you can skip this part. For those of you who would like a refresher, keep reading. I promise no long in-depth description, only a high-level view of what a cache is.
You can think of a cache as a temporary place to store the data (without persisting them). A cache will be a type of memory storage and the reason for that is that memory often is insanely fast. This is the actual reason that we can improve the performance and avoid pushing our database to its knees.
Let's have a look at a scenario, to give you a better understanding.
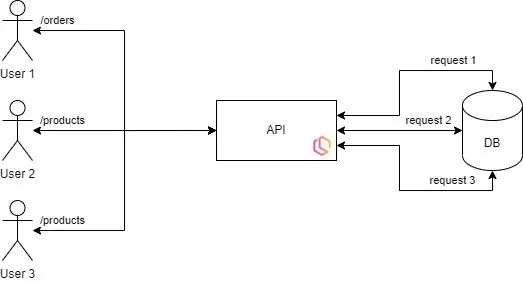
In the above image (Scenario 1) we have no cache and the API will translate all incoming requests and ask the database for data. This will make our database take a lot of hits because it has to respond to every request when a client asks for a resource.
Imagine having thousands of users requesting resources at the same time, that would cause the performance of the application to be slow. Let's take a look at what it looks like if we apply a cache.
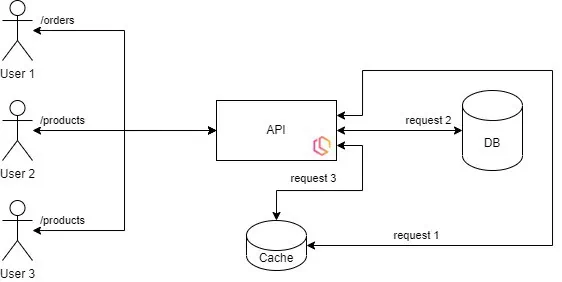
In the image above (Scenario 2) we have a cache to take some of the hits from our users. If the API is able to "see" that the request matches the same one it just got before, it will forward the request to the cache instead of the database.
This will make the first request slower because the data has to be loaded from the database into the cache, but then it will be fast! The next request for the same resource will be delivered within a few milliseconds because the response is stored within the memory and no database interaction has to be done.
What Type of Caches do we have?
I can't tell for other programming languages as I am mostly into .NET. When you develop applications using the .NET Framework, you got two options: In-Memory Caching, and Distributed Caching.
In-Memory Cache
An In-Memory cache is storing its data on the same server as the one handling the requests. This will often be the API server, which sometimes also is the one running the database.
When a new request is arriving we will fetch the cache data from the local machine and deliver it to the client. If we got a lot of requests and the API + database are some huge bastards, I would not recommend placing the cache onto the same resource server. This is where distributed caching comes into the picture.
If you would like to know more about how to implement an in-memory cache, you can take a look at my in-memory tutorial for .NET 6 below. Bonus - you will learn how to implement it using the decorator pattern.

Distributed Cache
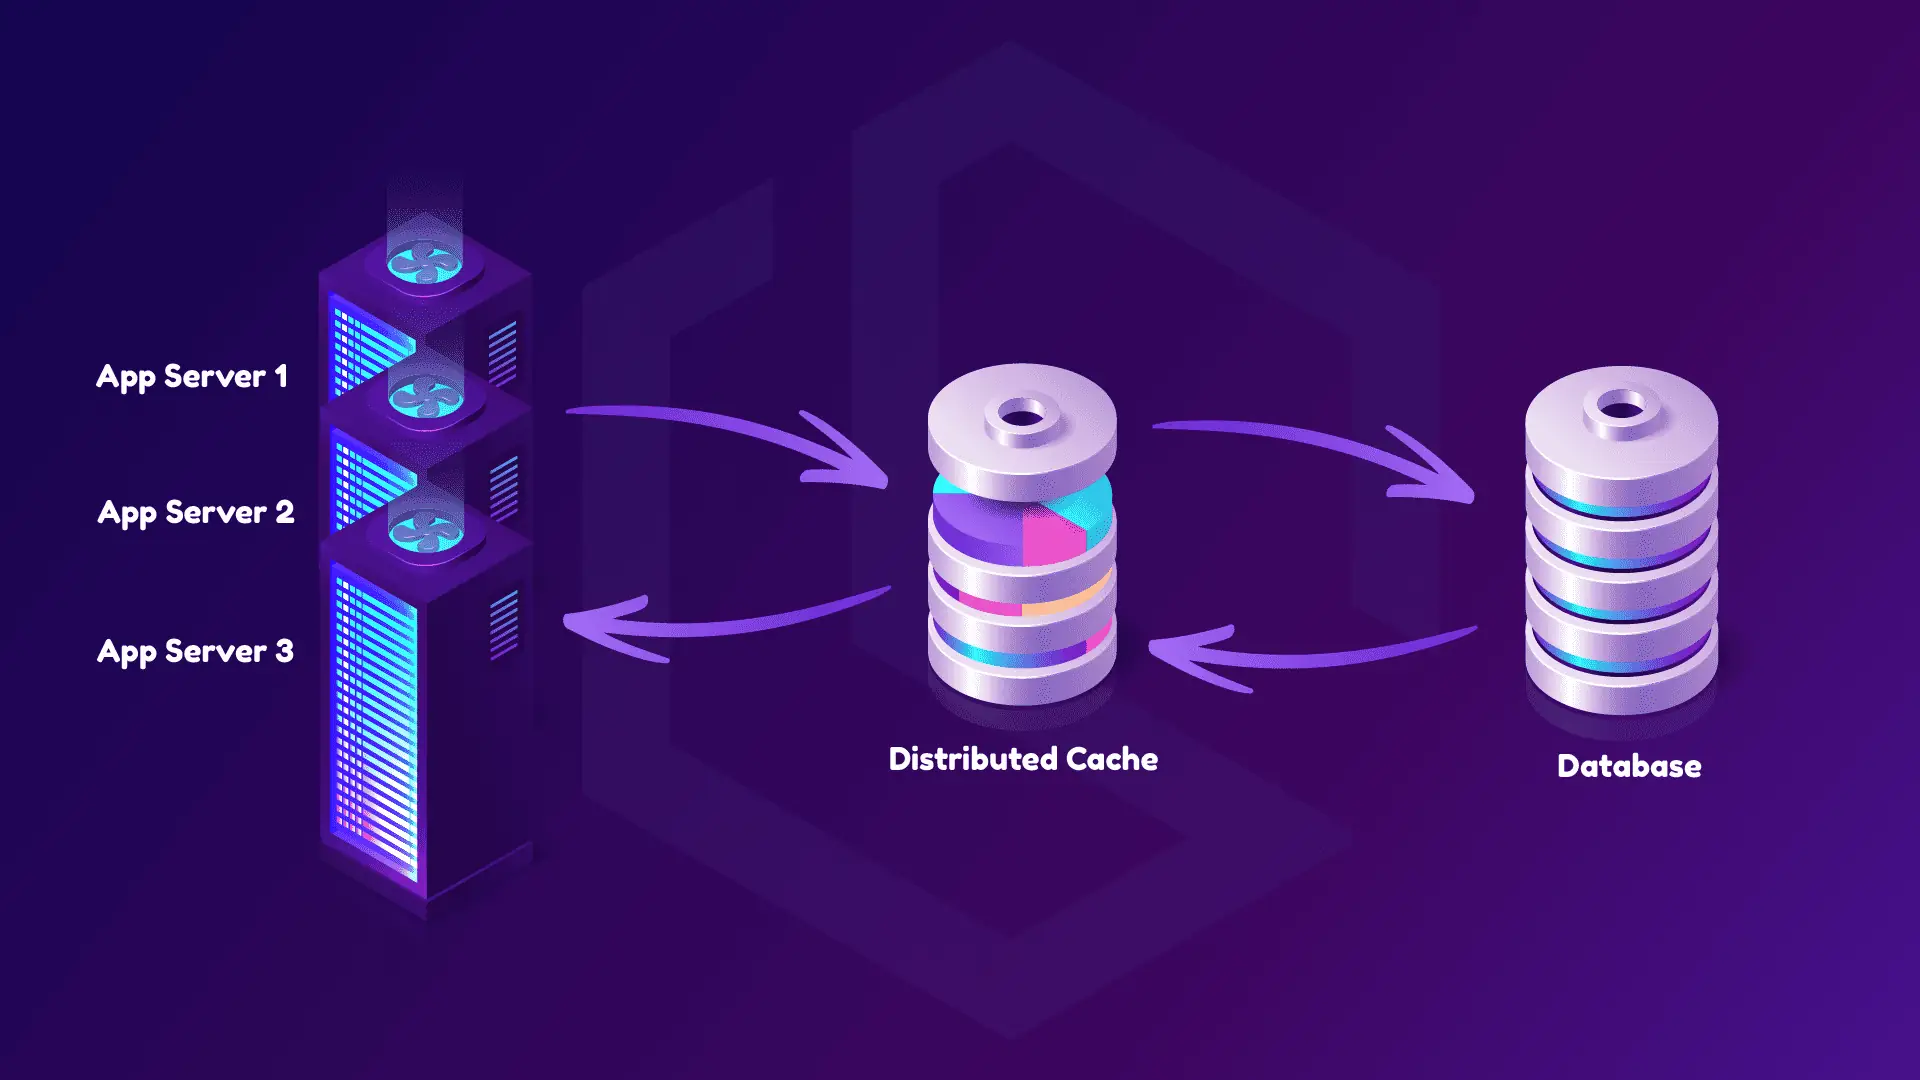
In the image above I have created a very simple illustration of what a distributed cache is. As you can see there are multiple application servers and that is because a distributed cache allows for scaling because each app server is capable of retrieving data from the same cache. Below are some key-take-away points.
- A distributed cache is running in the cloud or on-premise and makes it possible for data to be stored between multiple servers.
- Because it's located away from the application, we can scale it to follow the demand of our application up and down. This is often done when you work with multi-tenancy because a lot of users are accessing their details often.
- In an environment with a load balancer in front of our app servers we can restart a server without any issues because the two other servers running our application will have the same functionality and data in the cache + database will be consistent across the servers. Our users will not experience any drops in connectivity and can continue to use our application, while we fix one server.
For this tutorial, we will (as you might have guessed) use Redis as our distributed cache solution. Redis is probably the most popular cache solution (maybe because it's open-source) and can scale and improve the performance of an application like no one else. Let's take a brief introduction to Redis.
High-Level View of Redis Cache
Before we start configuring Azure, let's have a quick look at what Redis is.
Redis short for Remote Dictionary Server is an in-memory data store used by millions of developers as a database, cache, streaming engine, and message broker. It uses a NoSQL Key/value store to cache data a deliver a quick response of data.
Redis is storing data in memory instead of a traditional disk like an HDD or SSD (Solid-State Drive). Because of this, Redis delivers unparalleled speed, reliability, and performance to its users. Do we love anything else? I don't think so!
We use Redis to store often-accessed data and static data in the memory to unload the pressure on our database. Redis got a lot of options to list, set, hash, stream, etc... data inside an application, which also makes it so popular, because it got a lot of use cases. Below are some use cases.
- Real-Time Data Store - You can utilize the in-memory data structures to enable building data infrastructure for real-time applications that require low latency and high throughput.
- Caching & Session Storage - Because of the speed of Redis it is ideal for caching database queries, complex computations, API calls, and session states. What we will be doing for this tutorial.
- Streaming & Messaging - Stream is a data type in Redis, that enables high-rate data ingestion, messaging, event sourcing, and notifications.
Enough theory! Let's get to the fun part and get our hands dirty.
Azure Configuration
Configure Azure to use the Redis Caching Service
Configure an Azure Cache for Redis
Head over to portal.azure.com and sign in with your Azure Account and make sure you got an active subscription you can use at that account.
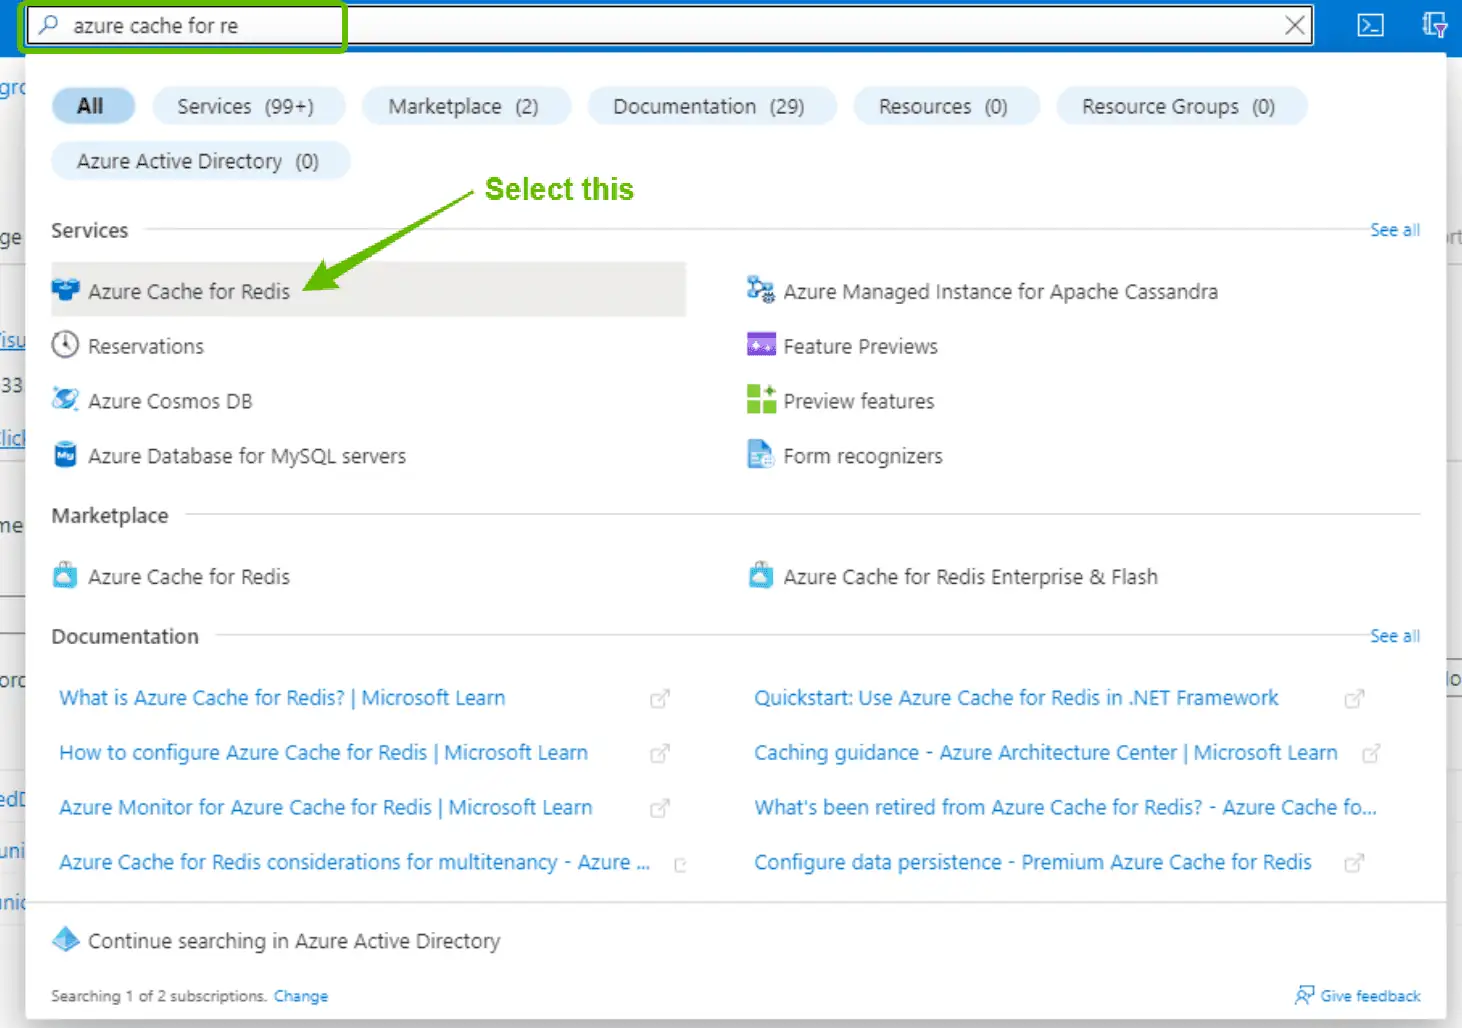
In the search field at the top of the dashboard, search for Azure Cache for Redis and select it.
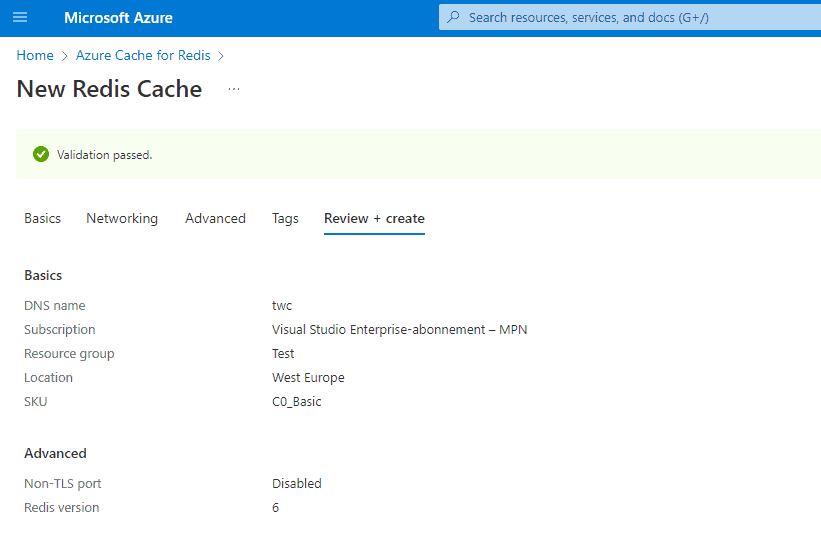
Now click on + Create at the new page that just opened. This will open a new page where you can fill out details about your Azure Cache for Redis. You can select the options as I have done below and click on the Review + create button. The rest of the settings are optional and not needed for this tutorial.
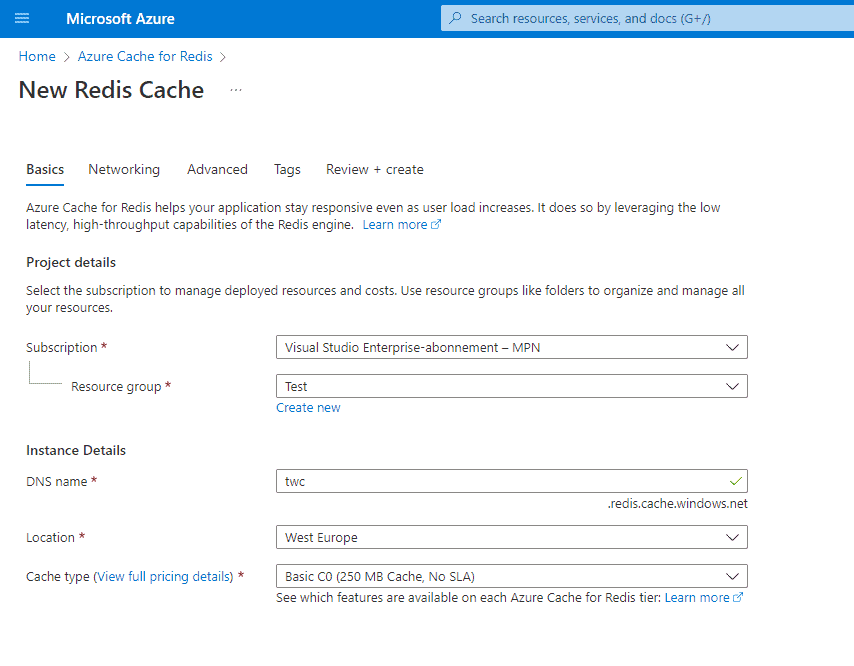
For the Cache type, I have selected Basic C0. This is currently the cheapest option and will cost you around $16 /month ~ $0.022 /hour - which is fair pricing as Azure got the full responsibility of configuration, domain, hosting, etc... You can read more about the pricing here.
When you are ready, simply hit the Create button to deploy your new Azure Redis Cache. This should bring you back to the page where you can see an overview of your Azure Redis Cache being deployed.
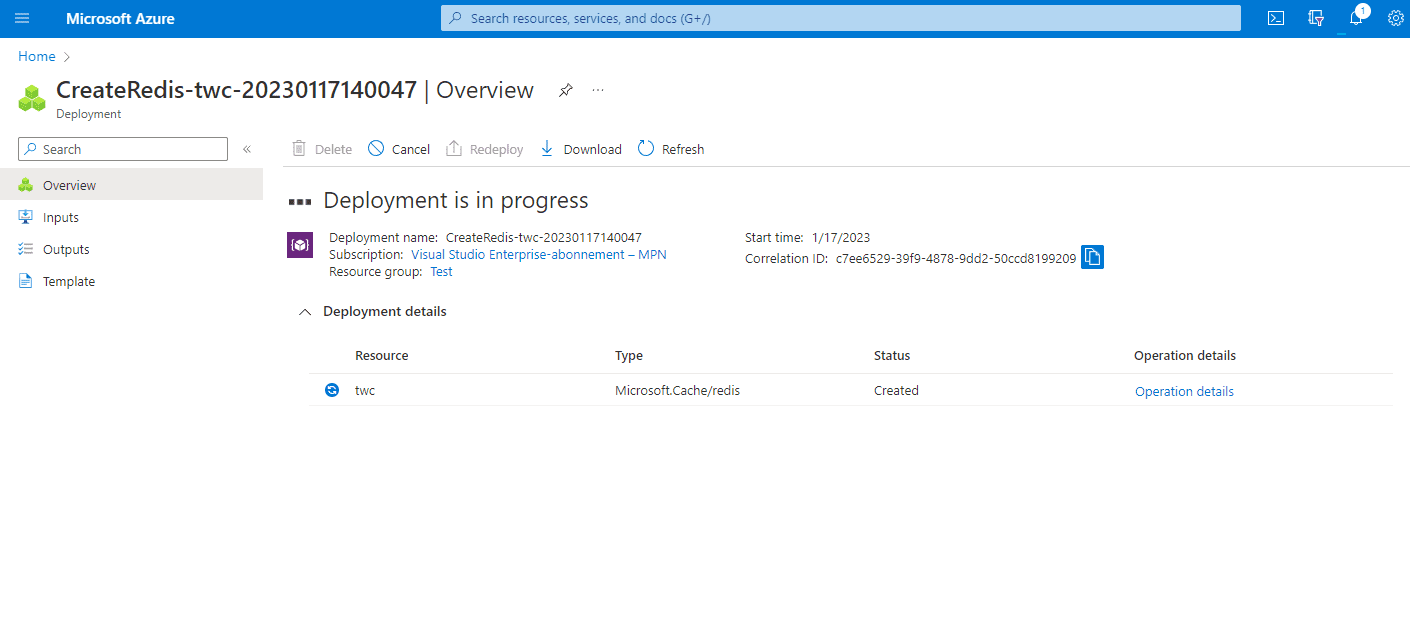
The deployment of the new Redis service can take some time - my deployment took roughly 15 minutes. Now is a good time to go grab a cup of coffee or tea while you wait. Once the deployment has been completed, you should see a page like the one I got below.
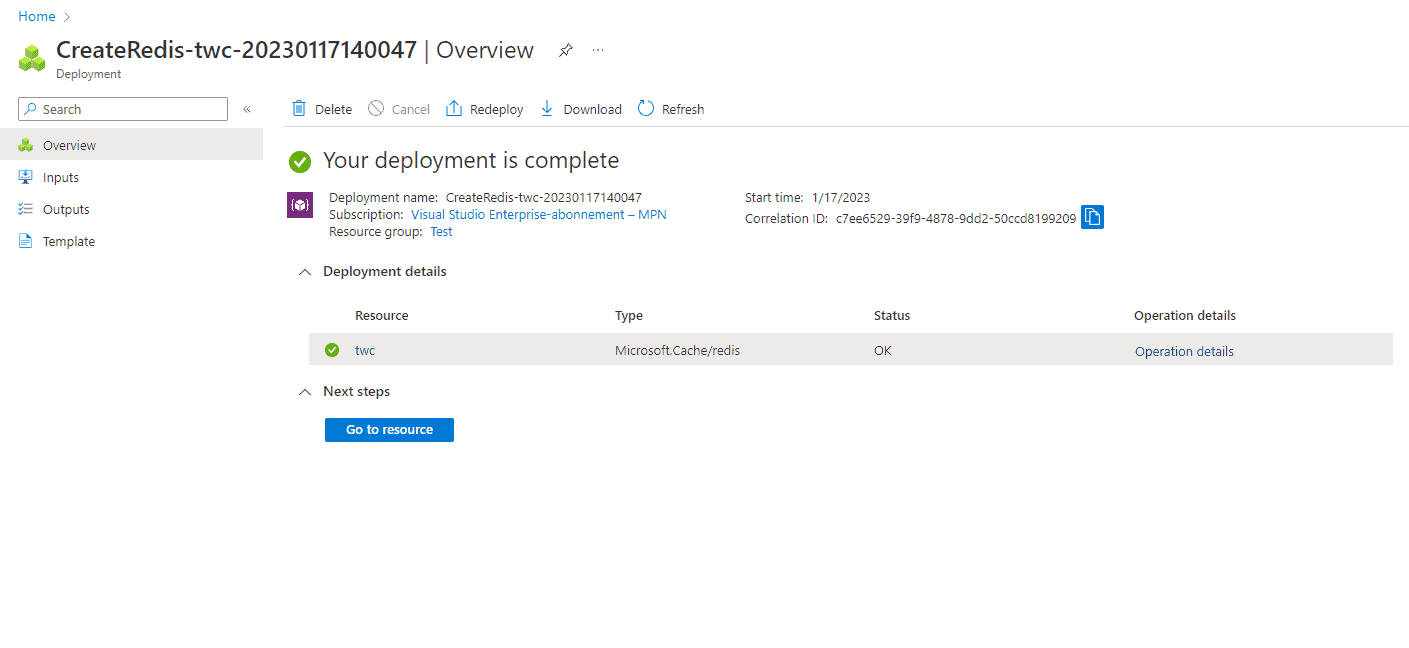
Click on the button Go to resource to continue.
Grab the Access keys for the Azure Redis Cache Service
In the menu on your left, head to the page named Access keys. It's located below the Settings heading in the menu.
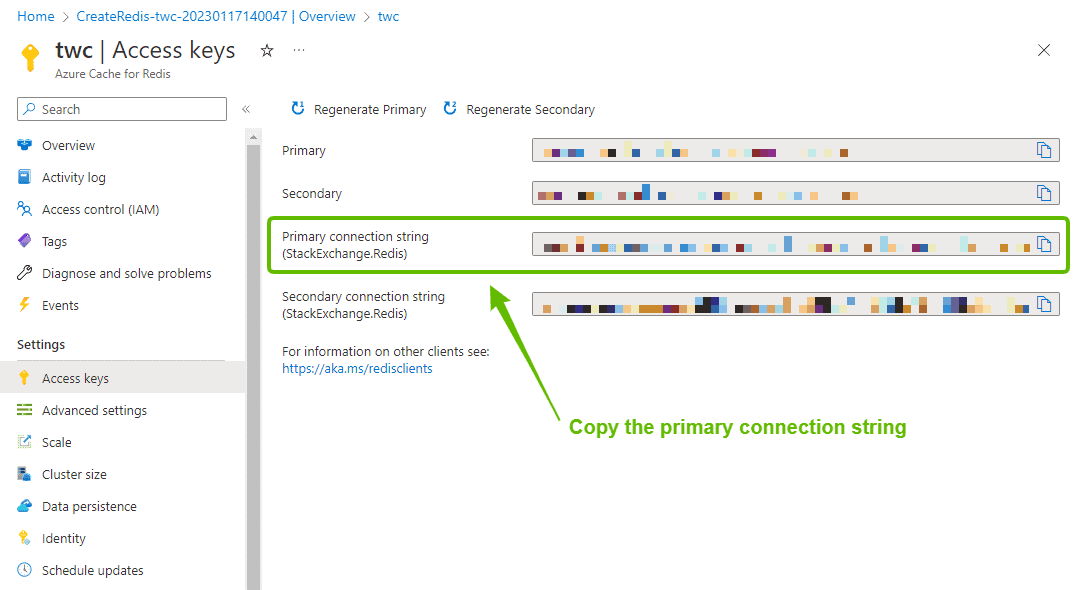
Copy the Primary connection string (StackExchange.Redis) value and store it in a secret place, we will use it in a moment to connect our .NET Web API to the Azure Redis Cache Service.
That's it for Azure. We are done with the configuration and can now continue with the development of our .NET Web API where we will be implementing a service to talk with our Redis Cache before we ask the database for any data.
Application Development
Time for implementation of Azure Redis Cache in our .NET Web API
Getting Started
By the end, I will post a link to the repository for the full solution. Before I do that, I will cover each step I do in order to communicate with the Azure Redis Cache Service we just created.
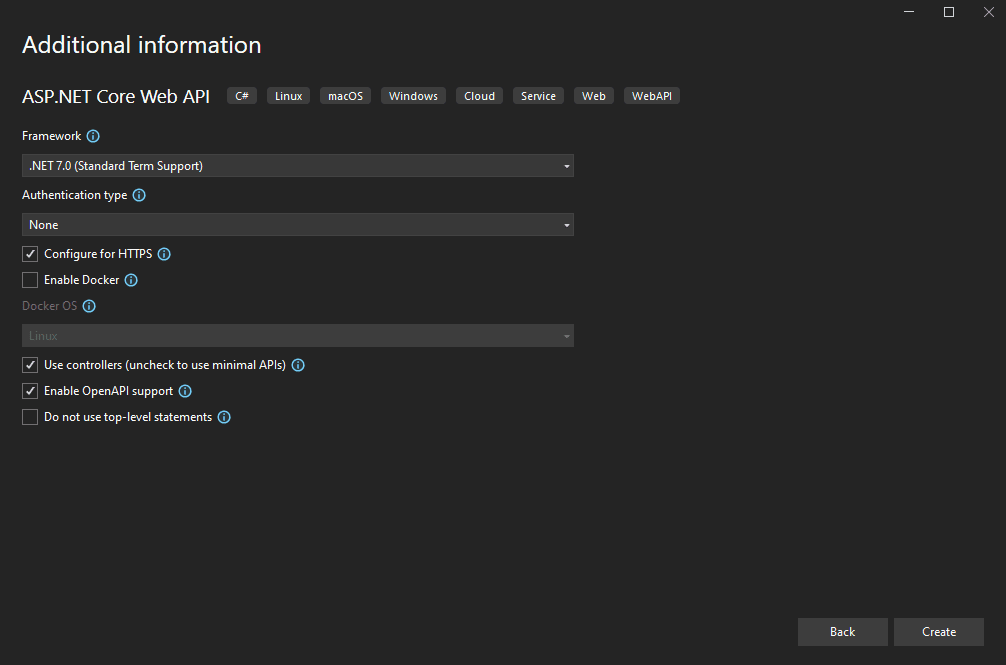
The first thing you have to do is open up Visual Studio 2022 (or newer) and create a new .NET Core Web API (or simply follow along with your existing solution).
I have named my project AzureRedisCacheApi - you can name yours what you prefer. Below are the additional settings for the project I have created.
For simplicity, I will not be implementing the solution using a fancy architecture and multiple layers to separate logic from the API, etc... Everything will be placed within the same solution, and the project structure will look like the following:
Implement Azure Redis Cache in .NET Web API
The final result will serve some books about software development from our cache and MS SQL Database. The first thing we will do is the installation of any required NuGet package in the project.
Install NuGet Packages
Our API will need a few packages installed in order to work. Below are the commands for the packages. Run each line inside the Package Manager Console and rebuild the project.
Install-Package Microsoft.EntityFrameworkCore
Install-Package Microsoft.EntityFrameworkCore.Tools
Install-Package Microsoft.EntityFrameworkCore.Design
Install-Package Microsoft.EntityFrameworkCore.SqlServer
Install-Package Microsoft.Extensions.Caching.StackExchangeRedis
Install-Package StackExchange.Redis
By default packages for Swagger / OpenAPI will be installed for us, when we create the API project. If you want to extend the documentation for your .NET Web API, you can check out my tutorial about creating API documentation using Swagger and ReDoc below.

Add Entities
To do this, we have to define what a book looks like in the real world. Let's create a new entity for a Book. The entity classes will be stored in a folder named Entities. Create a folder named Entities at the root of your API project and add a new class named Book.cs with the following properties:
namespace AzureRedisCacheApi.Entities
{
	public class Book
	{
		public int Id { get; set; }
		public string Title { get; set; }
		public string Description { get; set; }
		public string Author { get; set; }
		public string Publisher { get; set; }
		public string Language { get; set; }
		public string Edition { get; set; }
		public DateTime Published { get; set; }
        public string ISBN10 { get; set; }
        public string ISBN13 { get; set; }
		public double Rating { get; set; }
    }
}
The above code will define a basic book. The ideal application will move the data into separate tables in order to comply with 3NF.
Add Persistence
An API without any data is not much fun. Instead of us adding data to the API every time we make changes, etc... let's add a database seeder that will add a few books for us to request from the API. The books will later be stored within the Redis Cache too.
Create a new folder named Persistence at the root of your project and add a child folder named Seed inside the Persistence folder. Inside the Seed folder, create a new class named DbInitializer.cs with the following code inside. I will explain below:
using AzureRedisCacheApi.Entities;
using Microsoft.EntityFrameworkCore;

namespace AzureRedisCacheApi.Persistence.Seed
{
	public static class DbInitializer
	{
		public static void Seed(this ModelBuilder modelBuilder)
		{
			modelBuilder.Entity<Book>(x =>
			{
				x.HasData(new Book
				{
					Id = 1,
					Title = "Clean Code: A Handbook of Agile Software Craftsmanship",
					Description = "Even bad code can function. But if code isn’t clean, it can bring a development organization to its knees. Every year, countless hours and significant resources are lost because of poorly written code. But it doesn’t have to be that way.",
					Author = "Robert C. Martin (Author)",
					Publisher = "Pearson",
					Language = "English",
					Edition = "1st",
					ISBN10 = "9780132350884",
					ISBN13 = "978-0132350884",
					Published = DateTime.Parse("Aug 1, 2008"),
					Rating = 4.4
				});

				x.HasData(new Book
				{
					Id = 2,
					Title = "Design Patterns: Elements of Reusable Object-Oriented Software",
					Description = "Capturing a wealth of experience about the design of object-oriented software, four top-notch designers present a catalog of simple and succinct solutions to commonly occurring design problems. Previously undocumented, these 23 patterns allow designers to create more flexible, elegant, and ultimately reusable designs without having to rediscover the design solutions themselves.",
					Author = "Erich Gamma (Author), Richard Helm (Author), Ralph Johnson (Author), John Vlissides (Author), Grady Booch (Foreword)",
					Publisher = "Pearson",
					Language = "English",
					Edition = "1st",
					ISBN10 = "0201633612",
					ISBN13 = "978-0201633610",
					Published = DateTime.Parse("Oct 31, 1994"),
					Rating = 4.2
				});

				x.HasData(new Book
				{
					Id = 3,
					Title = "Head First Design Patterns: A Brain-Friendly Guide",
					Description = "At any given moment, someone struggles with the same software design problems you have. And, chances are, someone else has already solved your problem. This edition of Head First Design Patterns—now updated for Java 8—shows you the tried-and-true, road-tested patterns used by developers to create functional, elegant, reusable, and flexible software.",
					Author = "Eric Freeman (Author), Bert Bates (Author), Kathy Sierra (Author), Elisabeth Robson (Author)",
					Publisher = "O'Reilly Media",
					Language = "English",
					Edition = "1st",
					ISBN10 = "9780596007126",
					ISBN13 = "978-0596007126",
					Published = DateTime.Parse("Oct 1, 2004"),
					Rating = 4.7
				});

				x.HasData(new Book
				{
					Id = 4,
					Title = "The Pragmatic Programmer: From Journeyman to Master",
					Description = "Ward Cunningham Straight from the programming trenches, The Pragmatic Programmer cuts through the increasing specialization and technicalities of modern software development to examine the core process--taking a requirement and producing working, maintainable code that delights its users.",
					Author = "Andrew Hunt (Author), David Thomas (Author)",
					Publisher = "Addison-Wesley Professional",
					Language = "English",
					Edition = "1st",
					ISBN10 = "9780201616224",
					ISBN13 = "978-0201616224",
					Published = DateTime.Parse("Oct 30, 1999"),
					Rating = 4.8
				});
			});
		}
	}
}
The code above contains a static class with an extension method Seed(this ModelBuilder modelBuilder) for the ModelBuilder class. The Seed class got 4 books that will be seeded into the database during the migration of the database to the newest available version.
To use these seed data, we have to create a new Database Context using Entity Framework Core. Create a new class named AppDbContext.cs inside the Persistence folder. The AppDbContext.cs will look like the following, which I will explain below.
using AzureRedisCacheApi.Entities;
using AzureRedisCacheApi.Persistence.Seed;
using Microsoft.EntityFrameworkCore;

namespace AzureRedisCacheApi.Persistence
{
	public class AppDbContext : DbContext
	{
		public AppDbContext(DbContextOptions<AppDbContext> options) : base(options)
		{
		}

		// Add the books entity to be added in our database
		public DbSet<Book> Books { get; set; }

		protected override void OnModelCreating(ModelBuilder modelBuilder)
		{
			// Seed database with new data if its not already present
			modelBuilder.Seed();

			base.OnModelCreating(modelBuilder);
		}
	}
}
In the AppDbContext class above we:
- Derive from the
DbContextclass and create a new constructor where we overrideDbContext. - Register our Book entity, so that we can use it with LINQ and it will be created in our database using the code-first approach.
- Finally, we
Seedthe database with theDbInitializerclass we created before.
To follow along and see what changes I have made so far, you can check the commit for this point here: Add Entity, Database, and DB Initializer.
Register Services
I like to keep my Program.cs file is clean, but we have to register our services. Instead of cluttering up our Program.cs file when registering services in the service container, let's create an extension for IServiceCollection that we can register in Program.cs file.
Create a new folder named Services and add a new file named Startup.cs inside the folder. The Startup.cs file is a static class we will use to register all services and application services for the service container and HTTP Request Pipeline. Add the following code inside:
using AzureRedisCacheApi.Persistence;
using Microsoft.EntityFrameworkCore;

namespace AzureRedisCacheApi.Services
{
	public static class Startup
	{
		public static IServiceCollection AddServices(this IServiceCollection services, IConfiguration configuration)
		{
			services.AddDatabase(configuration);
			services.AddControllers();
			services.AddEndpointsApiExplorer();
			services.AddSwaggerGen();
			return services;
		}

		public static IServiceCollection AddDatabase(this IServiceCollection services, IConfiguration configuration)
		{
			services.AddDbContext<AppDbContext>(options =>
				options.UseSqlServer(configuration.GetConnectionString("Default")));

			return services;
		}

		public static IApplicationBuilder AddApplication(this IApplicationBuilder app)
		{
			app.UseSwagger();
			app.UseSwaggerUI();
			app.UseHttpsRedirection();
			app.UseAuthorization();

			return app;
		}
	}
}
As you can see I have moved most of the registrations from Program.cs to this Startup.cs class. This means we gotta do some housekeeping in Program.cs - let's head there.
Because I am lazy and I would like to migrate the database automatically every time the application boots, I will implement an automatic migration functionality. You can read more in-depth about how this is done in the article below.

The updated Program.cs file now looks like the following:
using AzureRedisCacheApi.Persistence;
using AzureRedisCacheApi.Services;
using Microsoft.EntityFrameworkCore;

var builder = WebApplication.CreateBuilder(args);

// Add services to the container.
builder.Services.AddServices(builder.Configuration);

var app = builder.Build();

// Configure the HTTP request pipeline.
// Seed Database
using (var scope = app.Services.CreateScope())
{
	var dbContext = scope.ServiceProvider
		.GetRequiredService<AppDbContext>();

	dbContext.Database.Migrate();
}

app.AddApplication();
app.MapControllers();
app.Run();
The AddDbContext method is expecting IConfiguration to contain a key/value for a connection string named Default, because I gave it that name when registering the database context in Startup.cs. Let's add that inside appsettings.json to avoid any errors.
{
  "Logging": {
    "LogLevel": {
      "Default": "Information",
      "Microsoft.AspNetCore": "Warning"
    }
  },
  "AllowedHosts": "*",
  "ConnectionStrings": {
    "Default": "Server=localhosts;Database=AzureRedisCacheDemoApi;Trusted_Connection=True;"
  }
}
You should of course change the connection string to match your database.
Create Migration for Database and Seed data
Let's create a migration for our database and seed data. Open up Package Manager Console and enter the following command to create a new migration and place the migrations in the persistence folder.
Add-Migration InitialMigration -o Persistence/MigrationsThis should result in the following:
PM> Add-Migration InitialMigration -o Persistence/Migrations
Build started...
Build succeeded.
To undo this action, use Remove-Migration.
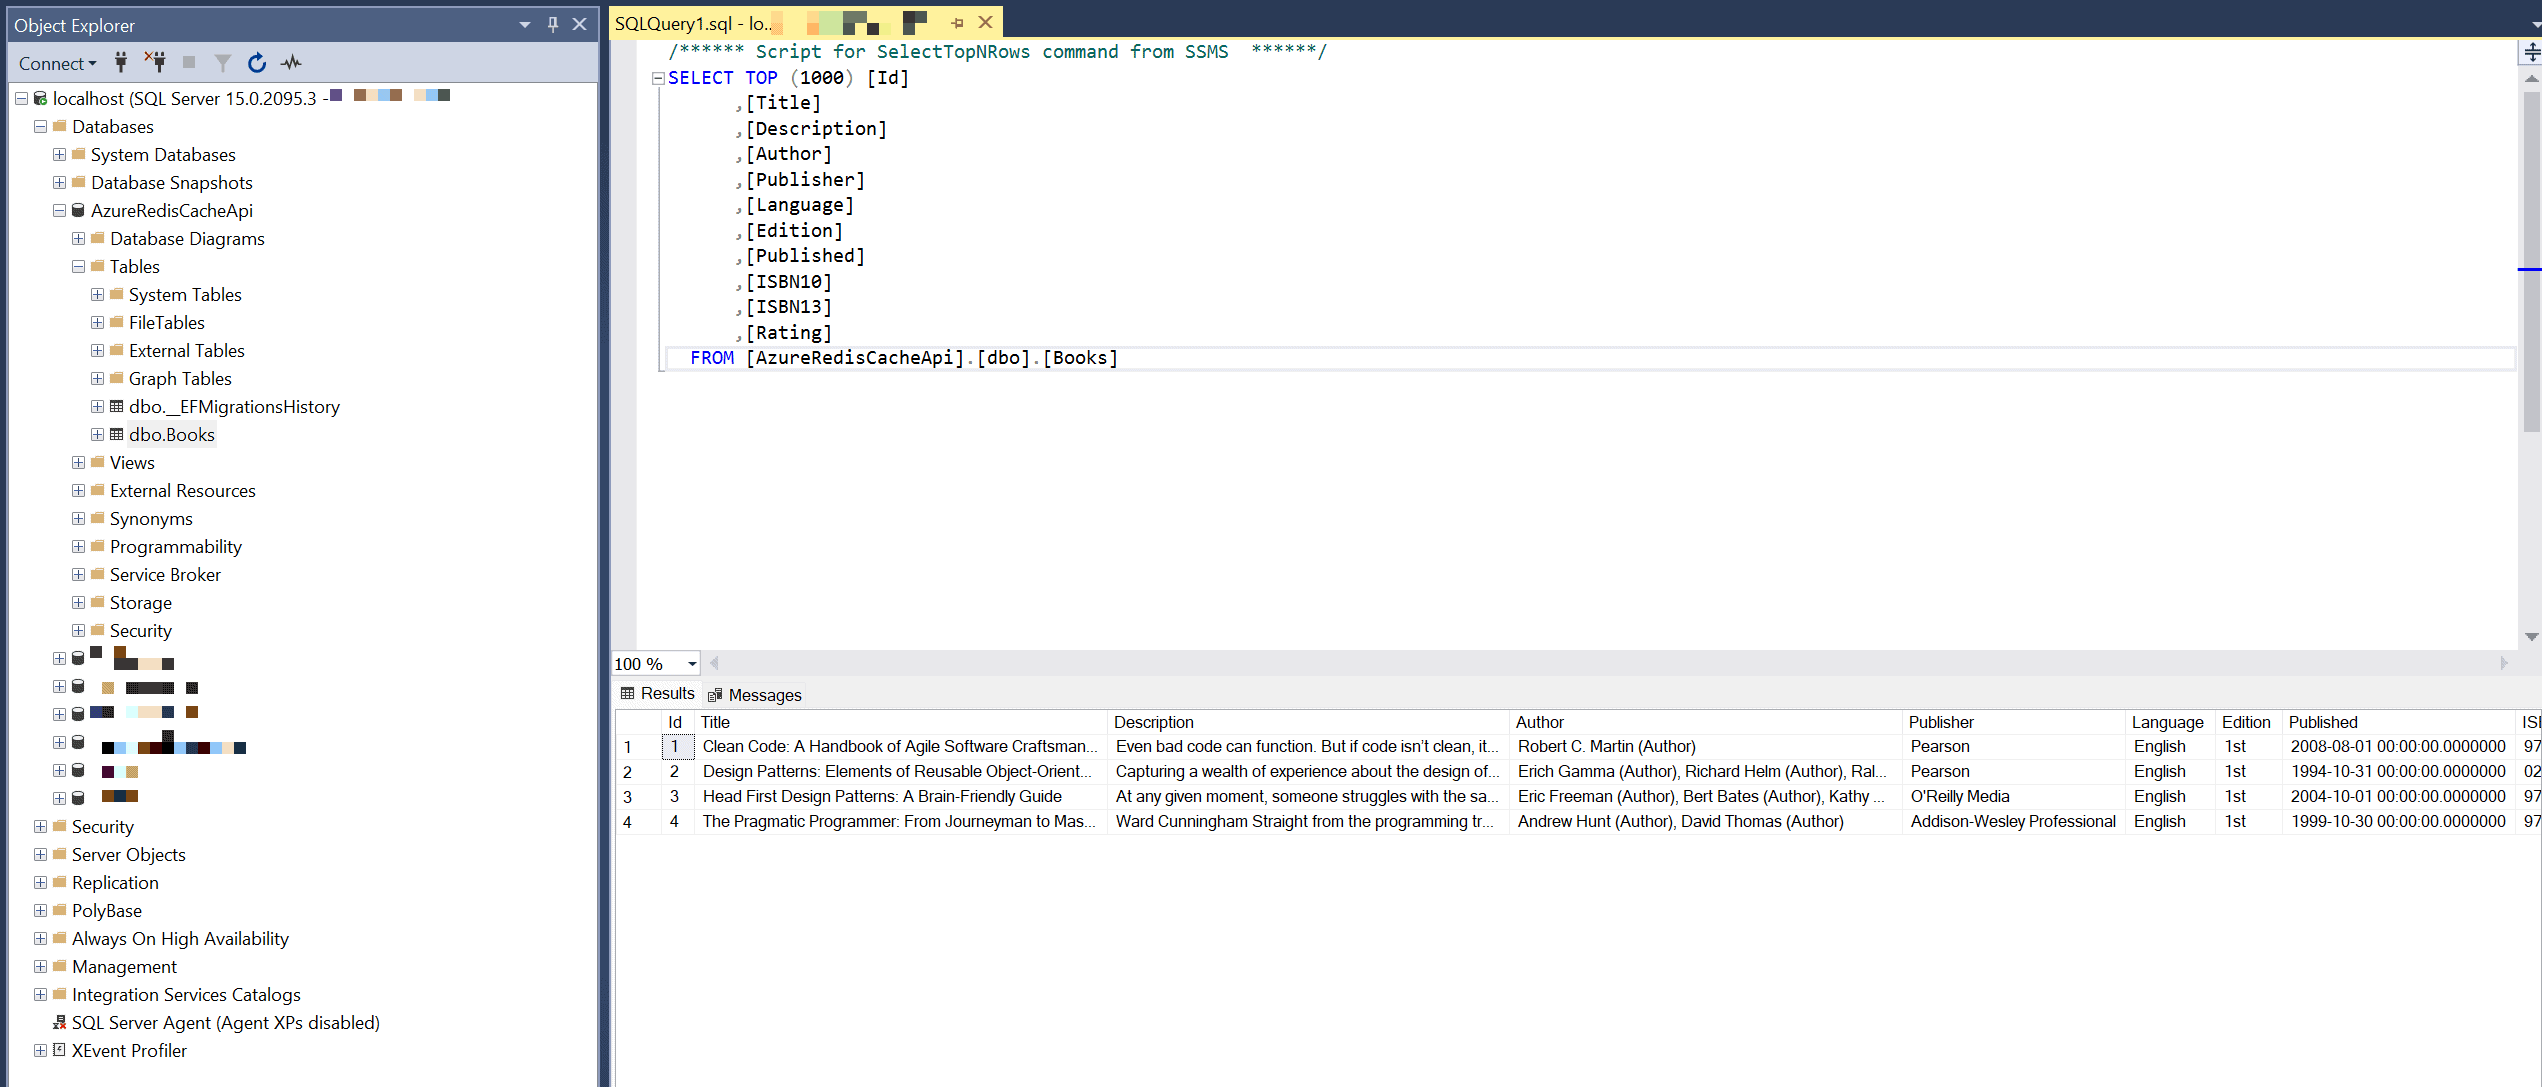
PM> Let's start up the application to make sure that the database is created in our SQL Server. At startup, the terminal should show you the migration process and inside the database itself, you should now see the following.
To see the changes I made so far, you can check the latest commit for the demo here: Added service registration, migrations, and update DB context.
Add Book Repository
Now that we got some books available in our database, let's create a repository to serve the books to our controller.
Create a new child folder inside the Services folder named Repositories. Now add a new class inside Repositories named IBookRepository.cs and add the following code inside it:
using AzureRedisCacheApi.Entities;
using AzureRedisCacheApi.Persistence;

namespace AzureRedisCacheApi.Services.Repositories
{
	public interface IBookRepository
	{
		Task<IReadOnlyList<Book>> GetBooksAsync();
		Task<Book> GetBookAsync(int bookId);
		Task<Book> AddBookAsync(Book book);
		Task<Book> UpdateBookAsync(Book book);
		Task<bool> DeleteBookAsync(int bookId);
	}
}
As you can see this is basic CRUD functionality and it will help us create a standard REST API in a moment. If you would like an in-depth tutorial about creating a REST API, you can check out my article below.
Let's give these methods some life by implementing the logic behind them. Create a new file in the Repositories folder named BookRepository.cs and add the following code inside it.
using AzureRedisCacheApi.Entities;
using AzureRedisCacheApi.Persistence;
using Microsoft.EntityFrameworkCore;

namespace AzureRedisCacheApi.Services.Repositories
{
	public class BookRepository : IBookRepository
	{
		private readonly AppDbContext _appDbContext;

		public BookRepository(AppDbContext appDbContext)
		{
			_appDbContext = appDbContext;
		}

		public async Task<Book> AddBookAsync(Book book)
		{
			await _appDbContext.Books.AddAsync(book);
			await _appDbContext.SaveChangesAsync();
			return book;
		}

		public async Task<bool> DeleteBookAsync(int bookId)
		{
			var book = await GetBookAsync(bookId);
			var deleteResult = _appDbContext.Books.Remove(book);
			await _appDbContext.SaveChangesAsync();
			return deleteResult != null ? true : false;
		}

		public async Task<Book> GetBookAsync(int bookId)
		{
			return await _appDbContext.Books.FirstOrDefaultAsync(x => x.Id == bookId);
		}

		public async Task<IReadOnlyList<Book>> GetBooksAsync()
		{
			return await _appDbContext.Books.ToListAsync();
		}

		public async Task<Book> UpdateBookAsync(Book book)
		{
			var updateResult = _appDbContext.Books.Update(book);
			await _appDbContext.SaveChangesAsync();
			return updateResult.Entity;
		}
	}
}
What happens in the code above?
- We inject the database context so that our repository is capable of communicating with the database.
- We implement the methods we inherited from
IBookRepositoryand add the logic to make them work.
Now we have to register the repository as a transient in our Startup.cs file in the Services folder. This is because we would like to inject the repository into a book controller in a moment.
In the AddServices(...) method, just below our database registration, we will register the Transient for our book repository.
using AzureRedisCacheApi.Persistence;
using AzureRedisCacheApi.Services.Repositories;
using Microsoft.EntityFrameworkCore;

namespace AzureRedisCacheApi.Services
{
	public static class Startup
	{
		public static IServiceCollection AddServices(this IServiceCollection services, IConfiguration configuration)
		{
			services.AddDatabase(configuration);
			services.AddTransient<IBookRepository, BookRepository>();
			services.AddControllers();
			services.AddEndpointsApiExplorer();
			services.AddSwaggerGen();
			return services;
		}

		...
	}
}
We have now registered the book repository in our service container. Let's use it in the book controller to retrieve some books.

Add Book Controller
This will start as a very simple implementation of our book controller and serve the book repository functionality for the client/user.
Create a new controller named BookController.cs and remove the default one named WeatherForecastController.cs alongside its class WeatherForecast.cs they are unnecessary for this tutorial.
Inside BookController.cs add the following code.
using AzureRedisCacheApi.Entities;
using AzureRedisCacheApi.Services.Repositories;
using Microsoft.AspNetCore.Mvc;

namespace AzureRedisCacheApi.Controllers
{
	[Route("api/[controller]")]
	[ApiController]
	public class BookController : ControllerBase
	{
		private readonly IBookRepository _bookRepo;

		public BookController(IBookRepository bookRepo)
		{
			_bookRepo = bookRepo;
		}

		[HttpGet("get")]
		public async Task<IActionResult> GetAllAsync()
		{
			var books = await _bookRepo.GetBooksAsync();
			return Ok(books);
		}

		[HttpGet("get/{id}")]
		public async Task<IActionResult> GetSingleAsync(int id)
		{
			var book = await _bookRepo.GetBookAsync(id);
			return Ok(book);
		}

		[HttpPost("add")]
		public async Task<IActionResult> AddBookAsync(Book book)
		{
			var result = await _bookRepo.AddBookAsync(book);
			return Ok(result);
		}

		[HttpPut("update")]
		public async Task<IActionResult> UpdateBookAsync(Book book)
		{
			var result = await _bookRepo.UpdateBookAsync(book);
			return Ok(result);
		}

		[HttpDelete("delete/{id}")]
		public async Task<bool> DeleteBookAsync(int id)
		{
			return await _bookRepo.DeleteBookAsync(id);
		}
	}
}
As you can see it's a simple controller for now that will just serve the books to and from our repository that will take care of the database operations. Great, let's fire it up and see if we can retrieve some books!
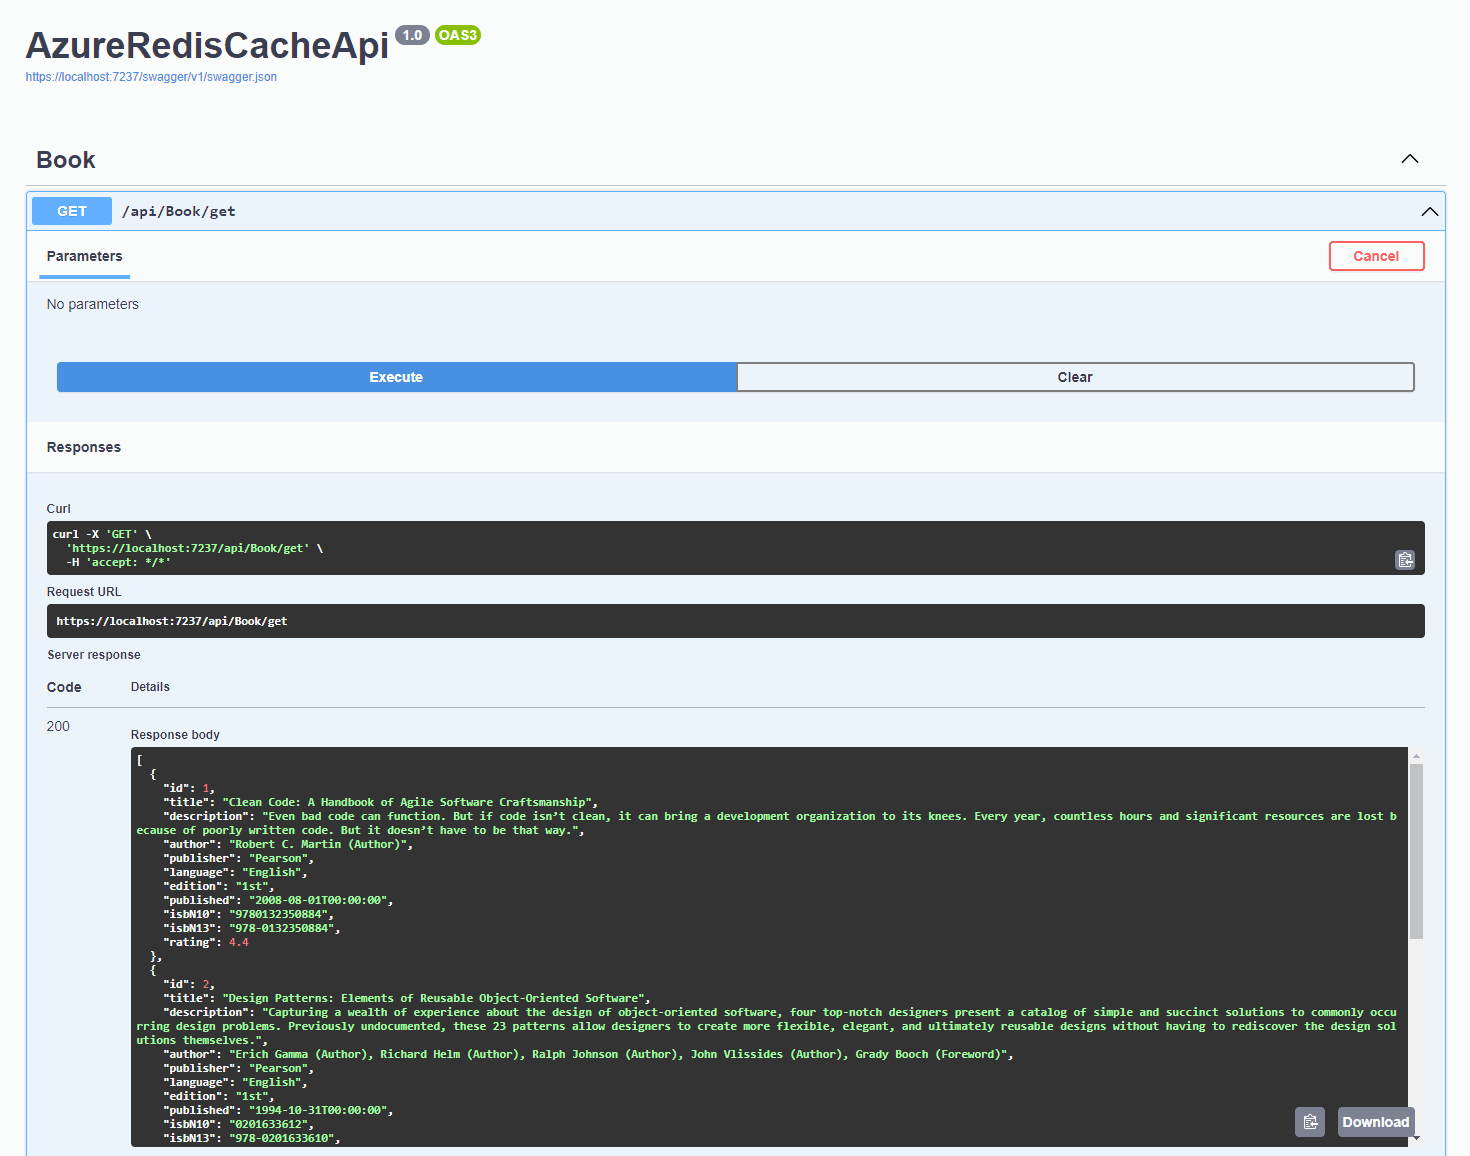
Awesome! We can get our books and the database got hit by the request because we currently do not have any caching enabled. Let's move on and add some distributed Azure Redis caching to our .NET Web API.
Add Azure Redis Caching (Distributed Caching)
Now for the fun part, you are here for. Now we will add Distributed caching to our application to serve the requests from a cache and not the database every time.
Add Primary Connection String from Access Keys
Now it's time for configuring the connection string in our application. You can set the connection string inside usersecrets.json or appsettings.json. For this tutorial, I have added an extra connection string property with the primary connection string from my Azure Redis Cache Service. It looks like this in appsettings.json.
{
  "Logging": {
    "LogLevel": {
      "Default": "Information",
      "Microsoft.AspNetCore": "Warning"
    }
  },
  "AllowedHosts": "*",
  "ConnectionStrings": {
    "Default": "Data Source=localhost;Initial Catalog=AzureRedisCacheApi;Integrated Security=True;MultipleActiveResultSets=True;TrustServerCertificate=True;",
    "AzureRedisUrl": "<YOUR-REDIS-URL>:6380,password=<YOUR-PASSWORD>,ssl=True,abortConnect=False"
  }
}
Register Caching Service in Startup
With the connection string in place, let's register our caching service with two options. Open Startup.cs inside the Services folder and add another IServiceCollection named AddCaching. It looks like this:
public static IServiceCollection AddCaching(this IServiceCollection services, IConfiguration configuration)
{
	services.AddStackExchangeRedisCache(options =>
	{
		options.Configuration = configuration.GetConnectionString("AzureRedisUrl");
		options.InstanceName = "master";
	});
	return services;
}
In the AddServices method above we will register this new service just below the database registration, just like I have done below.
public static IServiceCollection AddServices(this IServiceCollection services, IConfiguration configuration)
{
	services.AddDatabase(configuration);
	services.AddCaching(configuration);
	services.AddTransient<IBookRepository, BookRepository>();
	services.AddControllers();
	services.AddEndpointsApiExplorer();
	services.AddSwaggerGen();
	return services;
}
Now the Redis Cache has been registered in our service container with the connection string from our configuration.
Update Book Controller to use caching
Before I show you how to implement this functionality I would like to give you a short theory session about GetAsync and SetAsync.