How to implement GraphQL in ASP.Net Core Web API (.NET 6) using HotChocolate

In this tutorial, you will learn how to implement GraphQL in an ASP.NET Core Web API built on the .NET 6 framework. Throughout the tutorial, we will be using a few different third-party libraries – they are shown in the below section. We are also going to take a look at the different GrapQL elements used to integrate GrapQL in our ASP.NET Core Web API.
What is GraphQL?
According to GrapQLs own website, GraphQL is:
GraphQL is a query language for APIs and a runtime for fulfilling those queries with your existing data. GraphQL provides a complete and understandable description of the data in your API, gives clients the power to ask for exactly what they need and nothing more, makes it easier to evolve APIs over time, and enables powerful developer tools. graphql.org
With that very short introduction to what GrapQL is, I think it’s time to get started with the fun part.
GraphQL vs REST
As we just saw in the above section, GrapQL is a query language. When developing our code, we define a type that GrapQL can use to query against. The awesome thing about GrapQL is that adapts to the code and data at the client’s end. There is no specific programming language or database that has to be used for this to work.
When utilizing GrapQL we minimize the number of roundtrips made from the client to the server to get all required data. When we use REST we have to visit a specific endpoint to get the data we need, as there is made up an action inside a controller to serve just that data.
One thing that can be confusing about big applications using REST is the number of endpoints (it can be enormous)… by using GraphQL we can eliminate that as we only have one endpoint. Another great thing about GrapQL is that you only get what you ask for. You won’t get a lot of data that you don’t need? How is that – well the reason is that a GrapQL query is defined by fields that you would like returned. Take a look at the example below:
query HeroesQuery {
  heroes {
    name
    superpower {
      type
    }
  }
}
This would produce the following response:
{
  "data": {
    "heroes": [
     {
      "name": "Batman",
      "superpower": [
        {
          "type": "Absolute Knowledge"
        },
        {
          "type": "Super Strength"
        },
        {
          "type": "Magic Armors"
        }
      ]
     }
    ]
  }
}
The above request would not be possible to make with REST as the typical REST endpoint would return more or less data than you need and you then need to use the returned data to request another endpoint to build a full dataset. It depends on how the developers behind the API you are consuming have made the implementation on their end.
Now that we have a basic understanding of the primary difference between GrapQL and REST APIs I think it’s time to move on to the fun part. Let’s implement GraphQL in an ASP.NET Core Web API project and test out the features it got.
Create a new ASP.NET Core Web API and add some functionality for the superheroes
In this GraphQL tutorial, I will build an API serving data about superheroes. My personal favorite is Batman (you might have guessed that from above) – anyway. Let’s create a new Web API from a template in Visual Studio.
I have already created a starter template for this tutorial, that you are more than welcome to download and use. If you prefer to start from scratch, you can continue reading below and add the needed code to your project. Else you can jump to this section: Integrate GraphQL in ASP.NET Core Web API.
 Christian-Schou
#1 – Create ASP.NET Core Web API from Template
Open Visual Studio (I use version 2022) as developing with the .NET 6 framework. Create a new project, select ASP.NET Core Web API as the template, and give it a name you like:
Delete the default WeatherForecast class and controller, we don’t need them for this project.
#2 – Add Interfaces
In this application, we are going to build a repository to serve the data. Create a new folder named Interfaces and add the following three interfaces:
namespace SuperHeroApi.Interfaces
{
    public interface ISuperheroRepository
    {

    }
}
namespace SuperHeroApi.Interfaces
{
public interface ISuperpowerRepository
{
}
}namespace SuperHeroApi.Interfaces
{
public interface IMovieRepository
{
}
}We will not be implementing logic in them right now – it’s only to make the starter template for this project.
#3 – Add Models/Entities
Create a new folder named Model and add the following classes to that folder:
Superhero.cs
using System.ComponentModel.DataAnnotations;

namespace SuperHeroApi.Models
{
    public class Superhero
    {
        [Key]
        public Guid Id { get; set; }

        [Required(ErrorMessage = "Please specify a name for the superhero")]
        public string Name { get; set; }
        public string Description { get; set; }
        public string Height { get; set; }

        public ICollection<Superpower> Superpowers { get; set; }
        public ICollection<Movie> Movies { get; set; }
    }
}
Superpower.cs
using System.ComponentModel.DataAnnotations;
using System.ComponentModel.DataAnnotations.Schema;

namespace SuperHeroApi.Models
{
    public class Superpower
    {
        [Key]
        public Guid Id { get; set; }

        [Required(ErrorMessage = "The superpower is required")]
        public string SuperPower { get; set; }
        public string Description { get; set; }

        [ForeignKey("SuperheroId")]
        public Guid SuperheroId { get; set; }
        public Superhero Superhero { get; set; }
    }
}
Movie.cs
using System.ComponentModel.DataAnnotations;
using System.ComponentModel.DataAnnotations.Schema;

namespace SuperHeroApi.Models
{
    public class Movie
    {
        [Key]
        public Guid Id { get; set; }

        [Required(ErrorMessage = "The movie title is required")]
        public string Title { get; set; }
        public string Description { get; set; }
        public string Instructor { get; set; }
        public DateTime ReleaseDate { get; set; }

        [ForeignKey("SuperheroId")]
        public Guid SuperheroId { get; set; }
        public Superhero Superhero { get; set; }
    }
}
With the models in place, let’s move on to the data context.
#4 – Add Database Context using DbContext
Right-click your solution and click on Manage NuGet Packages... search for Microsoft.EntityFrameworkCore and install that package.
Create a new folder named Data and add a folder inside named ContextConfigurations.
Inside the ContextConfiguration folder, add three new classes with the names below and their code:
SuperheroContextConfiguration.cs
using Microsoft.EntityFrameworkCore;
using Microsoft.EntityFrameworkCore.Metadata.Builders;
using SuperHeroApi.Models;

namespace SuperHeroApi.Data.ContextConfigurations
{
    public class SuperheroContextConfiguration : IEntityTypeConfiguration<Superhero>
    {
        private Guid[] _ids;

        public SuperheroContextConfiguration(Guid[] ids)
        {
            _ids = ids;
        }

        public void Configure(EntityTypeBuilder<Superhero> builder)
        {
            builder
                .HasData(
                new Superhero
                {
                    Id = _ids[0],
                    Name = "Batman",
                    Description = "Batman was originally introduced as a ruthless vigilante who frequently killed or maimed criminals, but evolved into a character with a stringent moral code and strong sense of justice. Unlike most superheroes, Batman does not possess any superpowers, instead relying on his intellect, fighting skills, and wealth.",
                    Height = 1.93
                },
                new Superhero
                {
                    Id = _ids[1],
                    Name = "Luke Skywalker",
                    Description = "Luke Skywalker was a Tatooine farmboy who rose from humble beginnings to become one of the greatest Jedi the galaxy has ever known. Along with his friends Princess Leia and Han Solo, Luke battled the evil Empire, discovered the truth of his parentage, and ended the tyranny of the Sith.",
                    Height = 1.70
                },
                new Superhero
                {
                    Id = _ids[2],
                    Name = "Black Widow",
                    Description = "Black Widow, real name Natasha Romanoff, is a trained female secret agent and superhero that appears in Marvel Comics. Associated with the superhero teams S.H.I.E.L.D. and the Avengers, Black Widow makes up for her lack of superpowers with world class training as an athlete, acrobat, and expert martial artist and weapon specialist.",
                    Height = 1.70
                });
        }
    }
}
SuperpowerContextConfiguration.cs
using Microsoft.EntityFrameworkCore;
using Microsoft.EntityFrameworkCore.Metadata.Builders;
using SuperHeroApi.Models;

namespace SuperHeroApi.Data.ContextConfigurations
{
    public class SuperpowerContextConfiguration : IEntityTypeConfiguration<Superpower>
    {
        private Guid[] _ids;

        public SuperpowerContextConfiguration(Guid[] ids)
        {
            _ids = ids;
        }

        public void Configure(EntityTypeBuilder<Superpower> builder)
        {
            builder
                .HasData(
                new Superpower
                {
                    Id = Guid.NewGuid(),
                    SuperPower = "Intellect.",
                    Description = "He's always a step ahead.",
                    SuperheroId = _ids[0]
                },
                new Superpower
                {
                    Id = Guid.NewGuid(),
                    SuperPower = "Fighting",
                    Description = "Sublime fighting skills.",
                    SuperheroId = _ids[0]
                },
                new Superpower
                {
                    Id = Guid.NewGuid(),
                    SuperPower = "Wealth.",
                    Description = "He got a lot of money",
                    SuperheroId = _ids[0]
                },
                new Superpower
                {
                    Id = Guid.NewGuid(),
                    SuperPower = "Deflect blaster power.",
                    Description = "Skywalker is able to deflect fire from a blaster back at the opponent firing. This enables Luke to turn someone else's weapon against them.",
                    SuperheroId = _ids[1]
                },
                new Superpower
                {
                    Id = Guid.NewGuid(),
                    SuperPower = "Espionage",
                    Description = "She's good at spying at people.",
                    SuperheroId = _ids[2]
                },
                new Superpower
                {
                    Id = Guid.NewGuid(),
                    SuperPower = "Infiltration",
                    Description = "She knows how to infiltrate the enemy.",
                    SuperheroId = _ids[2]
                },
                new Superpower
                {
                    Id = Guid.NewGuid(),
                    SuperPower = "Subterfuge",
                    Description = "The knowledge of how to undermine others.",
                    SuperheroId = _ids[2]
                });
        }
    }
}
MovieContextConfiguration.cs
using Microsoft.EntityFrameworkCore;
using Microsoft.EntityFrameworkCore.Metadata.Builders;
using SuperHeroApi.Models;

namespace SuperHeroApi.Data.ContextConfigurations
{
    public class MovieContextConfiguration : IEntityTypeConfiguration<Movie>
    {
        private Guid[] _ids;

        public MovieContextConfiguration(Guid[] ids)
        {
            _ids = ids;
        }

        public void Configure(EntityTypeBuilder<Movie> builder)
        {
            builder
                .HasData(
                new Movie
                {
                    Id = Guid.NewGuid(),
                    Title = "Batman Begins",
                    Description = "Batman Begins is a 2005 superhero film directed by Christopher Nolan and written by Nolan and David S. Goyer. Based on the DC Comics character Batman, it stars Christian Bale as Bruce Wayne / Batman, with Michael Caine, Liam Neeson, Katie Holmes, Gary Oldman,",
                    Instructor = "Christopher Nolan",
                    ReleaseDate = new DateTime(2005, 06, 25),
                    SuperheroId = _ids[0]
                },
                new Movie
                {
                    Id= Guid.NewGuid(),
                    Title = "The Dark Knight",
                    Description = "The Dark Knight is a 2008 superhero film directed, produced, and co-written by Christopher Nolan. Based on the DC Comics character Batman, the film is the second installment of Nolan's The Dark Knight Trilogy and a sequel to 2005's Batman Begins, starring Christian Bale and supported by Michael Caine, Heath Ledger, Gary Oldman, Aaron Eckhart, Maggie Gyllenhaal, and Morgan Freeman.",
                    Instructor = "Christopher Nolan",
                    ReleaseDate = new DateTime(2008, 07, 18),
                    SuperheroId = _ids[0]
                },
                new Movie
                {
                    Id = Guid.NewGuid(),
                    Title = "The Dark Knight Rises",
                    Description = "The Dark Knight Rises is a 2012 superhero film directed by Christopher Nolan, who co-wrote the screenplay with his brother Jonathan Nolan, and the story with David S. Goyer.",
                    Instructor = "Christopher Nolan",
                    ReleaseDate = new DateTime(2012, 07, 20),
                    SuperheroId = _ids[0]
                },
                new Movie
                {
                    Id = Guid.NewGuid(),
                    Title = "Star Wars: Episode IV – A New Hope",
                    Description = "Star Wars (retroactively titled Star Wars: Episode IV – A New Hope) is a 1977 American epic space opera film written and directed by George Lucas, produced by Lucasfilm and distributed by 20th Century Fox.",
                    Instructor = "George Lucas",
                    ReleaseDate = new DateTime(1977, 05, 25),
                    SuperheroId = _ids[1]
                },
                new Movie
                {
                    Id = Guid.NewGuid(),
                    Title = "Star Wars: Episode V – The Empire Strikes Back",
                    Description = "The Empire Strikes Back (also known as Star Wars: Episode V – The Empire Strikes Back) is a 1980 American epic space opera film directed by Irvin Kershner and written by Leigh Brackett and Lawrence Kasdan, based on a story by George Lucas.",
                    Instructor = "Irvin Kershner",
                    ReleaseDate = new DateTime(1980, 05, 21),
                    SuperheroId = _ids[1]
                },
                new Movie
                {
                    Id = Guid.NewGuid(),
                    Title = "Star Wars: Episode VI – Return of the Jedi",
                    Description = "Return of the Jedi (also known as Star Wars: Episode VI – Return of the Jedi) is a 1983 American epic space opera film directed by Richard Marquand. The screenplay is by Lawrence Kasdan and George Lucas from a story by Lucas, who was also the executive producer.",
                    Instructor = "Richard Marquand",
                    ReleaseDate = new DateTime(1983, 05, 25),
                    SuperheroId = _ids[1]
                },
                new Movie
                {
                    Id = Guid.NewGuid(),
                    Title = "Black Widow",
                    Description = "Black Widow is a 2021 American superhero film based on Marvel Comics featuring the character of the same name. Produced by Marvel Studios and distributed by Walt Disney Studios Motion Pictures, it is the 24th film in the Marvel Cinematic Universe (MCU).",
                    Instructor = "Cate Shortland",
                    ReleaseDate = new DateTime(2021, 06, 29),
                    SuperheroId= _ids[2]
                });
        }
    }
}
Okay, let’s add a new class inside Data named ApplicationDbContext.cs with the following code:
using Microsoft.EntityFrameworkCore;
using SuperHeroApi.Data.ContextConfigurations;
using SuperHeroApi.Models;

namespace SuperHeroApi.Data
{
    public class ApplicationDbContext : DbContext
    {
        public ApplicationDbContext(DbContextOptions options) : base(options)
        {

        }

        protected override void OnModelCreating(ModelBuilder builder)
        {
            // Generate three GUIDS and place them in an arrays
            var ids = new Guid[] {Guid.NewGuid(), Guid.NewGuid(), Guid.NewGuid() };

            // Apply configuration for the three contexts in our application
            // This will create the demo data for our GraphQL endpoint.
            builder.ApplyConfiguration(new SuperheroContextConfiguration(ids));
            builder.ApplyConfiguration(new SuperpowerContextConfiguration(ids));
            builder.ApplyConfiguration(new MovieContextConfiguration(ids));
        }

        // Add the DbSets for each of our models we would like at our database
        public DbSet<Superhero> Superheroes { get; set; }
        public DbSet<Superpower> Superpowers { get; set; }
        public DbSet<Movie> Movies { get; set; }
    }
}
That’s it for the data part. Now we got the Application database context configured along with some demo data that will be seeded to the database.
#5 – Add Repositories
Add a new folder at the root of the project and name it Repositories. This will hold the repositories containing the logic to handle data back and forth from our database at runtime. Create three new classes for each of the interfaces we created earlier:
SuperheroRepository.cs
using SuperHeroApi.Data;
using SuperHeroApi.Interfaces;

namespace SuperHeroApi.Repositories
{
    public class SuperheroRepository : ISuperheroRepository
    {
        private readonly ApplicationDbContext _appDbContext;

        public SuperheroRepository(ApplicationDbContext appDbContext)
        {
            _appDbContext = appDbContext;
        }
    }
}
SuperpowerRepository.cs
using SuperHeroApi.Data;
using SuperHeroApi.Interfaces;

namespace SuperHeroApi.Repositories
{
    public class SuperpowerRepository : ISuperpowerRepository
    {
        private readonly ApplicationDbContext _appDbContext;

        public SuperpowerRepository(ApplicationDbContext appDbContext)
        {
            _appDbContext = appDbContext;
        }
    }
}
MovieRepository.cs
using SuperHeroApi.Data;
using SuperHeroApi.Interfaces;

namespace SuperHeroApi.Repositories
{
    public class MovieRepository : IMovieRepository
    {
        private readonly ApplicationDbContext _appDbContext;

        public MovieRepository(ApplicationDbContext appDbContext)
        {
            _appDbContext = appDbContext;
        }
    }
}
That’s it for the repositories in the starter template for this GraphQL tutorial. Now we have to register our services in Program.cs.
#6 – Register Services in Program.cs
Now it’s time to register our services inside Program.cs but first we have to install a new Nuget Package in order for the application to be able to use our SQL Server. Right-click your project and click Manage NuGet Packages... and install this package: Microsoft.EntityFrameworkCore.SqlServer.
Now edit your Program.cs file to look like this:
using Microsoft.EntityFrameworkCore;
using SuperHeroApi.Data;
using SuperHeroApi.Interfaces;
using SuperHeroApi.Repositories;

var builder = WebApplication.CreateBuilder(args);
ConfigurationManager configuration = builder.Configuration;

// Add services to the container.

builder.Services.AddControllers();
// Learn more about configuring Swagger/OpenAPI at https://aka.ms/aspnetcore/swashbuckle
builder.Services.AddEndpointsApiExplorer();
builder.Services.AddSwaggerGen();

// Register custom services for the superheroes
builder.Services.AddScoped<ISuperheroRepository, SuperheroRepository>();
builder.Services.AddScoped<ISuperpowerRepository, SuperpowerRepository>();
builder.Services.AddScoped<IMovieRepository, MovieRepository>();

// Add Application Db Context options
builder.Services.AddDbContext<ApplicationDbContext>(options =>
options.UseSqlServer(configuration.GetConnectionString("SqlServer")));

var app = builder.Build();

// Configure the HTTP request pipeline.
if (app.Environment.IsDevelopment())
{
    app.UseSwagger();
    app.UseSwaggerUI();
}

app.UseHttpsRedirection();

app.UseAuthorization();

app.MapControllers();

app.Run();
#7 – Add a Connection string to appsettings.json
For the application to be able to talk with our local (or external) database, we have to include settings for our database. Go to your appsettings.json file and update to look like mine below:
{
  "Logging": {
    "LogLevel": {
      "Default": "Information",
      "Microsoft.AspNetCore": "Warning"
    }
  },
  "AllowedHosts": "*",
  "ConnectionStrings": {
    "SqlServer": "Server=myServerAddress;Database=SuperheroesApi;Trusted_Connection=True;"
  }
}
#8 – Add migration and update the database using code-first approach
Now we have to create the database and seed the data to our SQL server. I am running a local MS SQL 2019 Developer server. You can use any MS SQL database with the above configuration, you just have to change the configuration for the connection string. To see SQL Server Connection Strings, please check this website below.
Open the Package Manager Console in Visual Studio and run this command: Update-Database. If you don’t see the console as a tab at the bottom of Visual Studio, you can open it by clicking Tools -> NuGet Package Manager -> Package Manager Console.
To run database-related commands, we have to run this command to install the tools: Install-Package Microsoft.EntityFrameworkCore.Tools. Now run the following commands:
Add-Migration InitialUpdate-Database
This will create a new folder named Migrations in our project and then create a new database in our SQL server and seed the data to the SQL database.
#9 – Verify solution and database
Okay, now we got the starter template for our GraphQL tutorial in place and the database with the demo data for our superheroes. If you have done everything right, you should have a solution that looks like this:
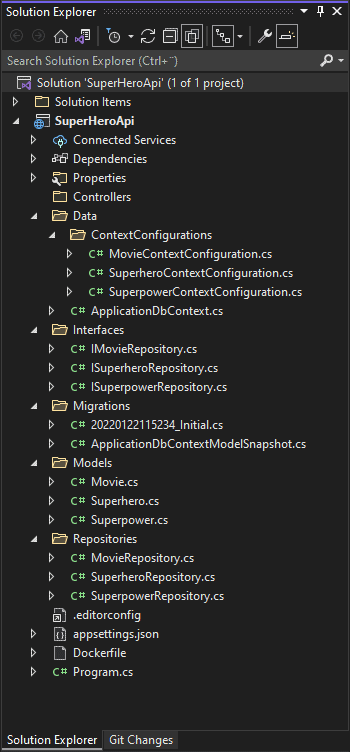
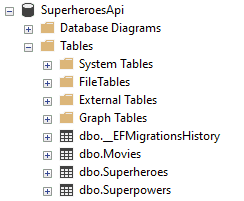
Don’t worry if you don’t have the docker file. It’s not needed to run the application later. Your code-first database should look like this:
Implement GraphQL in ASP.NET Core Web API
The first thing we have to do is install a few packages in order to play around with GraphQL. Below are the commands you need to install the GraphQL packages in your project:
Install required NuGet Packages
HotChocolate.AspNetCore
You can find version tags for HotChocolate.AspNetCore here: https://www.nuget.org/packages/HotChocolate.AspNetCore/. This package contains the GraphQL ASP.NET Core middleware for Hot Chocolate. Moreover, this package includes the Banana Cake Pop middleware, which provides you with our beloved GraphQL IDE middleware.
Install-Package HotChocolate.AspNetCoreHotChocolate.Data.EntityFramework
You can find version tags for HotChocolate.Data.EntityFramework here: https://www.nuget.org/packages/HotChocolate.Data.EntityFramework/. This package contains extensions for seamless integration of Entity Framework Core into HotChocolate.
Install-Package GraphQL.Server.Transports.AspNetCoreWhen you are done installing the packages, you can move on to the next section, where we will take a look at the core of working with GraphQL.
Implement GraphQL using HotChocolate
Okay, now we are going to implement GraphQL inside our application using the packages from HotChocolate. It will be very easy as we are using HotChocolate to do the heavy lifting. Thank you ChilliCream!

Add Query in Data
To use HotChocolate we will be creating a new class named Query.cs inside the Data folder similar to ApplicationDbContext.cs. This class will describe what to expose through GraphQL. I have named it Query as we are going to expose a query for our superheroes.
Below is the code you need for the method to get the superheroes:
using SuperHeroApi.Models;

namespace SuperHeroApi.Data
{
    public class Query
    {
        public IQueryable<Superhero> GetSuperheroes =>
            new List<Superhero>().AsQueryable();
    }
}
So now we got a class that exposes queries for our superheroes. Let’s register that service in Program.cs.
Add Services for GraphQL in Program.cs / Startup class
The first thing we have to do is add the GraphQL server from the HotChocolate package. To do this, you have to add the following line to Program.cs just beneath the already registered services:
// Register custom services for the superheroes
builder.Services.AddScoped<ISuperheroRepository, SuperheroRepository>();
builder.Services.AddScoped<ISuperpowerRepository, SuperpowerRepository>();
builder.Services.AddScoped<IMovieRepository, MovieRepository>();
builder.Services.AddGraphQLServer().AddQueryType<Query>;
After we have added AddGraphQLServer, we are telling it what types we would like to support. Here we wire up the Query class we just created in the Data folder. This will inject GraphQL into the equation.
Right after we have mapped our routes we wanna map our GraphQL route in the request pipeline, just like below:
// Configure the HTTP request pipeline.
if (app.Environment.IsDevelopment())
{
    app.UseSwagger();
    app.UseSwaggerUI();
}

app.UseHttpsRedirection();

app.UseAuthorization();

app.MapControllers();

app.MapGraphQL("/graphql");

app.Run();
Let’s go ahead and run that.
Here you will see BananaCakePop which is a built-in explorer for GraphQL. This allows you to set up projects inside your browser and explore the API.
In the example above I told GraphQL to return the names of all superheroes, but this is not returning anything yet because I told it to return an empty field. So let’s go ahead and wire that into Entity Framework.
Pull in data by default using HotChocolate.Data.EntityFramework
Since we are already using a code-first approach we will be using the Entity Framework Data package to return data at our GraphQL API.
The first thing we are going to do is add support for doing things like doing projections (bring back the fields we want), filtering and sorting. Go ahead and update the AddGraphQLServer service in Program.cs like I have done below:
// Register custom services for the superheroes
builder.Services.AddScoped<ISuperheroRepository, SuperheroRepository>();
builder.Services.AddScoped<ISuperpowerRepository, SuperpowerRepository>();
builder.Services.AddScoped<IMovieRepository, MovieRepository>();
builder.Services.AddGraphQLServer().AddQueryType<Query>().AddProjections().AddFiltering().AddSorting();
Now go to the definition of what the query for our superheroes looks like in Query.cs. Update the class to contain the below code instead of the code we previously added- look at line 6-11:
using SuperHeroApi.Models;

namespace SuperHeroApi.Data
{
    public class Query
    {
        [UseProjection]
        [UseFiltering]
        [UseSorting]
        public IQueryable<Superhero> GetSuperheroes([Service] ApplicationDbContext context) =>
            context.Superheroes;
    }
}
Instead of returning something hardcoded I have updated the method to inject my ApplicationDbContext (Entity Framework Context) as a service. HotChocolate will automatically see this and know how to pass the context in.
Because I wanna make it possible to return only the fields I want and make it possible to filter and sort the returned result, I have added the attributes to the method: [UseProjection], [UseFiltering], [UseSorting].
Let’s go ahead and run that.
The returned superheroes are not sorted in any way, they are just returned as they have been stored in the database during seeding. Let’s fix that – this will be the final thing I will show you in the getting started guide for GraphQL.
Add Sorting to GraphQL query results
To do sorting at different parts of the superhero model, we only have to add the attribute [UseSorting] like below:
using System.ComponentModel.DataAnnotations;

namespace SuperHeroApi.Models
{
    public class Superhero
    {
        [Key]
        public Guid Id { get; set; }

        [Required(ErrorMessage = "Please specify a name for the superhero")]
        public string Name { get; set; }
        public string Description { get; set; }
        public double Height { get; set; }

        [UseSorting]
        public ICollection<Superpower> Superpowers { get; set; }

        [UseSorting]
        public ICollection<Movie> Movies { get; set; }
    }
}
Let’s run it one more time.
GraphQL Query with Sorting ASC / DESC
If you look at your terminal you can actually see the actual SELECT statement that went to the database is only selecting fields we asked for in the GraphQL query. This means that our projection goes all the way through and doesn’t pull everything from the database and actually maps it which is super convenient.
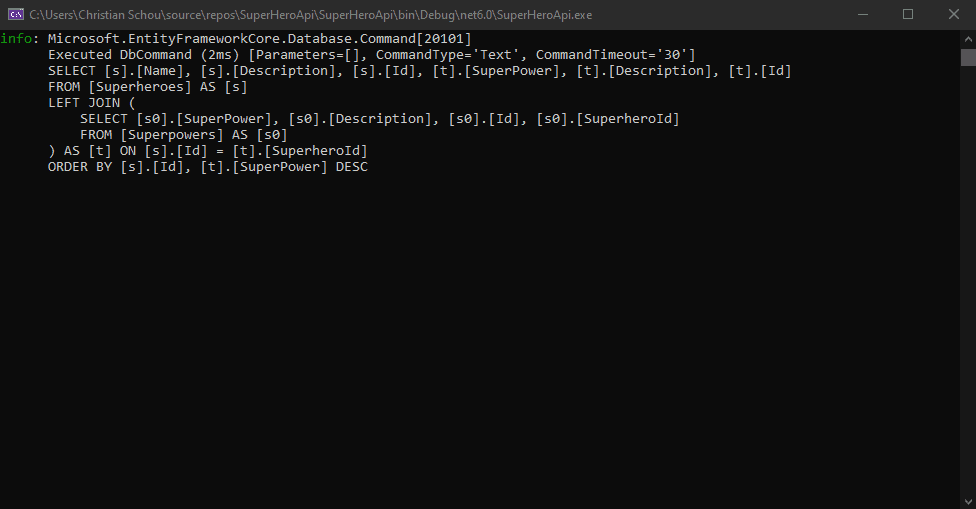
The final query looks like this:
query{
  superheroes{
    name,
    description,
    superpowers(order: {superPower:DESC}){
      superPower,
      description
    }
  }
}
And the response:
{
  "data": {
    "superheroes": [
      {
        "name": "Batman",
        "description": "Batman was originally introduced as a ruthless vigilante who frequently killed or maimed criminals, but evolved into a character with a stringent moral code and strong sense of justice. Unlike most superheroes, Batman does not possess any superpowers, instead relying on his intellect, fighting skills, and wealth.",
        "superpowers": [
          {
            "superPower": "Wealth.",
            "description": "He got a lot of money"
          },
          {
            "superPower": "Intellect.",
            "description": "He's always a step ahead."
          },
          {
            "superPower": "Fighting",
            "description": "Sublime fighting skills."
          }
        ]
      },
      {
        "name": "Black Widow",
        "description": "Black Widow, real name Natasha Romanoff, is a trained female secret agent and superhero that appears in Marvel Comics. Associated with the superhero teams S.H.I.E.L.D. and the Avengers, Black Widow makes up for her lack of superpowers with world class training as an athlete, acrobat, and expert martial artist and weapon specialist.",
        "superpowers": [
          {
            "superPower": "Subterfuge",
            "description": "The knowledge of how to undermine others."
          },
          {
            "superPower": "Infiltration",
            "description": "She knows how to infiltrate the enemy."
          },
          {
            "superPower": "Espionage",
            "description": "She's good at spying at people."
          }
        ]
      },
      {
        "name": "Luke Skywalker",
        "description": "Luke Skywalker was a Tatooine farmboy who rose from humble beginnings to become one of the greatest Jedi the galaxy has ever known. Along with his friends Princess Leia and Han Solo, Luke battled the evil Empire, discovered the truth of his parentage, and ended the tyranny of the Sith.",
        "superpowers": [
          {
            "superPower": "Deflect blaster power.",
            "description": "Skywalker is able to deflect fire from a blaster back at the opponent firing. This enables Luke to turn someone else's weapon against them."
          }
        ]
      }
    ]
  }
}
There we go. Data has been sorted and we can query the data we want using GraphQL.
Summary
GraphQL is a very nice way to expose an API to the public. It makes it easier for the clients to get just the data they need. We now got a full ASP.NET Core Web API with GraphQL using HotChocolate. Now you can extend it to include lots of more features. You can also use this article to integrate GraphQL in your own already existing or new applications. It’s easy and offers a nice and easy way to interact with your application through the API.
I hope you have learned something from this tutorial on how to implement GraphQL in ASP.NET Core Web APIs. If you got any questions, suggestions, or issues, please let me know in the comments. You can find links to the source code below. If you plan to use Swagger or ReDoc for documenting the other endpoints for posting new superheroes etc…, you can check out my other article about how to implement Swagger and ReDoc in an ASP.NET Core Web API. Happy coding!
Resources
Christian-Schou