How to produce documentation from source code with DocFX in .NET Core solutions
Implement DocFX in .NET Core to produce documentation from source code with this easy step-by-step guide + guide on how to add support for Mermaid diagrams.

I recently made a big project in a company that is responsible for handling all shipment data between the internal ERP and the carriers. During this project, I needed to generate documentation for the API I had developed.
During my time as a developer I have been working with several tools to help with the (boring) documentation part and I have finally chosen a tool – DocFX. Why is that Christian? Well, I primarily write code in Microsoft Languages (C#, etc…) and behind the scenes, Microsoft makes use of DocFX to generate its documentation. Due to that it makes really good sense for me to use the same tool as the documentation I often make is similar to the type of documentation often consume.
If you are ready, then let’s get started with DocFX and make some documentation for your .NET Core application.
What is DocFX?
To make it short and move on to the crucial part of this tutorial I will only give a short introduction to what DocFX is. DocFX is a command-line tool that is capable of producing a static website containing documentation for your application. It can use both Markdown files as well as your source code to generate the documentation. DocFX is a highly customizable tool that allows you to even modify the theme using templates and is possible to run in almost any environment. As you might have noticed – the generated website is static and can be deployed for a very low price on several Cloud Providers hosting plans.
Visual Studio Code Extensions make documentation easier
Below is a shortlist that references some of my favorite tools when talking about documentation. They will help you in the development of the markdown that DocFX uses when it’s generating the documentation website.
- YAML by Red Hat – Provides comprehensive YAML Language support to Visual Studio Code, via the YAML-language-server, with built-in Kubernetes syntax support.
- docs-article-templates by Microsoft – The Docs Article Templates extension lets writers in VS Code pull a Markdown template from a centralized store and apply it to a file.
- Markdown All in One by Yu Zhang – All you need for Markdown (keyboard shortcuts, table of contents, auto preview, and more).
- markdownlint by David Anson – markdownlint is a Visual Studio Code extension that includes a library of rules to encourage standards and consistency for Markdown files.
Getting started with DocFX
You got multiple options when it comes to the way you want to use DocFX. If you are going for the command line, then you have to visit the GitHub repo releases for DocFX. At the repo, you will be able to download the latest stable release as well as beta releases. I always go for stable releases unless it’s a test project.
A second option for the command line is to use the Chocolately DocFX Package. You can install the package using the following command: choco install docfx -y. “-y” is for accepting terms when installing, else you will be prompted for that during installation.
The last option and the one I tend to use the most is through NuGet, where you can install DocFX directly from within your console in the IDE. The command to install DocFX using NuGet installer is: nuget install docfx.console. If you are doing it from the NuGet Console, you can use the following command: Install-Package docfx.console.
Integrate DocFX into Visual Studio
If you like me would like to have DocFX integrated directly inside Visual Studio, you can easily accomplish this too. The only thing you have to do is add a new class library to your existing solution and add the docfx.console NuGet package to the newly created library. The first time you build your application after the above has been added, the library will automatically generate the content for the static website.
Creating Documentation with DocFX
In the rest of this tutorial, I will be using the built-in DocFX inside Visual Studio. Now let’s move on to the part where the magic happens – the generation of the static documentation.
Folder structure
To get an understanding of how the content is organized I thought it would be a good idea, to include a description of the default folder structure that will be generated upon the first build of your application. Below the image is a short description of what is inside the folders.
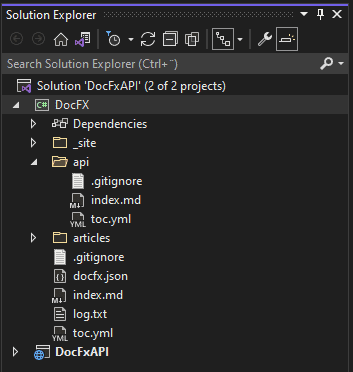
_site
_site contains static assets/files that have been generated by the package and are the content that you should be uploading to your host. In other words – it’s the static website showing off your documentation.
API
Inside the API folder, you will find all your documentation files, generated by the package.
articles
If you decide to manually write documentation in Markdown, you have to place them inside the articles folder.
root folder
- docfx.json – Is used to configure how the package generates the documentation upon build as well as what it is generating the documentation for.
- index.md – The name says it all. This page is the landing page for your documentation website.
- toc.yml – This file is used to populate the navigation header of your documentation website.
How to configure DocFX
The JSON file named docfx.json is the one containing all information that DocFX needs in order to compile the documentation source into a static website that you can populate. Below is a list of properties you can adjust to your needs. This is one part that makes this tool very flexible when it comes to configuration.
Metadata
"metadata": [
    {
      "src": [
        {
          "files": [
            "**.csproj"
          ],
          "src": "C:\\Users\\Christian Schou\\source\\repos\\DocFxAPI\\DocFX"
        }
      ],
      "dest": "api",
      "disableGitFeatures": false,
      "disableDefaultFilter": false
    }
  ]
This property lists the source directory, source files, and API directory.
Build
"build": {
    "content": [
      {
        "files": [
          "api/**.yml",
          "api/index.md"
        ]
      },
      {
        "files": [
          "articles/**.md",
          "articles/**/toc.yml",
          "toc.yml",
          "*.md"
        ]
      }
    ],
    "resource": [
      {
        "files": [
          "images/**"
        ]
      }
    ],
    "overwrite": [
      {
        "files": [
          "apidoc/**.md"
        ],
        "exclude": [
          "obj/**",
          "_site/**"
        ]
      }
    ]
This property instructs DocFX about the type of files we expect to be building. It also includes details about where the resource files will be located, what files are allowed to be overwritten upon build, and if we should exclude something from the documentation.
Template
"template": [
      "default"
    ]
When using the template property, we can extend the documentation website with a template we would like. If you list “default” as the first template, you can allow other templates to inherit. This makes up for a good way to only extend the areas we would like.
Host your documentation locally (on the dev machine)
Now that the site has been built for our project, we can open a terminal or command-line interface and navigate to the folder where our documentation website is hosted.
Let’s launch the website using the following command: docfx docfx.json serve. This command will serve your site locally on the development machine and allow for the developer (you) to review any changes before they would be deployed to the populated documentation website.
This is the site hosted on the just populated port 8080.
How to customize your documentation website
Add another section to your navigation menu bar
Now go back to your class library in Visual Studio and open up toc.yml. This file is the one holding details about the contents of your website. You can see this one as a table of contents file. In order to add a new section, all you have to do is add the following:
- Use the
nameparameter, this will identify the section by a name. - Use the
hrefparameter to specify where the documentation for that specific section is located. - Use the
topicHrefparameter to link to a specific file inside thehref folder.
DocFX Templates
By default, DocFX has some pre-defined templates that you can choose between. You can visit this page to see Templates & Plugins you can use on your website. On each template page, you can see the command you need to add inside your docfx.json file to use the template.
Below is an example of how to use the Material template. Please notice that I have created a folder named templates and placed the material template inside that one.
"template": [
      "default",
      "templates/material"
    ]

Including diagrams in your documentation (Mermaid with DocFX)
A short introduction… Mermaid is a JavaScript tool that allows you to render diagrams and charts dynamically from your written markdown. How cool is that? Often when documenting applications, we can write tons of pages about how the application is structured, how calls are received and returned, how the application stack is made up, etc…
Using Mermaid we can add support for several diagrams that are often used when documenting code. This includes diagrams like:
- Flow Chart
- Sequence Diagram
- Class Diagram
- State Diagram
- Etc…
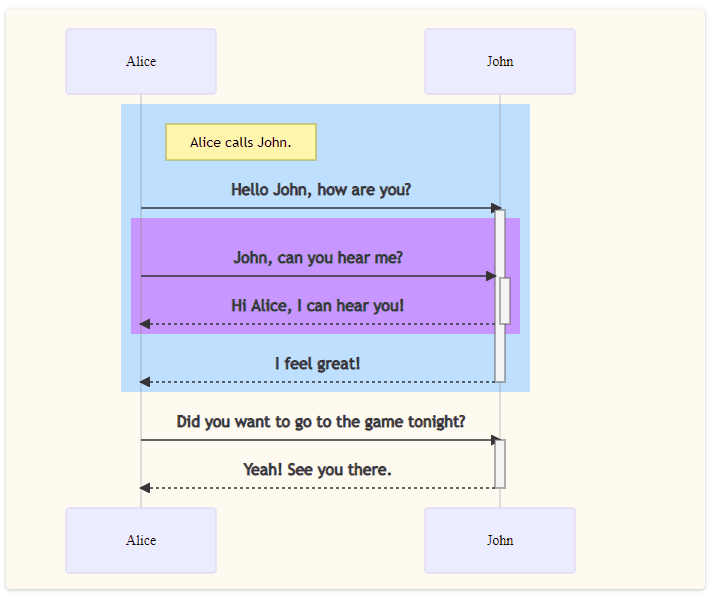
Below is an example of a very simple sequence diagram showing a conversation between Alice and John. If you want some examples of sequence diagram markdown for testing purposes, you can check this repo: mermaid-js blobs.
 mermaid-js
The markdown to generate the image below is the one I have added below:
```mermaid
sequenceDiagram
    participant Alice
    participant John

    rect rgb(191, 223, 255)
    note right of Alice: Alice calls John.
    Alice->>+John: Hello John, how are you?
    rect rgb(200, 150, 255)
    Alice->>+John: John, can you hear me?
    John-->>-Alice: Hi Alice, I can hear you!
    end
    John-->>-Alice: I feel great!
    end
    Alice ->>+ John: Did you want to go to the game tonight?
    John -->>- Alice: Yeah! See you there.
```
Out of the box, Mermaid is unfortunately not supported, but luckily we can easily add it to our solution. To use Mermaid inside your website, we will extend our default template with a partial.
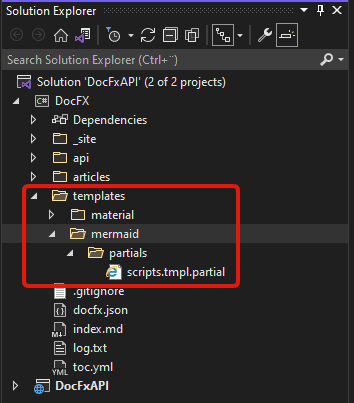
To add a partial file to the default theme, all you have to do is add a folder in the templates named mermaid. Inside that folder you have to add a new subfolder named partials and add a new file named: scripts.tmpl.partial. See the structure below for reference:
Now add the following line of codes to that newly created file scripts.tmpl.partial.
<script type="text/javascript" src="{{_rel}}styles/docfx.vendor.js"></script>
<script src="https://cdnjs.cloudflare.com/ajax/libs/highlight.js/11.0.1/highlight.min.js"></script>
<script src="https://unpkg.com/highlightjs-dotnetconfig@0.9.3/dist/dotnetconfig.min.js"></script>
<script type="text/javascript" src="{{_rel}}styles/docfx.js"></script>
<script type="text/javascript" src="{{_rel}}styles/main.js"></script>
<script type="text/javascript" src="https://unpkg.com/mermaid@8.10.2/dist/mermaid.min.js"
integrity="sha384-nzpOk138h0/O14Ig1PAUlf1XSo5T+XvpBUVkpLaU40QBvMgrNkSKusdNAomDLEd2"
crossorigin="anonymous"></script>
<script>
mermaid.initialize({
startOnLoad: false
});
mermaid.init(undefined, ".lang-mermaid");
</script>
That’s it! Now go to an article page and add a sample sequence diagram and serve your website again. The diagram should now be rendered as an image instead of the text you wrote in the markdown.
Summary
If you are a software developer who is currently using the Microsoft Technology Stack and you would like to make meaningful documentation in a nice and easy way, then DocFX might be the choice for you. I use it a lot and everyone who is reading my documentation always says that it’s awesome to read so well-documented solutions.
It can be integrated into your CI/CD pipeline and can be automatically populated upon new releases. Can it be easier!? In the future, I hope that the guys behind DocFX will be adding support for OpenAPI 3.0 documents, as that would allow us to automatically add documentation generated by Swagger (a nice API tool).
If you got any issues, questions, or suggestions, please let me know in the comments. Happy coding! 🙂