How to use API versioning in ASP.NET Core Web API and integrate it with Swagger using .NET 6

What is API versioning? A question I see a lot. I’m mostly working on the backend and have many times exposed an API to clients they could consume to get data about their order, shipments, invoice, purchase data, etc… I’m sure you might have done the same or are about to? Anyway – when doing that, most developers agree that APIs should not be changed that much once implemented. Then we have to make a new version (here it comes: API versioning) with the new functionality in order not to break things on the other end.
If you have been consuming third-party APIs, I’m sure that you might have experienced that you would have to type something like
https://<domain>/api/v2/...to get the resource you need. By implementing API versioning like in the above URL, we can easily add new versions of the API.
With that said, let’s move on and find out how you easily can implement API versioning in your own .NET Core Web API. The project is built on top of my previous article “How to add localization in ASP.NET Core Web APIs with Caching” – you can ignore the localization part in the project – it will not have any impact on the API functionality.
What are the benefits of using API versioning?
Let’s agree that API versioning is not a thing many developers are thinking of when creating a new project – Am I right? After I first started implementing versions I do it every I create a new project to make everything easier for myself in the future.
Here is an example: let’s say that you would like to offer your customers a way to get a list of their current processing orders. Time passes everything is good, but one day you need to make a breaking change in the API that would cause all clients to stop retrieving data if you update the endpoint they are using – and if there is one thing don’t like, then it’s angry customers – they should be happy all the time. What to do?
The first thing we need to do is to make sure that none of our clients will be affected by this change unless they choose to by themselves. From my perspective, there are three ways to go around this, and I only like one of them:
- We could talk with all our customers and make them change their apps at the same time as we deploy the new solution to our host (Not recommended)
- We could add a new method (new URL) in our API that would serve the new model for the endpoint and ask the customer to update their app accordingly. (Not recommended)
- We could make use of API versioning and just give the customer the option to change the version parameter in the URL when they are ready for it. (Recommended)
Why use API Versioning?
The primary reason we would offer API versioning is that the same method is able to be called in the same way, but with a different version number in the URL. This gives us the option to serve the data to clients that we would like, but our customers are also able to wait and update their applications when they got time for it in their systems. Sounds good? Let’s see how you can achieve just that in your .NET Core Web API.
Implementing API Versioning in .NET Core Web API using .NET 6
For this tutorial I will be using .NET 6, please make sure you have that installed on your computer. You also have to install the following package:
Install-Package Microsoft.AspNetCore.Mvc.VersioningThe first thing you have to do is go to your program.cs file and add the following code to the services section:
builder.Services.AddApiVersioning(opt =>
                                    {
                                        opt.DefaultApiVersion = new Microsoft.AspNetCore.Mvc.ApiVersion(1,0);
                                        opt.AssumeDefaultVersionWhenUnspecified = true;
                                        opt.ReportApiVersions = true;
                                        opt.ApiVersionReader = ApiVersionReader.Combine(new UrlSegmentApiVersionReader(),
                                                                                        new HeaderApiVersionReader("x-api-version"),
                                                                                        new MediaTypeApiVersionReader("x-api-version"));
                                    });
The ReportAPIVersions flag is optional, but it can be useful. The function of that one is that it allows for the API to return versions in the response header. When a client is calling your API they will see a flag with available options for that method.
The first flag named DefaultApiVersion is important. It will set v1 as the default version number if a client forgets to set that themselves.
Second-line AssumeDefaultVersionWhenUnspecified (quite a mouthful 🙂 ) can be handy when migrating an API without API versioning to supporting versioning. If you do not set this, you are gonna break your client’s applications if they do not specify a version in the API call. If your client gets an error saying: “An API version is required, but was not specified.” – then you know why.
ApiVersionReader makes it possible for our clients to choose whether they would like to place the parameter in the URL or in the request header. The reasons are:
- UrlSegmentApiVersionReader – this method allow us to get the version number from the URL, ex:
https://domain.com/api/v1/metod - HeaderApiVersionReader – makes it possible to get the version number from a header parameter, ex:
x-api-version:1.0 - MediaTypeApiVersionReader – gives us the option to get the parameter from the header again, but this time it’s placed within the Content-Type or Accept flags, ex:
Accept/Content-Type: application/json; x-api-version=1.0
Update controllers to accept API versioning
Now that our configuration is in place, we need to update our controllers to accept the API versions we would like to offer our clients. It’s possible to set a whole controller to be within one version or do it on one specific action in the controller.
Below is a configuration on the controller that allows us to make the controller work in both versions 1.0 and 2.0. Underneath the [ApiController] attribute you find the Route for the controller accepting versions.
[ApiController]
[Route("api/v{version:apiVersion}/[controller]")]
[ApiVersion("1.0")]
[ApiVersion("2.0")]
public class WeatherForecastController : ControllerBase
If you would like to map each action to a specific version, you can use the attribute [MapToApiVersion] to control it.
using Microsoft.AspNetCore.Mvc;

namespace LocalizationAPI.Controllers.v1
{
    [ApiController]
    [Route("api/v{version:apiVersion}/[controller]")]
    [ApiVersion("1.0")]
    public class WeatherForecastController : ControllerBase
    {
        [MapToApiVersion("1.0")]
        [HttpGet]
        public string Get() => ".Net Core Web API Version 1";
    }
}

using Microsoft.AspNetCore.Mvc;

namespace LocalizationAPI.Controllers.v2
{
    [ApiController]
    [Route("api/v{version:apiVersion}/[controller]")]
    [ApiVersion("2.0")]
    public class WeatherForecastController : ControllerBase
    {
        [MapToApiVersion("2.0")]
        [HttpGet]
        public string Get() => ".Net Core Web API Version 2";
    }
}
It is possible to create a new version of the action and not the entire controller as you have seen above. A word of warning (from my own learning and experience). At some point in the future, you will get a mismatch of the controller, actions, versions, etc… When you get a big solution with lots of those, it will get hard to manage. Instead, I would always go for a more structured way.
The best practice is to place actions in different controllers in sub-folders named v1, v2, etc… inside the Controllers folder. This will give you a more clean solution that will be easier for you and other developers to maintain in the future.
Below is a screenshot of how I would place the controllers:

Okay, this gives us two endpoints we can access
API V1.0
curl -X 'GET' \
'https://localhost:7013/api/v1/WeatherForecast' \
-H 'accept: text/plain; x-api-version=1.0'
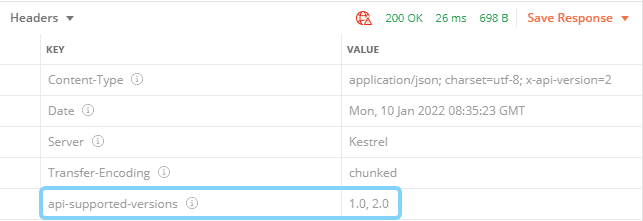
Response Headers
api-supported-versions: 1.0,2.0
content-type: text/plain; charset=utf-8; x-api-version=1
date: Mon,10 Jan 2022 20:35:22 GMT
server: Kestrel
Response body
.Net Core Web API Version 1API v2.0
curl -X 'GET' \
  'https://localhost:7013/api/v2/WeatherForecast' \
  -H 'accept: text/plain; x-api-version=2.0'

Response Headers
 api-supported-versions: 1.0,2.0
 content-type: text/plain; charset=utf-8; x-api-version=2
 date: Mon,10 Jan 2022 20:35:10 GMT
 server: Kestrel

Response body
 .Net Core Web API Version 2
Integrate .NET Core API Versioning with Swagger
I’m a big fan of Swagger and I often expose Swagger documentation for my APIs to clients in order to show the API solution I have made and to give them an easier way to test and implement it into their own applications.
If you created a solution based on the .NET Core Web API template you would already have the Swashbuckle.AspNetCore NuGet. If you started out from a blank solution you can get this package by running this command in your package manager console: Install-Package Swashbuckle.AspNetCore and then add the required services and middleware to your program.cs file.
Your program.cs file should look like the following:
var builder = WebApplication.CreateBuilder(args);

// Add services to the container.

builder.Services.AddControllers();

builder.Services.AddEndpointsApiExplorer();
builder.Services.AddSwaggerGen();

builder.Services.AddApiVersioning(opt =>
                                    {
                                        opt.DefaultApiVersion = new ApiVersion(1, 0);
                                        opt.AssumeDefaultVersionWhenUnspecified = true;
                                        opt.ReportApiVersions = true;
                                        opt.ApiVersionReader = ApiVersionReader.Combine(new UrlSegmentApiVersionReader(),
                                                                                        new HeaderApiVersionReader("x-api-version"),
                                                                                        new MediaTypeApiVersionReader("x-api-version"));
                                    });

var app = builder.Build();

// Configure the HTTP request pipeline.
if (app.Environment.IsDevelopment())
{
    app.UseSwagger();
    app.UseSwaggerUI();
}

app.UseRequestLocalization(options);
app.UseStaticFiles();
app.UseMiddleware<LocalizerMiddleware>();

app.UseHttpsRedirection();

app.UseAuthorization();

app.MapControllers();

app.Run();
When launching the application right now, we would get an error telling us that we have an unhandled exception while executing the request.
Fetch the version of our APIs with ApiExplorer
The first thing we do is implement logic to get information about the version for each of our endpoints. To achieve this we have to add the NuGet package: Microsoft.AspNetCore.Mvc.Versioning.ApiExplorer. This package is responsible for providing metadata for the APIs (of course based on how we decorate them with attributes). In this guide, I will return the Version information for each of our actions. You can install it with this command:
Package Manager CLI
Install-Package Microsoft.AspNetCore.Mvc.Versioning.ApiExplorerdotnet
dotnet add package Microsoft.AspNetCore.Mvc.Versioning.ApiExplorerNext, off we have to add logic to program.cs to get the ApiExplorer to work (See lines 17 to 22):
var builder = WebApplication.CreateBuilder(args);

// Add services to the container.
builder.Services.AddControllers();
builder.Services.AddEndpointsApiExplorer();
builder.Services.AddSwaggerGen();

builder.Services.AddApiVersioning(opt =>
                                    {
                                        opt.DefaultApiVersion = new ApiVersion(1, 0);
                                        opt.AssumeDefaultVersionWhenUnspecified = true;
                                        opt.ReportApiVersions = true;
                                        opt.ApiVersionReader = ApiVersionReader.Combine(new UrlSegmentApiVersionReader(),
                                                                                        new HeaderApiVersionReader("x-api-version"),
                                                                                        new MediaTypeApiVersionReader("x-api-version"));
                                    });
// Add ApiExplorer to discover versions
builder.Services.AddVersionedApiExplorer(setup =>
{
    setup.GroupNameFormat = "'v'VVV";
    setup.SubstituteApiVersionInUrl = true;
});

builder.Services.AddEndpointsApiExplorer();
builder.Services.AddSwaggerGen();

var app = builder.Build();
Then we inject the ApiExplorer into the configuration part of program.cs. This is the part that allows us to use the collected metadata in our SwaggerUI middleware. Awesome!
Show V1 first in Swagger
var apiVersionDescriptionProvider = app.Services.GetRequiredService<IApiVersionDescriptionProvider>();

// Configure the HTTP request pipeline.
if (app.Environment.IsDevelopment())
{
    app.UseSwagger();
    app.UseSwaggerUI(options =>
    {
        foreach (var description in apiVersionDescriptionProvider.ApiVersionDescriptions)
        {
            options.SwaggerEndpoint($"/swagger/{description.GroupName}/swagger.json",
                description.GroupName.ToUpperInvariant());
        }
    });
}

app.UseStaticFiles();

app.UseHttpsRedirection();

app.UseAuthorization();

app.MapControllers();

app.Run();
Show V2 first in Swagger
var apiVersionDescriptionProvider = app.Services.GetRequiredService<IApiVersionDescriptionProvider>();

// Configure the HTTP request pipeline.
if (app.Environment.IsDevelopment())
{
    app.UseSwagger();
    app.UseSwaggerUI(options =>
    {
        foreach (var description in apiVersionDescriptionProvider.ApiVersionDescriptions.Reverse())
        {
            options.SwaggerEndpoint($"/swagger/{description.GroupName}/swagger.json",
                description.GroupName.ToUpperInvariant());
        }
    });
}

app.UseStaticFiles();

app.UseHttpsRedirection();

app.UseAuthorization();

app.MapControllers();

app.Run();
By using the Reverse() method on our IApiVersionDescriptionProvider, we can control what version is shown first in the Swagger documentation for our API. I like to addReverse() as it will show the most recent version of the API to the client and not confuse them with old deprecated versions of the API.
If we launch it now, Swagger would not pick up all versions of our API… How can that be?! Well, we need to configure some options for Swagger. The best way to do that is by extending IConfigurationNamedOptions<SwaggerGenOptions> with a few methods. Let's do just that.
Configure SwaggerOptions to register all API versions
Right now Swagger is only generating documentation for one of our versions – v1. If we only had a single version of our API we could easily create the documentation inside the
SwaggerGen()service. Well… I don't like to hardcode things (only if I really have to). To get around that we have to create a new class named ConfigureSwaggerOptions in the root of our project.
The code you are gonna need inside that class looks like the following:
public class ConfigureSwaggerOptions
    : IConfigureNamedOptions<SwaggerGenOptions>
{
    private readonly IApiVersionDescriptionProvider _provider;

    public ConfigureSwaggerOptions(
        IApiVersionDescriptionProvider provider)
    {
        _provider = provider;
    }

    /// <summary>
    /// Configure each API discovered for Swagger Documentation
    /// </summary>
    /// <param name="options"></param>
    public void Configure(SwaggerGenOptions options)
    {
        // add swagger document for every API version discovered
        foreach (var description in _provider.ApiVersionDescriptions)
        {
            options.SwaggerDoc(
                description.GroupName,
                CreateVersionInfo(description));
        }
    }

    /// <summary>
    /// Configure Swagger Options. Inherited from the Interface
    /// </summary>
    /// <param name="name"></param>
    /// <param name="options"></param>
    public void Configure(string name, SwaggerGenOptions options)
    {
        Configure(options);
    }

    /// <summary>
    /// Create information about the version of the API
    /// </summary>
    /// <param name="description"></param>
    /// <returns>Information about the API</returns>
    private OpenApiInfo CreateVersionInfo(
            ApiVersionDescription desc)
    {
        var info = new OpenApiInfo()
        {
            Title = ".NET Core (.NET 6) Web API",
            Version = desc.ApiVersion.ToString()
        };

        if (desc.IsDeprecated)
        {
            info.Description += " This API version has been deprecated. Please use one of the new APIs available from the explorer.";
        }

        return info;
    }
}
Then we only have to Configure our newly created Swagger Options Configuration class in program.cs. Line 20,21, and 23
// Add services to the container.
builder.Services.AddControllers();

builder.Services.AddApiVersioning(opt =>
                                    {
                                        opt.DefaultApiVersion = new ApiVersion(1, 0);
                                        opt.AssumeDefaultVersionWhenUnspecified = true;
                                        opt.ReportApiVersions = true;
                                        opt.ApiVersionReader = ApiVersionReader.Combine(new UrlSegmentApiVersionReader(),
                                                                                        new HeaderApiVersionReader("x-api-version"),
                                                                                        new MediaTypeApiVersionReader("x-api-version"));
                                    });

builder.Services.AddVersionedApiExplorer(setup =>
{
    setup.GroupNameFormat = "'v'VVV";
    setup.SubstituteApiVersionInUrl = true;
});

builder.Services.AddEndpointsApiExplorer();
builder.Services.AddSwaggerGen();

builder.Services.ConfigureOptions<ConfigureSwaggerOptions>();

var app = builder.Build();
Test Swagger with API Versioning v1 and v2
Now for the fun part – fire up your Web API and check if it works. You should now have a Swagger interface where you are able to select from two versions like I have done in the video below:
Summary
Out-of-the-box Swagger API Documentation is ready to use when creating a project using a template. The problem comes in when we start to create multiple versions of our routes – I can easily mess things up, even for the most organized. By using ApiExplorer we can achieve a nice and quite easy way to create api versioning for our API.
Instead of relying on the default SwaggerGen() method we configured some new Swagger Configuration Options by giving it a NamedOptions implementation to instruct the API on how to handle versions at runtime. In this short tutorial you learned about:
- Swagger Integration.
- API Versioning.
- How to integrate API versioning in Swagger Documentation.
If you got any issues, questions, or suggestions, please let me know in the comments below. Happy coding!