How to use Azure Blob Storage in an ASP.NET Core Web API to list, upload, download, and delete files
Learn how to make a simple ASP.NET Core Web API to make CRUD operations against an Azure Storage Container for interacting with Azure Blobs.

In this article, I will show you how to use Azure Blob Storage with ASP.NET Core. Often when working with web applications, APIs, or basically any other application, we are interacting with files in one way or another.
This article is made because I got a task the other day, where I had to share files between two organizations using Azure. The solution I ended up making contained a database and container with the file service API hosted at Azure and then two web services at each organization consuming the API for new files. Since I often read about others who would like to get started with Azure and work with applications in the cloud, I thought it would be a good idea to share my findings and knowledge about this little project.
Prerequisites
- Azure Subscription
- Storage Account
- .NET 6 (LTS)
- Visual Studio 2022
Configure Azure
The first thing we have to do is to create a Storage Account in our Azure Portal. This is used to provide the managed service from Microsoft delivering the cloud storage. Azure cloud storage includes Azure Blobs (objects) that we will use in this article. You can also pick other services like Azure Data Lake, Files, Azure Queues, and Azure Tables. I won’t get in touch with those in this article.
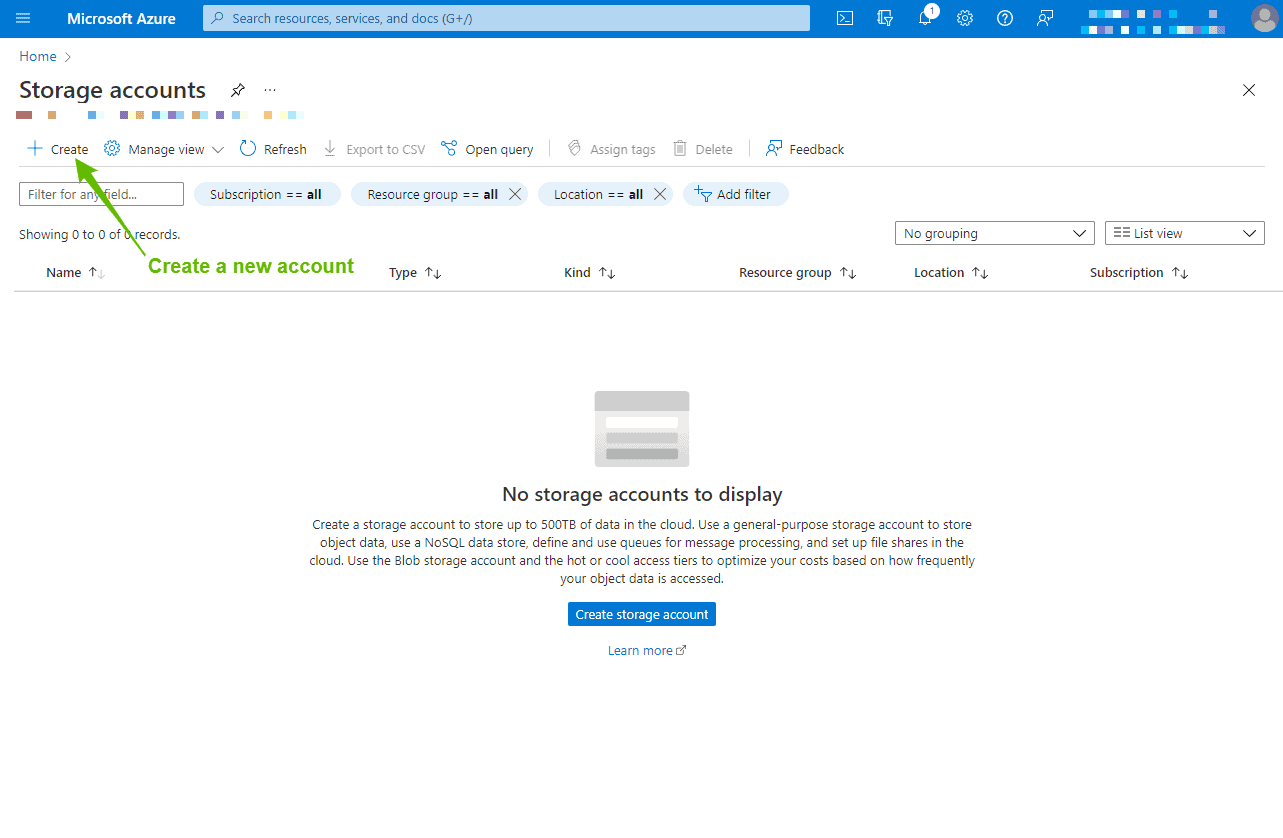
Create a new Azure Storage Account
Open up the Azure Portal and search for Storage Accounts and open that page. You will now be able to create a new storage account, by using the “Create” button as seen in the image below:
You will then be presented to a page, where you can select your subscription and the resource group you would like this storage account to appear in.
Below that, you have to fill in some instance details like:
- Storage Account Name.
- Select Region (I’m from Denmark, so I have chosen West Europe).
- Select Performance (You will be fine with Standard).
- Choose Redundancy (I have switched mine to LRS – Locally Redundant Storage for this example).
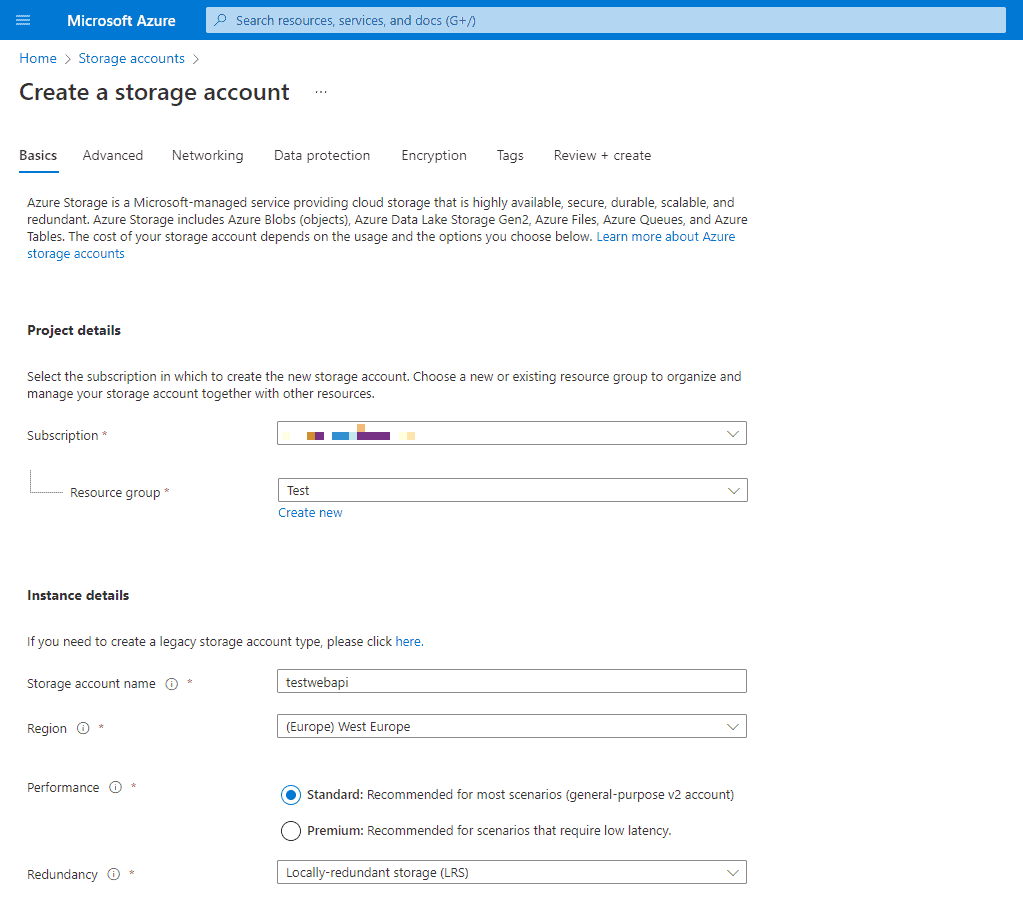
If you want to you can go through all the menus and configure every little detail. I will just continue by clicking Review + Create at the bottom of the page.
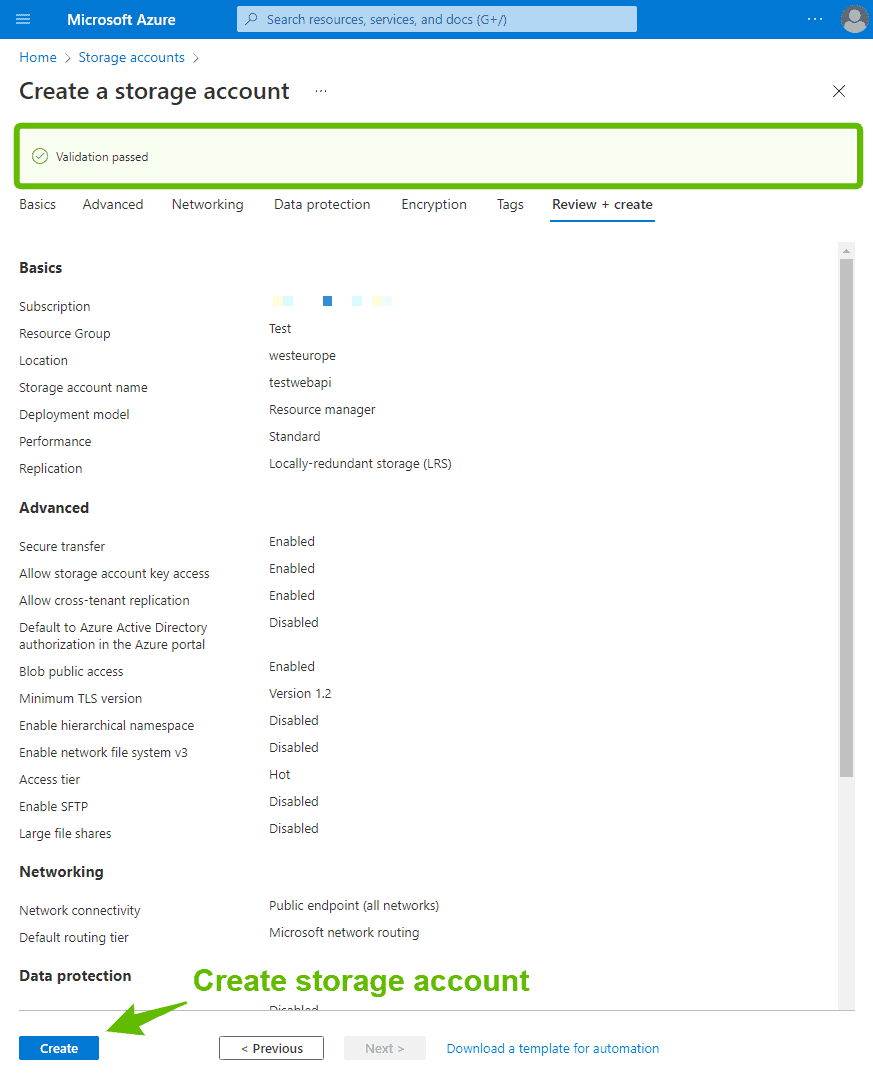
When you click the Review + Create button, you will be taken to the Review page (the storage account has not been created yet). Here you can go through all the details for your new storage account. If you take a look at the top of the page, you will see that the validation has passed. If you are happy with the settings, then click the Create button at the bottom of the page.
On the overview page of your storage accounts, you now got the option to open up that storage account by clicking it, and configuring it.
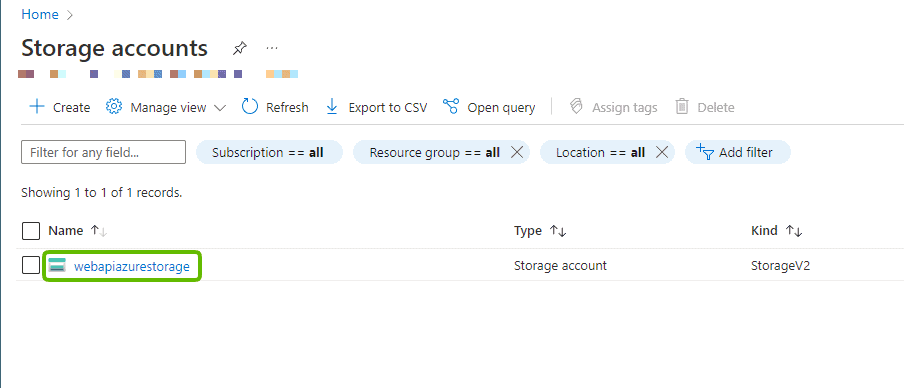
I changed the name of my storage account to “webapiazurestorage” instead of “testwebapi“.
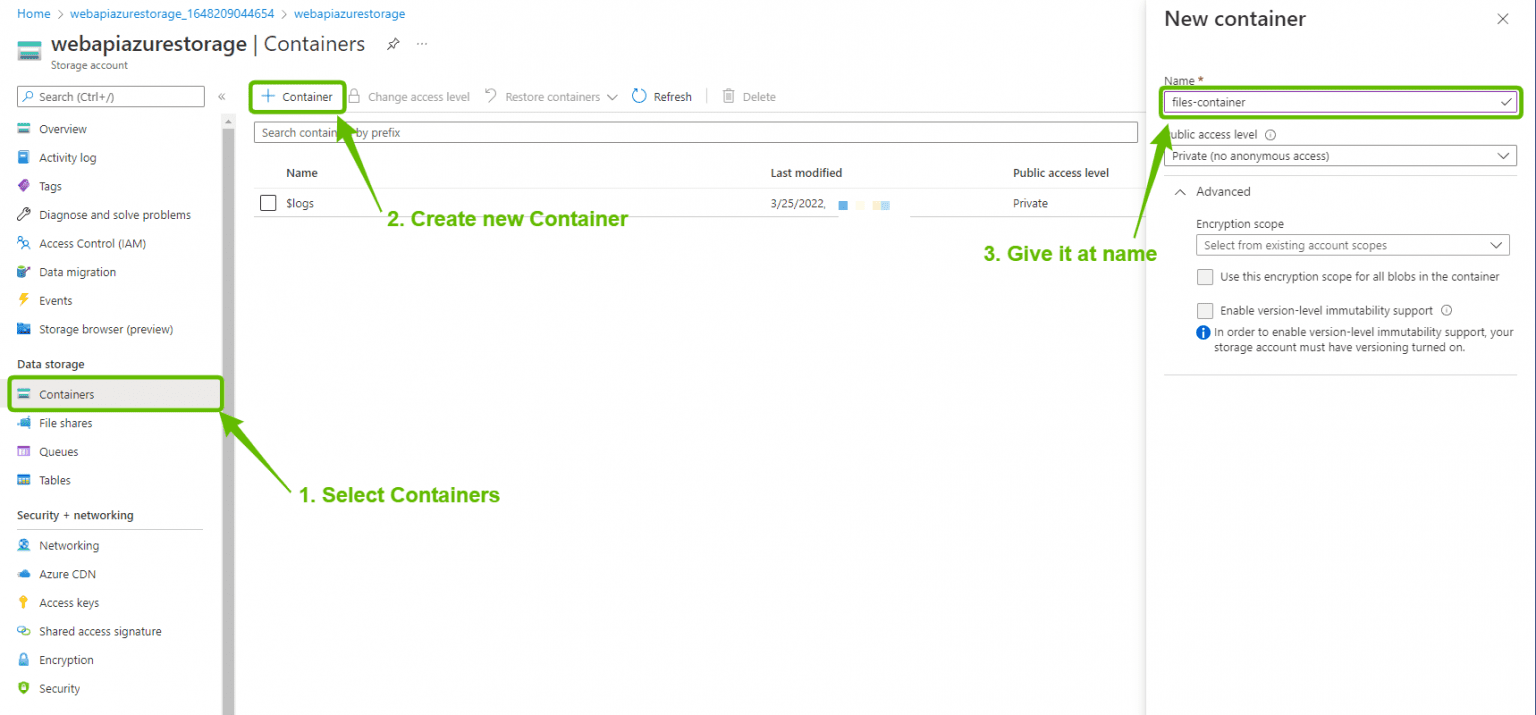
Create a Blob Container at the Storage Account
Click on the Storage Account and select Container in the menu on your left side.
For us to store a file/document, we need a blob container inside that same storage account. This means that we have to create a new blob container. Check the image below to get an overview of how to do it.
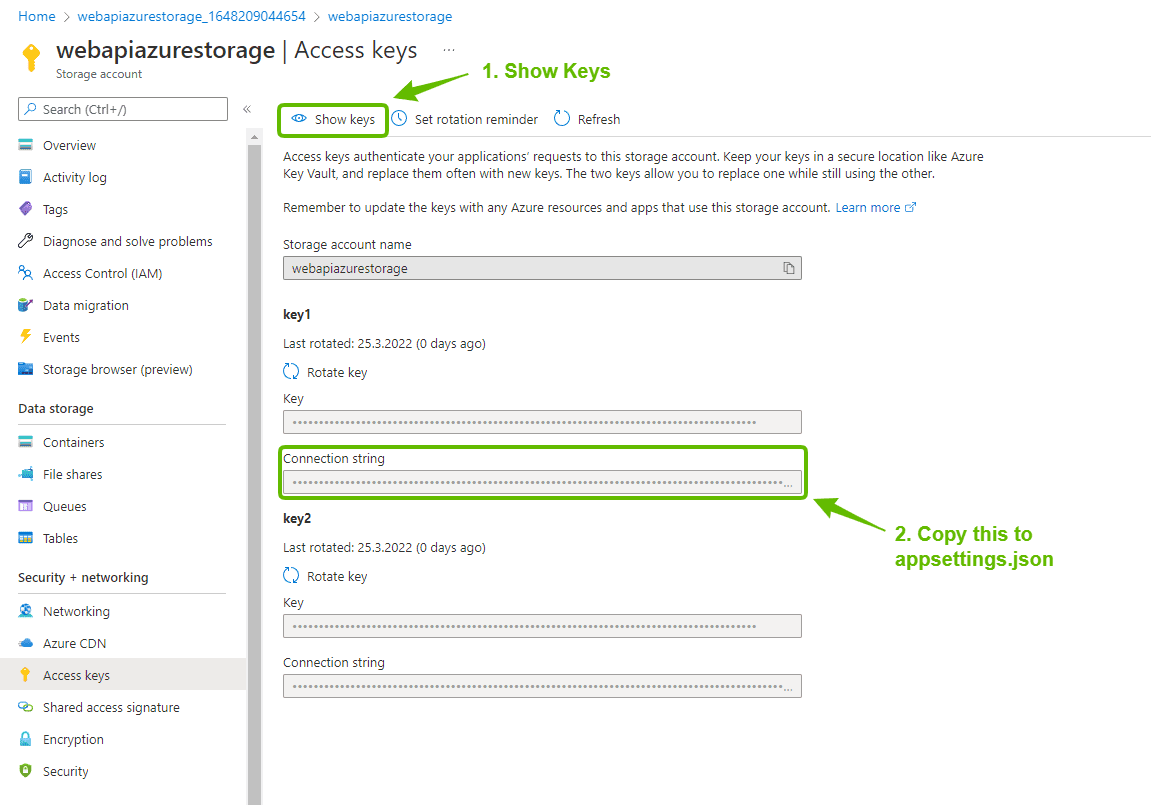
Get Access Keys for Azure Storage Account (Connection String)
To gain access to our Azure Storage account and thereby our newly created Blob Container, we need a connection string. This is placed under Access Keys. You can find that in the menu on your left as well. Click the button “Show Keys” to reveal your connection string. We have to place this key inside our Web API project, leave the page here for now and go back to copy the connection string in a moment.
That’s it for Azure. We are now ready to move on to the implementation of logic inside our Web API to make CRUD operations on our Azure Blob Storage using ASP.NET Core Web API.
Quick Introduction to Azure Blob Storage
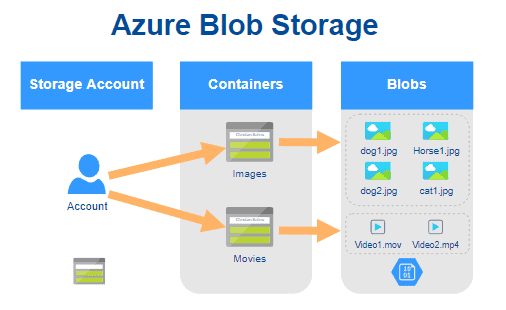
To give you a brief understanding of how Azure Blob Storage works, I have decided to include this section. Blob storage offers three different types of resources:
- Your Storage Account.
- the container(s) inside the storage account.
- A blob (file/document/video/etc…) inside the container.
The diagram above shows the relationship between these resources. Inside our API, we could actually check against file type and place the file inside the correct container, if we were to organize the files uploaded to the API.
What is Azure Blob Storage?
Azure Blob Storage is Microsoft's object storage solution for the cloud. Blob storage is optimized for storing massive amounts of unstructured data. Unstructured data is data that doesn't adhere to a particular data model or definition, such as text or binary data.
What is Azure Data Lake Storage Gen2?
Blob storage supports Azure Data Lake Storage Gen2, Microsoft's enterprise big data analytics solution for the cloud. Azure Data Lake Storage Gen2 offers a hierarchical file system as well as the advantages of Blob storage, including: - Low-cost, tiered storage - High availability - Strong consistency - Disaster recovery capabilities You can read more about that here: Introduction to Data Late Gen2.
What is a Storage Account?
A storage account provides a unique namespace in Azure for your data. Every object that you store in Azure Storage has an address that includes your unique account name. The combination of the account name and the Blob Storage endpoint forms the base address for the objects in your storage account.
What is a Storage Container?
A container organizes a set of blobs, similar to a directory in a file system. A storage account can include an unlimited number of containers, and a container can store an unlimited number of blobs.
What is a Blob in Azure?
Azure Storage supports three types of blobs: - Block blobs store text and binary data. Block blobs are made up of blocks of data that can be managed individually. Block blobs can store up to about 190.7 TiB. - Append blobs are made up of blocks like block blobs but are optimized for append operations. Append blobs are ideal for scenarios such as logging data from virtual machines. - Page blobs store random access files up to 8 TiB in size. Page blobs store virtual hard drive (VHD) files and serve as disks for Azure virtual machines.
Create a new ASP.NET Web API to handle files in Azure
Open up Visual Studio and create a new project using the template ASP.NET Core Web API and choose .NET 6 (Long-term Support) as a framework. I have not placed my solution and project in the same folder. Optionally you can enable Docker Support if you are thinking of containerizing the solution.
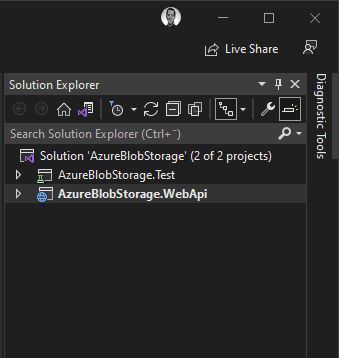
My solution structure is as follows. I have one solution with two projects inside:
- AzureBlobStorage
- AzureBlobStorage.WebApi (this is built on the ASP.NET Core Web API template)
- AzureBlobStorage.Test (this is built on the template NUnit Test Project)
Install required NuGet Packages
Azure.Storage.Blobs
To gain easy access to Azure Blob Storage, we have to install a package named Azure.Storage.Blobs. It is a package that provides access to the Azure Blob Storage (object storage) solution for the cloud.
# Package Manager
Install-Package Azure.Storage.Blobs

# .NET CLI
dotnet add package Azure.Storage.Blobs

# Package Reference
<PackageReference Include="Azure.Storage.Blobs" Version="<VERSION-TAG-HERE>" />
Microsoft.VisualStudio.Azure.Containers.Tools.Targets
This package contains target files to enable your application to communicate with containers through tools.
# Package Manager
Install-Package Microsoft.VisualStudio.Azure.Containers.Tools.Targets

# .NET CLI
dotnet add package Microsoft.VisualStudio.Azure.Containers.Tools.Targets

# Package Reference
<PackageReference Include="Microsoft.VisualStudio.Azure.Containers.Tools.Targets" Version="<VERSION-TAG-HERE>" />
Add configuration details in appsettings.json
Open appsettings.json and add the following lines below “AllowedHosts”:
{
  "Logging": {
    "LogLevel": {
      "Default": "Information",
      "Microsoft.AspNetCore": "Warning"
    }
  },
  "AllowedHosts": "*",
  "BlobConnectionString": "*Your Connection string from Azure*",
  "BlobContainerName": "*Your container name in Azure*"
}
With the connection string and container name in place, let’s create a repository to handle the operations we are going to perform against our Azure Storage Account.
Create models for working with Azure Blob Storage
When uploading a file to Azure Blob Storage, we have to supply a name (string) and a file (string). The files we will be uploading, downloading, and deleting from Azure in this project are of the form IFormFile.
Create a new folder named Models and a new public class named BlobDto and another one named BlobResponseDto.
Place below code inside BlobDto.cs.
namespace AzureBlobStorage.WebApi.Models
{
    public class BlobDto
    {
        public string? Uri { get; set; }
        public string? Name { get; set; }
        public string? ContentType { get; set; }
        public Stream? Content { get; set; }
    }
}
This is for BlobResponseDto.cs
namespace AzureBlobStorage.WebApi.Models
{
    public class BlobResponseDto
    {
        public string? Status { get; set; }
        public bool Error { get; set; }
        public BlobDto Blob { get; set; }

        public BlobResponseDto()
        {
            Blob = new BlobDto();
        }
    }
}
Create Repository for Azure Blob Storage
To make it all a bit more clear and easy to maintain in the future or to implement for you in another solution/project, let’s put it all inside a repository and wire that up in or controller using an interface.
Create a new folder named Services, this will contain our interface for the repository implementation. Create a new public interface and name it IAzureStorage. Place below code inside the interface:
using AzureBlobStorage.WebApi.Models;

namespace AzureBlobStorage.WebApi.Services
{
    public interface IAzureStorage
    {
        /// <summary>
        /// This method uploads a file submitted with the request
        /// </summary>
        /// <param name="file">File for upload</param>
        /// <returns>Blob with status</returns>
        Task<BlobResponseDto> UploadAsync(IFormFile file);

        /// <summary>
        /// This method downloads a file with the specified filename
        /// </summary>
        /// <param name="blobFilename">Filename</param>
        /// <returns>Blob</returns>
        Task<BlobDto> DownloadAsync(string blobFilename);

        /// <summary>
        /// This method deleted a file with the specified filename
        /// </summary>
        /// <param name="blobFilename">Filename</param>
        /// <returns>Blob with status</returns>
        Task<BlobResponseDto> DeleteAsync(string blobFilename);

        /// <summary>
        /// This method returns a list of all files located in the container
        /// </summary>
        /// <returns>Blobs in a list</returns>
        Task<List<BlobDto>> ListAsync();
    }
}
As you can see we now got 4 different async methods making up a CRUD (Create, Read, Update, Delete) interface for files located at Azure. Next, we have to add a new folder named Repository and create a new file inside that folder named AzureStorage.cs.
Let’s break the AzureStorage.cs file up in chunks and take a look at what happens. Let’s start off by adding the constructor with DI (dependency injection).
using AzureBlobStorage.WebApi.Services;

namespace AzureBlobStorage.WebApi.Repository
{
    public class AzureStorage : IAzureStorage
    {
        #region Dependency Injection / Constructor

        private readonly string _storageConnectionString;
        private readonly string _storageContainerName;
        private readonly ILogger<AzureStorage> _logger;

        public AzureStorage(IConfiguration configuration, ILogger<AzureStorage> logger)
        {
            _storageConnectionString = configuration.GetValue<string>("BlobConnectionString");
            _storageContainerName = configuration.GetValue<string>("BlobContainerName");
            _logger = logger;
        }

        #endregion

        }
    }
}
I have added this as a region, to make it easier to read the class and hide/unhide certain things in the class.
- We start by inheriting our Interface and then declaring two readonly string to house our connection string and the container name from our
appsettings.jsonfile. During runtime, these variables will be updated by the constructor. - Then we declare an ILogger<AzureStorage> variable. This will be used to create logs to our console at runtime, showing errors etc…
- Finally we got the constructor where we tell it to take the values from our appsettings.json (configuration) and update the two variables so that we avoid getting a “Object reference is not set to an instance of an object” error at runtime.
Let’s implement the interface.
ListAsync()
At the controller, we would like to present a list to the user with all files we have stored inside our container in Azure. Create the implementation for the interface and add the following logic:
public async Task<List<BlobDto>> ListAsync()
{
    // Get a reference to a container named in appsettings.json
    BlobContainerClient container = new BlobContainerClient(_storageConnectionString, _storageContainerName);

    // Create a new list object for
    List<BlobDto> files = new List<BlobDto>();

    await foreach (BlobItem file in container.GetBlobsAsync())
    {
        // Add each file retrieved from the storage container to the files list by creating a BlobDto object
        string uri = container.Uri.ToString();
        var name = file.Name;
        var fullUri = $"{uri}/{name}";

        files.Add(new BlobDto {
            Uri = fullUri,
            Name = name,
            ContentType = file.Properties.ContentType
        });
    }

    // Return all files to the requesting method
    return files;
}
In the code above we:
- Start off by creating a new BlobContainerClient using the connection string and container name. This allows us to manipulate Azure Storage Containers and their blobs.
- At line 7 we create a new list uwing our BlobDto and name it files. The files are the object we would like to end up returning to the requesting method.
- In the foreach loop, we get the blobs inside the container and adds the to the list we created at line 7.
- Finally we return the files.
We do not make any logging here, we will just return an empty list if no files have been added prior to the request. You could (if you want to) make a log showing how many files were found in the container.
UploadAsync()
If we don’t upload any files, the rest of the functionality will not make any sense. Let’s take a look at how we can upload files asynchronously to Azure Storage.
public async Task<BlobResponseDto> UploadAsync(IFormFile blob)
{
    // Create new upload response object that we can return to the requesting method
    BlobResponseDto response = new();

    // Get a reference to a container named in appsettings.json and then create it
    BlobContainerClient container = new BlobContainerClient(_storageConnectionString, _storageContainerName);
    //await container.CreateAsync();
    try
    {
        // Get a reference to the blob just uploaded from the API in a container from configuration settings
        BlobClient client = container.GetBlobClient(blob.FileName);

        // Open a stream for the file we want to upload
        await using (Stream? data = blob.OpenReadStream())
        {
            // Upload the file async
            await client.UploadAsync(data);
        }

        // Everything is OK and file got uploaded
        response.Status = $"File {blob.FileName} Uploaded Successfully";
        response.Error = false;
        response.Blob.Uri = client.Uri.AbsoluteUri;
        response.Blob.Name = client.Name;

    }
    // If the file already exists, we catch the exception and do not upload it
    catch (RequestFailedException ex)
       when (ex.ErrorCode == BlobErrorCode.BlobAlreadyExists)
    {
        _logger.LogError($"File with name {blob.FileName} already exists in container. Set another name to store the file in the container: '{_storageContainerName}.'");
        response.Status = $"File with name {blob.FileName} already exists. Please use another name to store your file.";
        response.Error = true;
        return response;
    }
    // If we get an unexpected error, we catch it here and return the error message
    catch (RequestFailedException ex)
    {
        // Log error to console and create a new response we can return to the requesting method
        _logger.LogError($"Unhandled Exception. ID: {ex.StackTrace} - Message: {ex.Message}");
        response.Status = $"Unexpected error: {ex.StackTrace}. Check log with StackTrace ID.";
        response.Error = true;
        return response;
    }

    // Return the BlobUploadResponse object
    return response;
}
This method returns a BlobResponseDto with different error messages, depending on the return message from Azure. Each error message has also been configured with a log. The last exception handler will not expose the message to the client, only the stack trace. This has been done to avoid exposing sensitive data. What happens when no errors are present:
- First we create the BlobResponseDto and a new BlobContainerClient with our connection string and container name.
- We then try to create a new
BlobClientwith the filename specified fromIFormFile. - If that was a success we create a new stream and upload the data inside that stream to the client (
BlobClient) with the filename we gave it earlier. - We then update the BlobResponseDto with data from the upload request and return to the client.
DownloadAsync()
It’s not fun having a file repository if you cant access the files. Let’s implement some logic to download a file by name inside our repository.
public async Task<BlobDto> DownloadAsync(string blobFilename)
{
    // Get a reference to a container named in appsettings.json
    BlobContainerClient client = new BlobContainerClient(_storageConnectionString, _storageContainerName);

    try
    {
        // Get a reference to the blob uploaded earlier from the API in the container from configuration settings
        BlobClient file = client.GetBlobClient(blobFilename);

        // Check if the file exists in the container
        if (await file.ExistsAsync())
        {
            var data = await file.OpenReadAsync();
            Stream blobContent = data;

            // Download the file details async
            var content = await file.DownloadContentAsync();

            // Add data to variables in order to return a BlobDto
            string name = blobFilename;
            string contentType = content.Value.Details.ContentType;

            // Create new BlobDto with blob data from variables
            return new BlobDto { Content = blobContent, Name = name, ContentType = contentType };
        }
    }
    catch (RequestFailedException ex)
        when(ex.ErrorCode == BlobErrorCode.BlobNotFound)
    {
        // Log error to console
        _logger.LogError($"File {blobFilename} was not found.");
    }

    // File does not exist, return null and handle that in requesting method
    return null;
}
Once again we create a BlobContanerClient with our connection string and the container name. We then try to get the file, if it turns out that the file does not exist at our Azure Blob Storage, we create an error log message and return null to the requesting method. If it goes well, we do the following:
- Get the file using the filename provided
- Open an async stream for the file we would like to download.
- Then download the content of the file asyncronosly.
- Set the content type and filename and finally return that as a
BlobDto.
DeleteAsync()
If we are not able to delete files, we will get a ton of them in our Azure Blob Storage container = a lot of garbage. Let’s implement some logic to delete the files we don’t need anymore.
public async Task<BlobResponseDto> DeleteAsync(string blobFilename)
{
    BlobContainerClient client = new BlobContainerClient(_storageConnectionString, _storageContainerName);

    BlobClient file = client.GetBlobClient(blobFilename);

    try
    {
        // Delete the file
        await file.DeleteAsync();
    }
    catch (RequestFailedException ex)
        when (ex.ErrorCode == BlobErrorCode.BlobNotFound)
    {
        // File did not exist, log to console and return new response to requesting method
        _logger.LogError($"File {blobFilename} was not found.");
        return new BlobResponseDto { Error = true, Status = $"File with name {blobFilename} not found." };
    }

    // Return a new BlobResponseDto to the requesting method
    return new BlobResponseDto { Error = false, Status = $"File: {blobFilename} has been successfully deleted." };

}
If we do not find the blob/file, we create a new error log to the console and return an error message in the BlobResponseDto to the requesting method. However, if we do find the file at our Azure Blob Storage, we do the following:
- We create a new blob client with the filename provided from the requester.
- We then try to delete the file using the method
DeleteAsync()it takes no parameters, as it already got it from th client (BlobClient). - Finally we create a new BlobResponseDto object and return that to the requesting method.
Modify Program.cs to use Serilog and register our Azure Service
I have totally rewritten the program.cs file because I wanted to add some extra logging. I have decided to add Serilog and write to the console.


Serilog got many great options and is capable of beautifying the logs, and integrate with many different services like Seq, Elasticsearch, etc…
 Datalust


Below is the new implementation of program.cs.
using AzureBlobStorage.WebApi.Common;
using AzureBlobStorage.WebApi.Repository;
using AzureBlobStorage.WebApi.Services;
using Serilog;

StaticLogger.EnsureInitialized();
Log.Information("Azure Storage API Booting Up...");

try
{
    var builder = WebApplication.CreateBuilder(args);

    // Add Serilog
    builder.Host.UseSerilog((_, config) =>
    {
        config.WriteTo.Console()
        .ReadFrom.Configuration(builder.Configuration);
    });


    builder.Services.AddControllers();
    builder.Services.AddEndpointsApiExplorer();
    builder.Services.AddSwaggerGen();

    // Add Azure Repository Service
    builder.Services.AddTransient<IAzureStorage, AzureStorage>();
    Log.Information("Services has been successfully added...");

    var app = builder.Build();

    // Configure the HTTP request pipeline.
    if (app.Environment.IsDevelopment())
    {
        app.UseSwagger();
        app.UseSwaggerUI();
    }

    app.UseHttpsRedirection();

    app.UseAuthorization();

    app.MapControllers();

    app.Run();
    Log.Information("API is now ready to serve files to and from Azure Cloud Storage...");
}
catch (Exception ex) when (!ex.GetType().Name.Equals("StopTheHostException", StringComparison.Ordinal))
{
    StaticLogger.EnsureInitialized();
    Log.Fatal(ex, "Unhandled Exception");
}
finally
{
    StaticLogger.EnsureInitialized();
    Log.Information("Azure Storage API Shutting Down...");
    Log.CloseAndFlush();
}
As you might notice I use a class named StaticLogger with the method EnsureInitialized(). For you to get that, you have to add a new folder named Common and then add a new class named StaticLogger.cs. Below is the implementation for StaticLogger.cs.
using Serilog;

namespace AzureBlobStorage.WebApi.Common
{
    public class StaticLogger
    {
        public static void EnsureInitialized()
        {
            if (Log.Logger is not Serilog.Core.Logger)
            {
                Log.Logger = new LoggerConfiguration()
                    .Enrich.FromLogContext()
                    .WriteTo.Console()
                    .CreateLogger();
            }
        }
    }
}
This method is just to make sure that if the logger used is not Serilog, we change it and make sure that we use Serilog and that it writes to the console.
Create StorageController for implementing Azure Blob Storage endpoints
The controller is a simple one with four actions. Each action is returning an IActionResult when the repository has done its work against our Azure Blob Storage.
I have not created any names on the routes, as the four methods are different. You are welcome to update the naming for the routes if you like that. In a production environment, I would probably change this to include namings, especially if I have multiple actions in the same controller with the same type of request methods (POST, GET, DELETE, PUT)…
Below is the implementation for the controller:
using AzureBlobStorage.WebApi.Models;
using AzureBlobStorage.WebApi.Services;
using Microsoft.AspNetCore.Mvc;

namespace AzureBlobStorage.WebApi.Controllers
{
    [Route("api/[controller]")]
    [ApiController]
    public class StorageController : ControllerBase
    {
        private readonly IAzureStorage _storage;

        public StorageController(IAzureStorage storage)
        {
            _storage = storage;
        }

        [HttpGet(nameof(Get))]
        public async Task<IActionResult> Get()
        {
            // Get all files at the Azure Storage Location and return them
            List<BlobDto>? files = await _storage.ListAsync();

            // Returns an empty array if no files are present at the storage container
            return StatusCode(StatusCodes.Status200OK, files);
        }

        [HttpPost(nameof(Upload))]
        public async Task<IActionResult> Upload(IFormFile file)
        {
            BlobResponseDto? response = await _storage.UploadAsync(file);

            // Check if we got an error
            if (response.Error == true)
            {
                // We got an error during upload, return an error with details to the client
                return StatusCode(StatusCodes.Status500InternalServerError, response.Status);
            }
            else
            {
                // Return a success message to the client about successfull upload
                return StatusCode(StatusCodes.Status200OK, response);
            }
        }

        [HttpGet("{filename}")]
        public async Task<IActionResult> Download(string filename)
        {
            BlobDto? file = await _storage.DownloadAsync(filename);

            // Check if file was found
            if (file == null)
            {
                // Was not, return error message to client
                return StatusCode(StatusCodes.Status500InternalServerError, $"File {filename} could not be downloaded.");
            }
            else
            {
                // File was found, return it to client
                return File(file.Content, file.ContentType, file.Name);
            }
        }

        [HttpDelete("filename")]
        public async Task<IActionResult> Delete(string filename)
        {
            BlobResponseDto response = await _storage.DeleteAsync(filename);

            // Check if we got an error
            if (response.Error == true)
            {
                // Return an error message to the client
                return StatusCode(StatusCodes.Status500InternalServerError, response.Status);
            } else
            {
                // File has been successfully deleted
                return StatusCode(StatusCodes.Status200OK, response.Status);
            }
        }
    }
}
What is going on here?
Get()– Create a list and reques the files at our Azure Blob Storage. Then return the files in a list. If no files were found an empty list will be returned.Upload()– This action takes in anIFormFileand passes it onto the UploadAsync method we created in our interface and repository. It then checks the result and returns a Status 500 if an error occured or a status 200 including the response from the repository.Dowload()– This action is requesting a filename is can pass on to theDownloadAsync()method. It then checks the result to see if it was an error (null is returned) or simply just returns the File with the content from theBlobDto.Delete()– This action also requests a filename for the file we would like to delete. It then requests the repository to delete that file. If the repository encountered an error, a status of 500 is returned to the client. However if the file was actually found and deleted from our Azure Blob Storage, we return status 200 with a success status message.
Testing the API with Swagger
Now for the exciting part of the project. The testing of the API using Swagger or Postman.
Boot the API
Start off by booting up the API. If we check the console, we can see that Serilog is outputting some great logs for us – perfect!
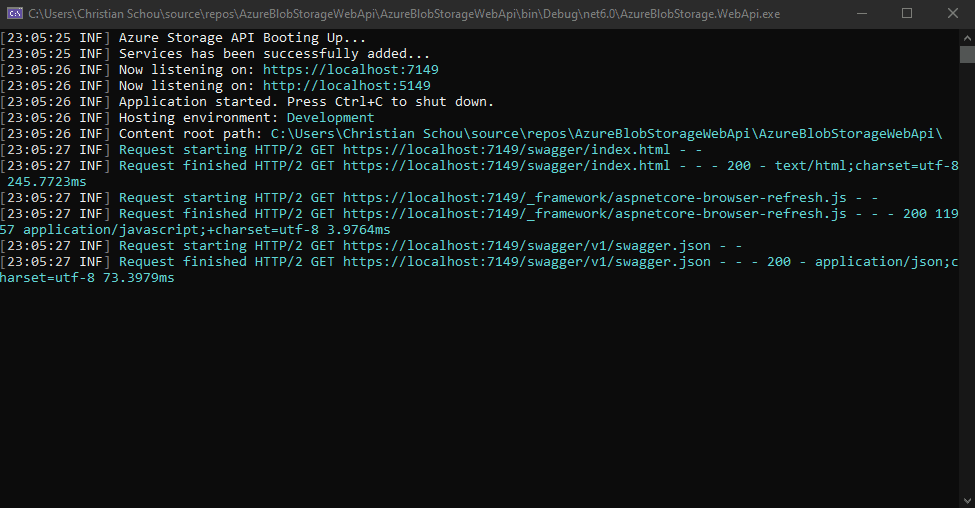
The API is ready and you should now have a webpage in front of you with Swagger and your endpoints.
Upload a file
Let’s start off by uploading some files to our Azure Blob Storage. I have uploaded two files named test.txt and test1.txt. You can upload anything you would like.
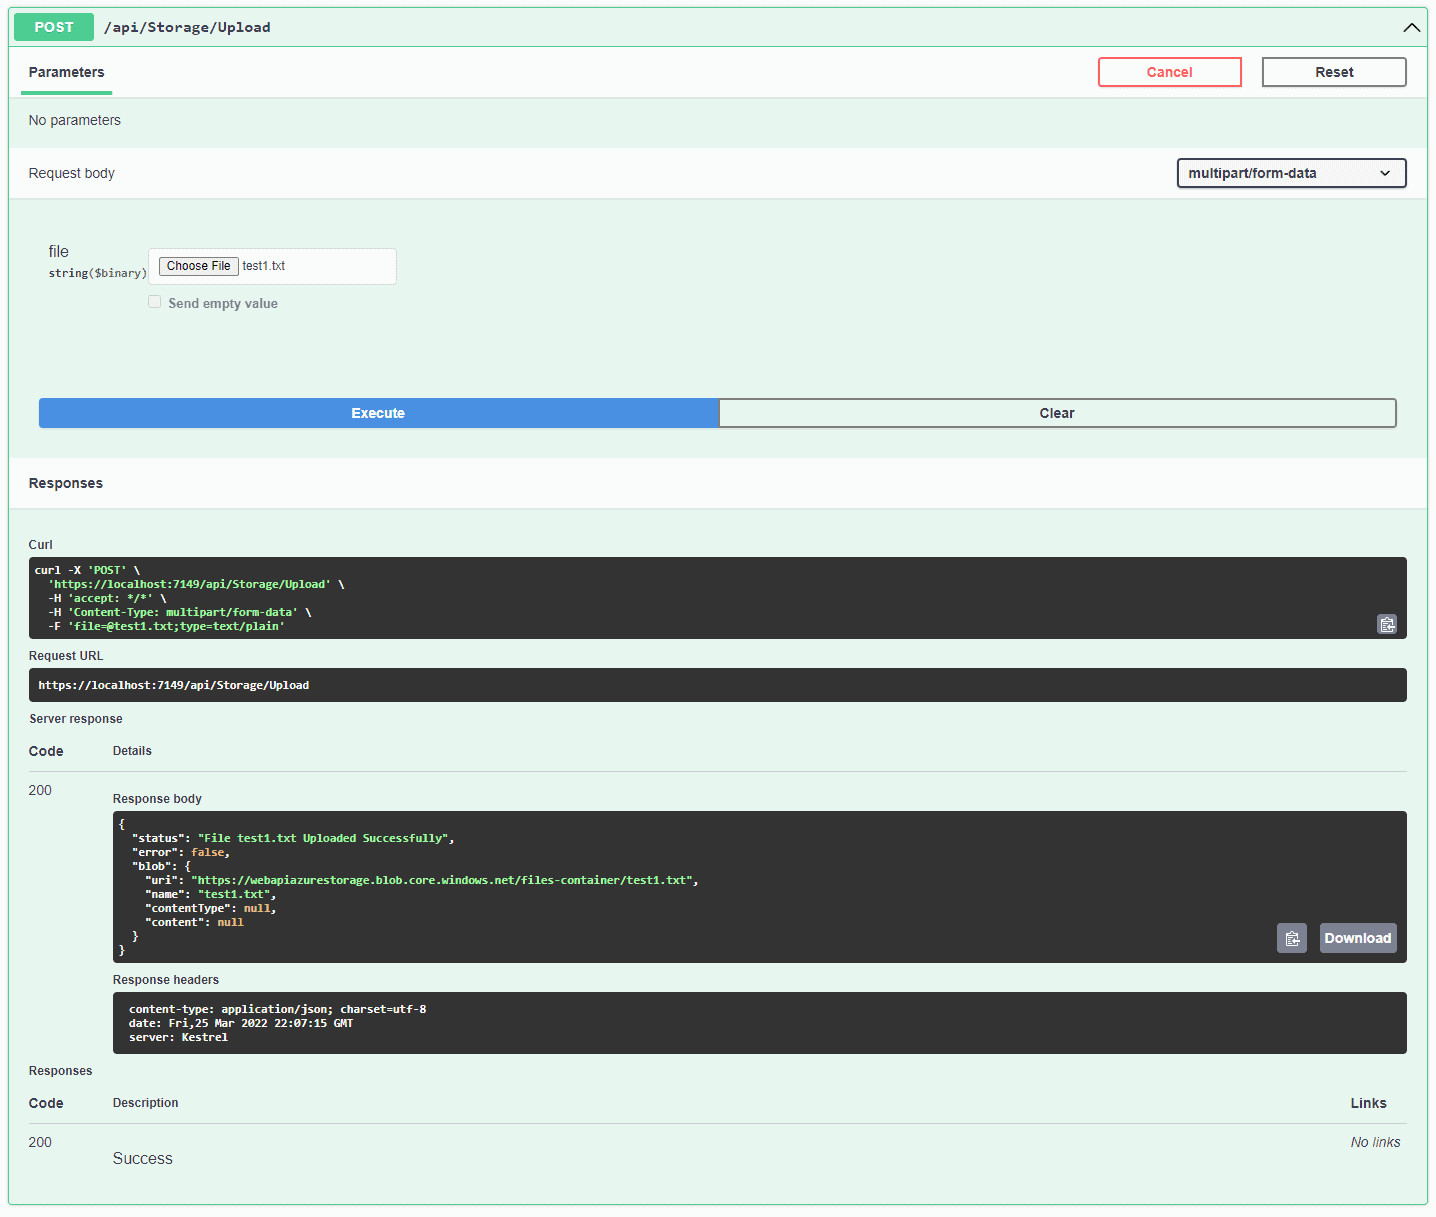
The file got uploaded and we get the expected response in return. If you were to allow a public (unauthorized) view of your files in the container, you could copy and paste the link from URI to get your file.
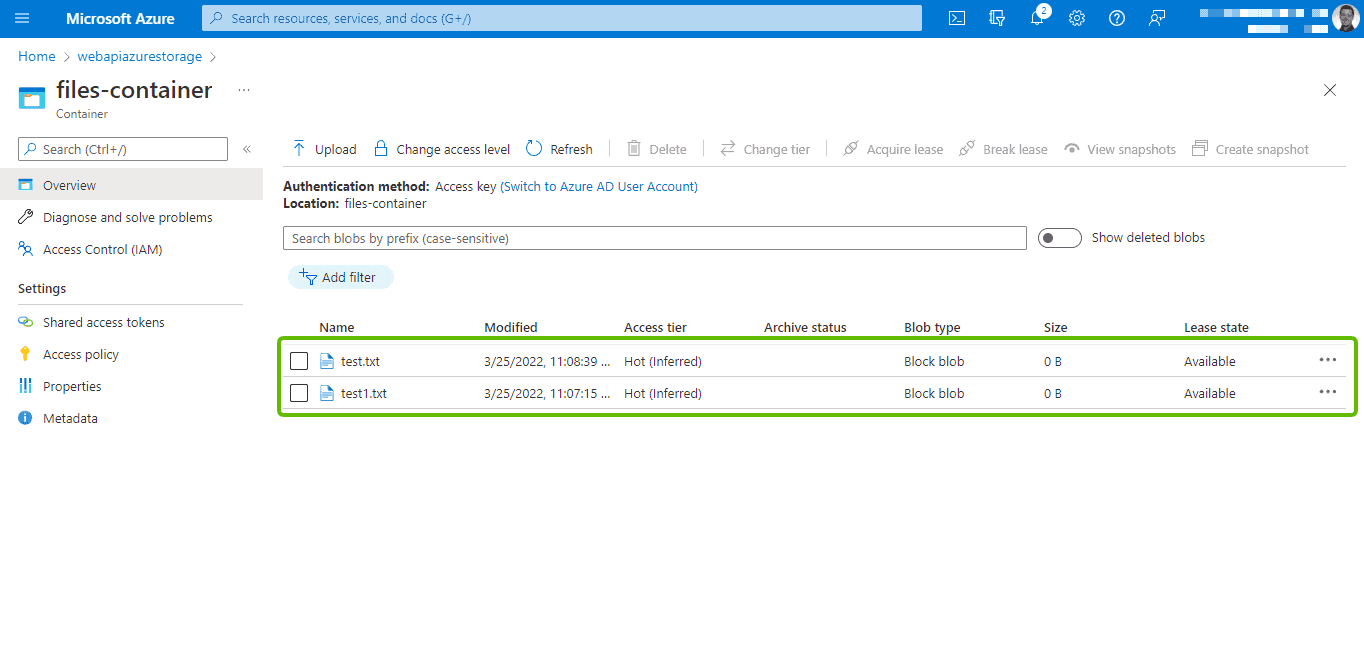
If we refresh our Azure Storage Container, we now see the files we uploaded from the API. Awesome!
Get all files
Let’s see if we can make the same list of files as we see in Azure. Execute the Get endpoint.
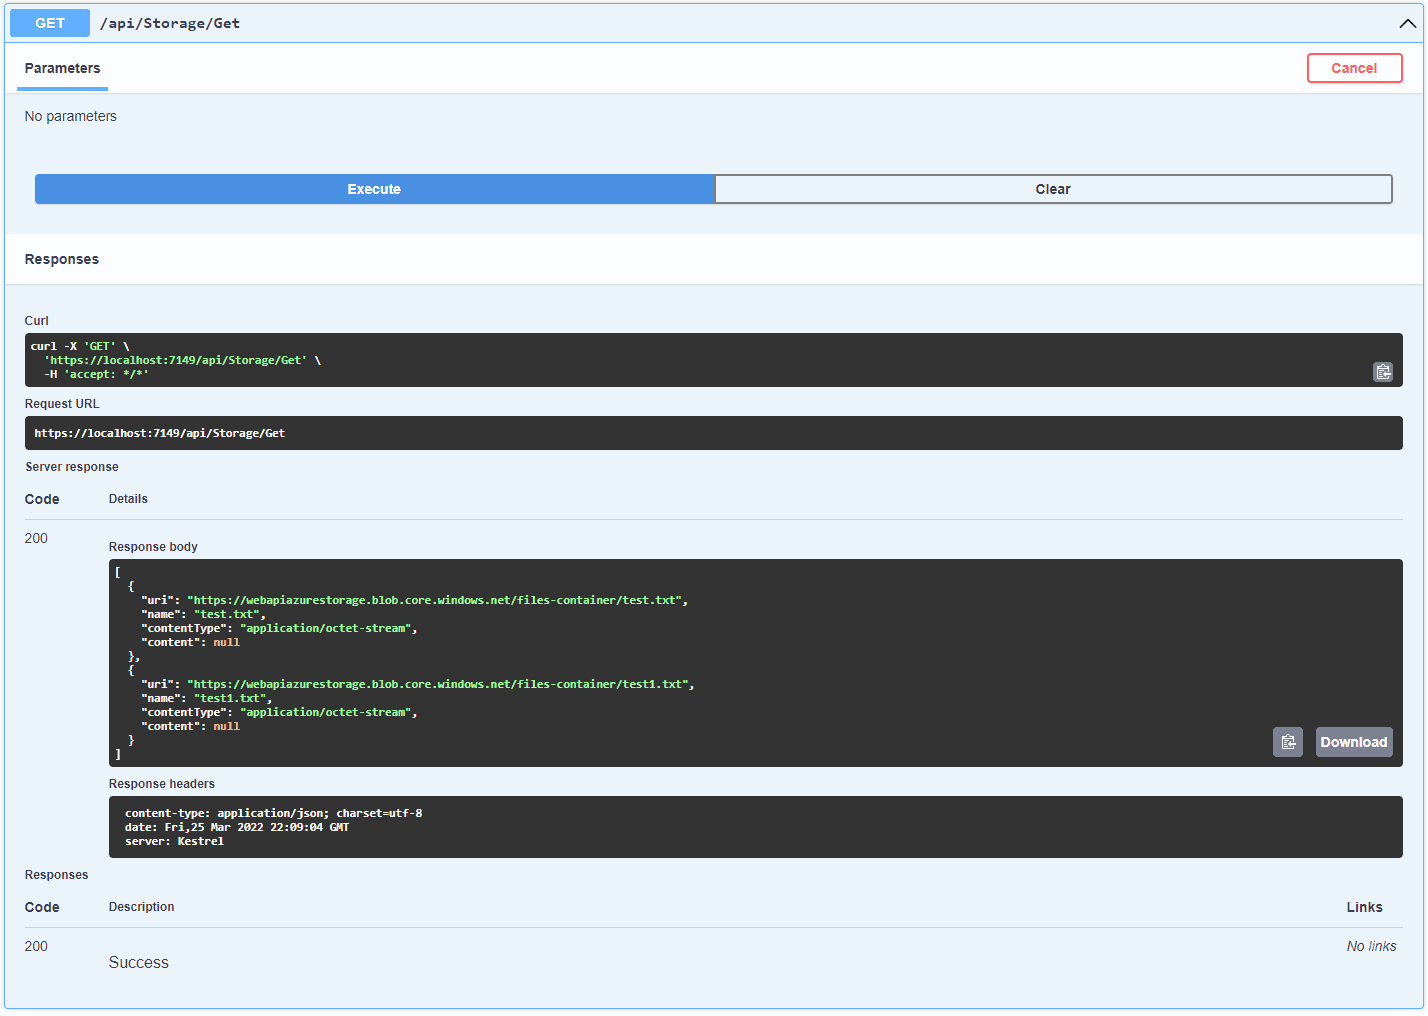
As we expected, we get to see the files we just saw in the web interface in Azure.
Download file
Now for a crucial part of this API. Can we actually download our files again? Execute the endpoint to download a file and specify the name of the file you would like to download.
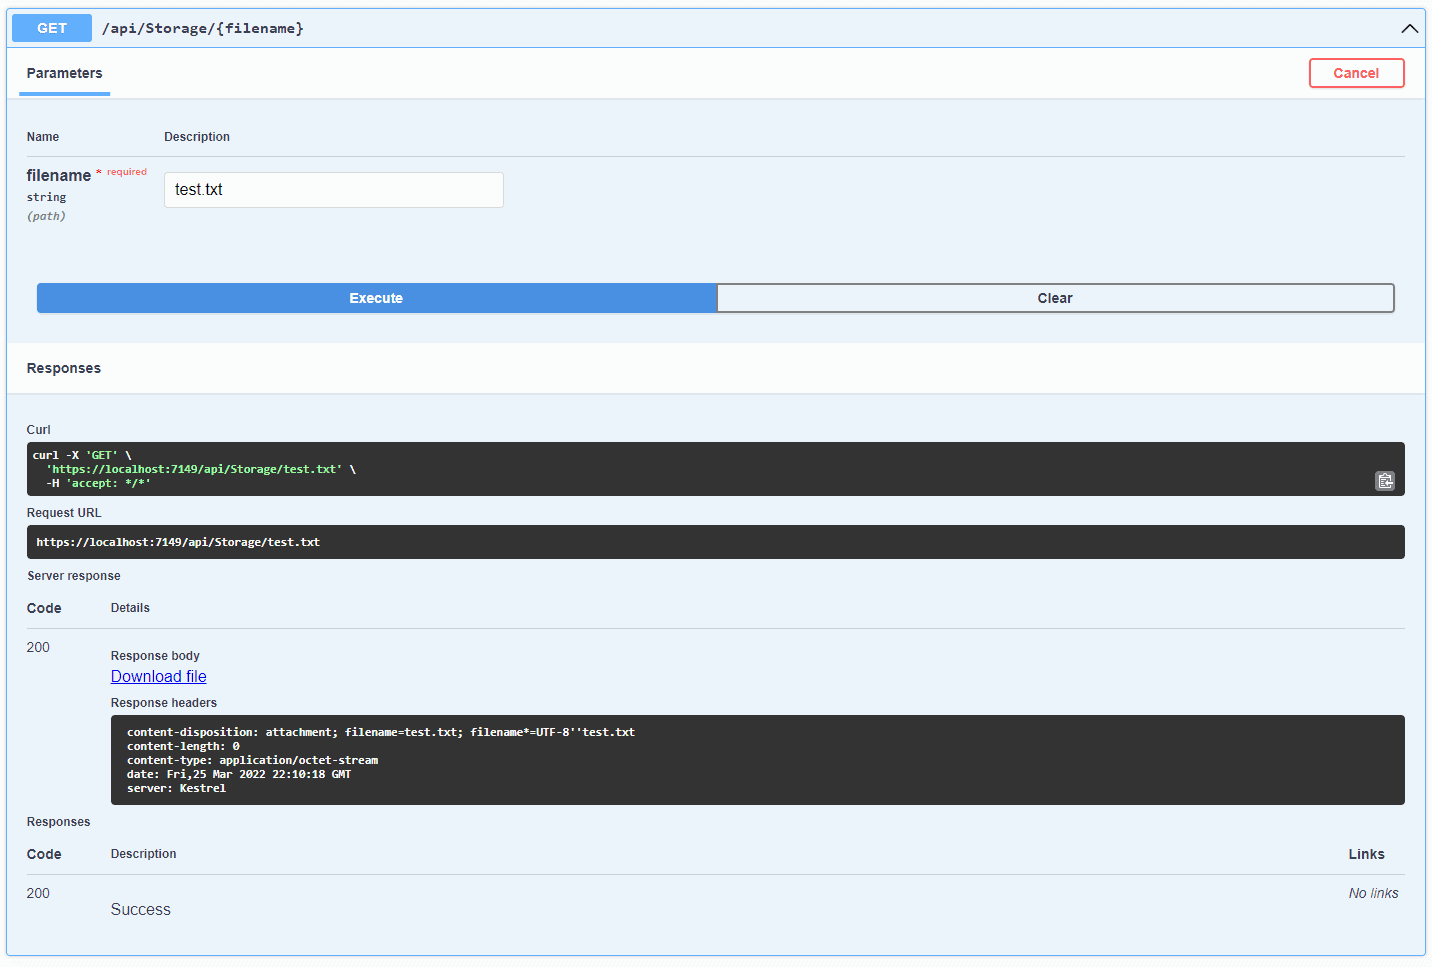
When we execute this method with a valid filename, we get a link to download the file in the response body. It works!
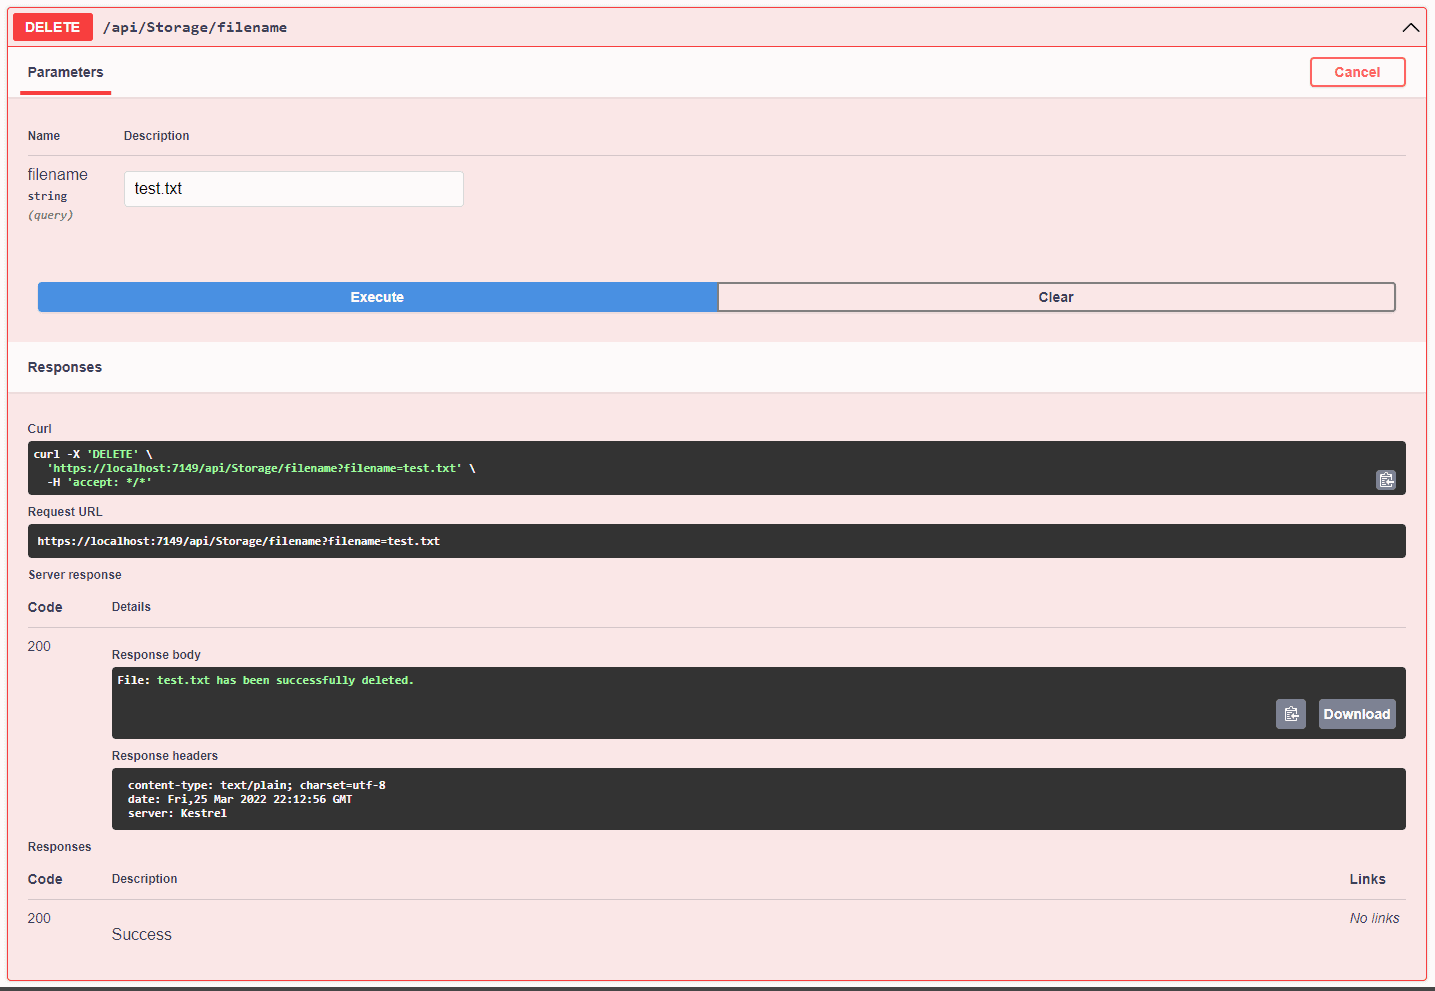
Delete file
Last but very important – cleanup. Enter the name of the file you would like to delete at Azure and click Execute. If the file exists it will be deleted as shown below:
That went well. Let’s see if the Azure portal agrees and only shows one file now.
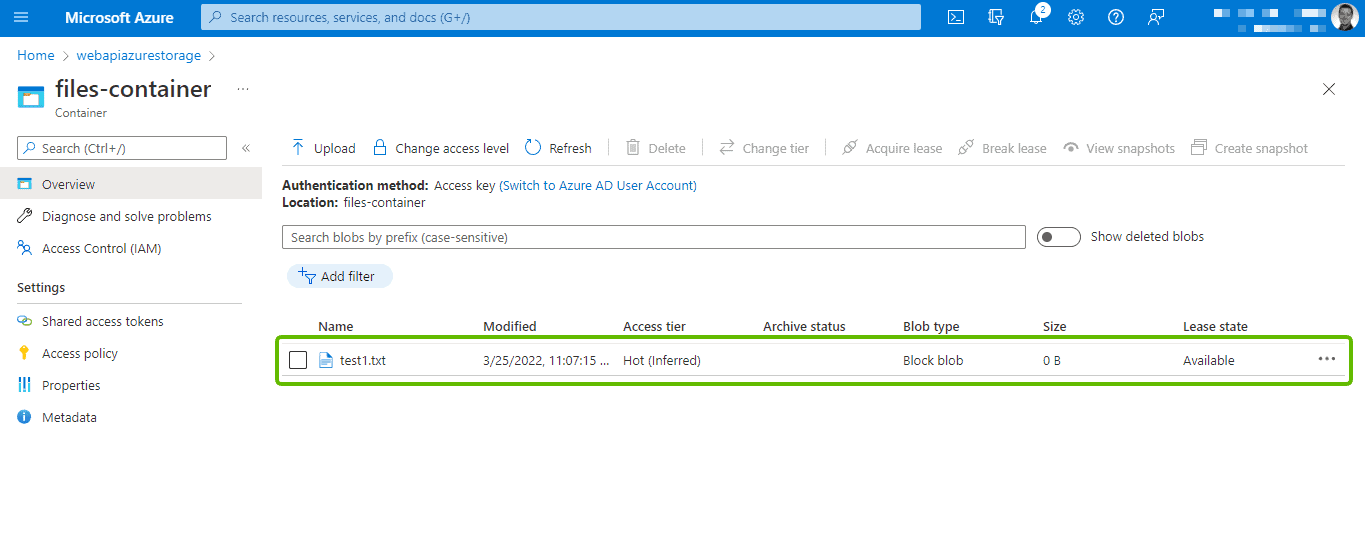
It has been deleted and is no longer available inside of our container. Perfect – just what we expected it to do.
Summary
Azure Blob Storage is a very powerful cloud storage solution provided by Microsoft. In almost any project you make I’m sure that you interact with files in one way or another. If you want to get away from the old way of storing files like with an on-premise file server, Azure Blob Storage would be the perfect fit for you.
In this article, you learned how to set up a new storage account at Azure and create your own container + extract the connection string from the Access Keys section in your Storage Account. You then learned how to implement CRUD functionality inside your ASP.NET Core Web API to interact with Azure Blob Storage to get, upload, delete and list your files inside a container and serve the result to a client through the API.
If you got any questions, issues, or suggestions, please let me know in the comments below. The source code is available at my Github. Until next time -Happy coding!
 Christian-Schou