How to Send Emails with ASP.NET Core using SMTP with MailKit

I often see the question “how to send emails with ASP.NET Core” and it is also one thing I often implement in the software applications I make or extend. Emails are used for confirmations at user sign-up, new orders, newsletters, OTP (one-time-password) emails, etc… It’s a very common requirement for many applications, which also is one of the reasons I have baked it into the core of my toolbox for new applications.
In this article, I will show you how to send emails with C# / ASP.NET Core using Mailkit. When you are done reading this article you know how to create an ASP.NET Core Web API, add new configuration details, and how to implement new logic in order to send emails using MailKit with an SMTP account.
Related tutorials about sending emails

What is MailKit?
MailKit is a cross-platform mail client library built on top of MimeKit. MailKit is a personal open-source project that jstedfast has put thousands of hours into perfecting with the goal of making it the very best email framework for .NET.
What is an SMPT Server?
SMTP is short for Simple Mail Transfer Protocol. If you append "server" to SMTP you get an SMPT Server which is an email-based server that allows you, applications, or other users to send and receive emails between two parties. Gmail, Outlook, Yahoo, etc... are SMTP servers. When you signup for an email account at these services, you get an ID that is capable of sending and receiving emails on that specific SMTP Server. By default, an SMTP server will have an address that will be consumed by other mail clients like MailKit that we will be using for this article. For this, to work we have to obtain SMTP server details like Host, Port, Security Settings, Username/Password, etc...
Requirements
If you would like to follow along or implement MailKit in your own solution, you will need at least, the following:
- An IDE (I will be using Visual Studio 2022 Community Edition)
- .NET 6
- Access to an Email account (I will be using Ethereal for this article). Ethereal is a fake SMTP service, where the mail never gets delivered. You can create an account here.
- Access to the internet 😉
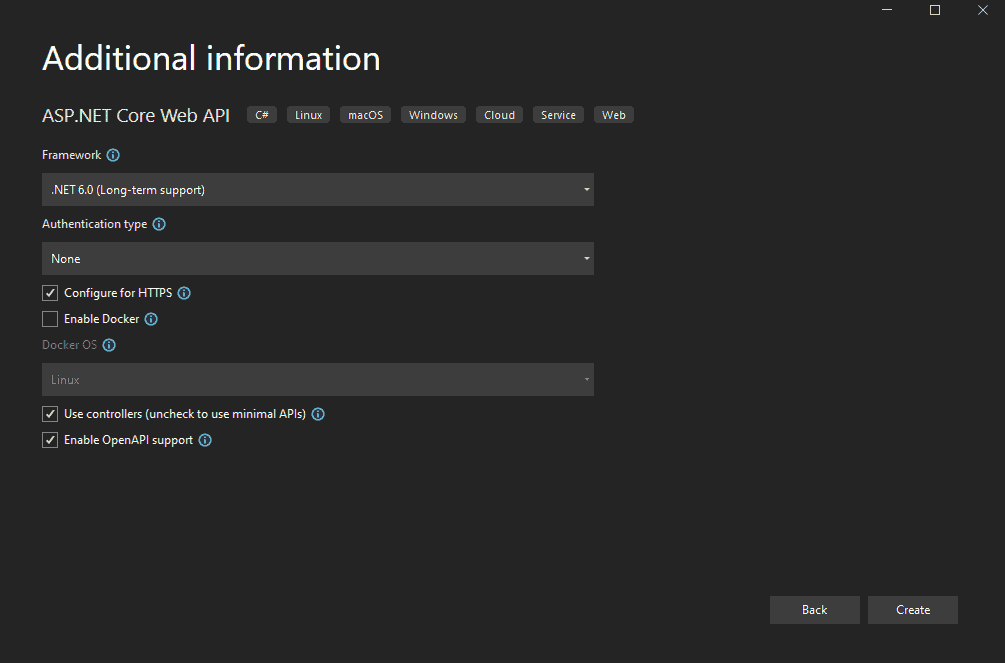
Create an ASP.NET Core Web API from a template
Open Visual Studio and create a new project. I have named mine MailKitDemo and my settings are as below:
Implement email functionality in ASP.NET Core Web API
Now that we got our project in place, let’s move on and implement some logic for sending emails and emails based on templates with the Razor engine.
Install the MailKit package in the project
You can do this in multiple ways. If you like me and prefer the CLI, look below for the commands. Else you can right-click your project in the solution explorer and click on Manage NuGet Packages. In the popup window, you click on the Browse tab and search for MailKit. Now install the MailKit package.

You can check the NuGet package for MailKit here to get the latest version tag.
### Package Manager
Install-Package MailKit
###

### .NET CLI
dotnet add package MailKit
###

### PackageReference
<PackageReference Include="MailKit" Version="<Version-Tag-Here>" />
###
Update appsettings.json to include SMTP- and Email details
To send an email we need to provide some SMTP server details along with the account we would like to send emails from. These details should not be hardcoded in the application as they might change over time and needs to be updated. It also makes it easier to maintain for other developers. Below is the implementation in appsettings.json.
{
  "Logging": {
    "LogLevel": {
      "Default": "Information",
      "Microsoft.AspNetCore": "Warning"
    }
  },
  "AllowedHosts": "*",
  "MailSettings": {
    "DisplayName": "Christian Schou",
    "From": "christian@christian-schou.dk",
    "Host": "smtp.ethereal.email",
    "Password": "upPftsKAqgcFKKmX8W",
    "Port": 587,
    "UserName": "joesph.beatty9@ethereal.email",
    "UseSSL": false,
    "UseStartTls": true
  }
}
As you can see I am using Ethereal for demo purposes, but you can switch the details with your own SMTP Server- and Account details.
Read MailSettings from appsettings.json at runtime
Now that we have added our details for the configuration inside appsettings.json, we would like to load those settings from the JSON file and make them available to the code at runtime in order to send the emails from our application.
Create a new folder named Configuration at the root of your project and add a new file named MailSettings.cs inside that folder with the properties shown below. Remember to change the namespace if you copy the code.
namespace MailKitDemo.Configuration
{
    public class MailSettings
    {
        public string? DisplayName { get; set; }
        public string? From { get; set; }
        public string? UserName { get; set; }
        public string? Password { get; set; }
        public string? Host { get; set; }
        public int Port { get; set; }
        public bool UseSSL { get; set; }
        public book UseStartTls { get; set; }
    }
}
By using Options Pattern and Dependency Injection we can read the data from the JSON file into our MailSettings class object.
Inside Program.cs you have to add the following line (line 11) of code in order to pick up the settings. What happens here s that we use Configuration to read the data from a specific section named MailSettings just like our class object. The data will then be loaded into the object and made available to controllers and repositories/services through Dependency Injection.
using MailKitDemo.Configuration;

var builder = WebApplication.CreateBuilder(args);

// Add services to the container.

builder.Services.AddControllers();
// Learn more about configuring Swagger/OpenAPI at https://aka.ms/aspnetcore/swashbuckle
builder.Services.AddEndpointsApiExplorer();
builder.Services.AddSwaggerGen();
builder.Services.Configure(builder.Configuration.GetSection(nameof(MailSettings)));

var app = builder.Build();
...
Add MailKit to send emails with ASP.NET Core
Now for the fun part, where we actually implement the core logic for sending emails with ASP.NET Core using SMTP with MailKit.
Create MailData Model
The first thing we have to do is add a model that will hold all of our basic mail data. Create a new folder named Models at the root of your project and create a new file named MailData.cs with the following properties inside.
namespace MailKitDemo.Models
{
    public class MailData
    {
        // Receiver
        public List<string> To { get; }
        public List<string> Bcc { get; }

        public List<string> Cc { get; }

        // Sender
        public string? From { get; }

        public string? DisplayName { get; }

        public string? ReplyTo { get; }

        public string? ReplyToName { get; }

        // Content
        public string Subject { get; }

        public string? Body { get; }

        public MailData(List<string> to, string subject, string? body = null, string? from = null, string? displayName = null, string? replyTo = null, string? replyToName = null, List<string>? bcc = null, List<string>? cc = null)
        {
            // Receiver
            To = to;
            Bcc = bcc ?? new List<string>();
            Cc = cc ?? new List<string>();

            // Sender
            From = from;
            DisplayName = displayName;
            ReplyTo = replyTo;
            ReplyToName = replyToName;

            // Content
            Subject = subject;
            Body = body;
        }
    }
}
Create an Interface for sending an email with ASP.NET Core
Now we have to add a new service (interface) for sending emails using our newly installed MailKit library. Create a new folder named Services at the root of your project along with two new files inside named ImailService.cs and MailService.cs.
Add the following inside MailService.cs:
using MailKitDemo.Models;

namespace MailKitDemo.Services
{
    public interface IMailService
    {
        Task<bool> SendAsync(MailData mailData, CancellationToken ct);
    }
}
Add Logic for sending emails with ASP.NET Core with MailKit
Below is the implementation for our MailService. I have used the IOption interface in the constructor to inject the MailSettings data object into the service implementation. As you might remember this object contains settings for our SMTP server and the account we are connecting to at the SMTP server.
using MailKit.Net.Smtp;
using MailKit.Security;
using MailKitDemo.Configuration;
using MailKitDemo.Models;
using Microsoft.Extensions.Options;
using MimeKit;

namespace MailKitDemo.Services
{
    public class MailService : IMailService
    {
        private readonly MailSettings _settings;

        public MailService(IOptions<MailSettings> settings)
        {
            _settings = settings.Value;
        }

        public async Task<bool> SendAsync(MailData mailData, CancellationToken ct = default)
        {
            try
            {
                // Initialize a new instance of the MimeKit.MimeMessage class
                var mail = new MimeMessage();

                #region Sender / Receiver
                // Sender
                mail.From.Add(new MailboxAddress(_settings.DisplayName, mailData.From ?? _settings.From));
                mail.Sender = new MailboxAddress(mailData.DisplayName ?? _settings.DisplayName, mailData.From ?? _settings.From);

                // Receiver
                foreach (string mailAddress in mailData.To)
                    mail.To.Add(MailboxAddress.Parse(mailAddress));

                // Set Reply to if specified in mail data
                if(!string.IsNullOrEmpty(mailData.ReplyTo))
                    mail.ReplyTo.Add(new MailboxAddress(mailData.ReplyToName, mailData.ReplyTo));

                // BCC
                // Check if a BCC was supplied in the request
                if (mailData.Bcc != null)
                {
                    // Get only addresses where value is not null or with whitespace. x = value of address
                    foreach (string mailAddress in mailData.Bcc.Where(x => !string.IsNullOrWhiteSpace(x)))
                        mail.Bcc.Add(MailboxAddress.Parse(mailAddress.Trim()));
                }

                // CC
                // Check if a CC address was supplied in the request
                if (mailData.Cc != null)
                {
                    foreach (string mailAddress in mailData.Cc.Where(x => !string.IsNullOrWhiteSpace(x)))
                        mail.Cc.Add(MailboxAddress.Parse(mailAddress.Trim()));
                }
                #endregion

                #region Content

                // Add Content to Mime Message
                var body = new BodyBuilder();
                mail.Subject = mailData.Subject;
                body.HtmlBody = mailData.Body;
                mail.Body = body.ToMessageBody();

                #endregion

                #region Send Mail

                using var smtp = new SmtpClient();

                if (_settings.UseSSL)
                {
                    await smtp.ConnectAsync(_settings.Host, _settings.Port, SecureSocketOptions.SslOnConnect, ct);
                }
                else if (_settings.UseStartTls)
                {
                    await smtp.ConnectAsync(_settings.Host, _settings.Port, SecureSocketOptions.StartTls, ct);
                }
                await smtp.AuthenticateAsync(_settings.UserName, _settings.Password, ct);
                await smtp.SendAsync(mail, ct);
                await smtp.DisconnectAsync(true, ct);

                #endregion

                return true;

            }
            catch (Exception)
            {
                return false;
            }
        }
    }
}
All we have to do now is register the service inside our application container in order for us to be able to inject it into the API controller using dependency injection. To add the mail service to the container, we have to register it in Program.cs like I have done below in line 13:
using MailKitDemo.Configuration;
using MailKitDemo.Services;

var builder = WebApplication.CreateBuilder(args);

// Add services to the container.

builder.Services.AddControllers();
// Learn more about configuring Swagger/OpenAPI at https://aka.ms/aspnetcore/swashbuckle
builder.Services.AddEndpointsApiExplorer();
builder.Services.AddSwaggerGen();
builder.Services.Configure(builder.Configuration.GetSection(nameof(MailSettings)));
builder.Services.AddTransient();

var app = builder.Build();

// Configure the HTTP request pipeline.
if (app.Environment.IsDevelopment())
{
    app.UseSwagger();
    app.UseSwaggerUI();
}

app.UseHttpsRedirection();

app.UseAuthorization();

app.MapControllers();

app.Run();
Add a new MailController to send emails
The moment we all have been waiting for. Let’s add a new controller named MailController inside the Controllers folder and add a new API endpoint taking a POST request for sending an email using our IMailService we are making it available through dependency injection.
using MailKitDemo.Models;
using MailKitDemo.Services;
using Microsoft.AspNetCore.Mvc;

namespace MailKitDemo.Controllers
{
    [Route("api/[controller]")]
    [ApiController]
    public class MailController : ControllerBase
    {
        private readonly IMailService _mail;

        public MailController(IMailService mail)
        {
            _mail = mail;
        }

        [HttpPost("sendmail")]
        public async Task<IActionResult> SendMailAsync(MailData mailData)
        {
            bool result = await _mail.SendAsync(mailData, new CancellationToken());

            if (result)
            {
                return StatusCode(StatusCodes.Status200OK, "Mail has successfully been sent.");
            }
            else
            {
                return StatusCode(StatusCodes.Status500InternalServerError, "An error occured. The Mail could not be sent.");
            }
        }
    }
}
In the code above I have added a POST method named SendMailAsync and made it available at host:port/api/sendmail. This takes by default the MailData object but allows nulls in several of the values, meaning that you don’t have to fill all values when posting the data. Let’s spin it up for a test drive and send emails with ASP.NET Core for the first time in this MailKit Demo.
TESTING – Send Emails with ASP.NET Core Web API
I have removed the default controller for the WeatherForecast – we don’t need that controller. Select the action under Mail and fill out the details in the prepared JSON payload. You are free to remove some of the properties as we allow nulls – remember that?
My test payload:
{
  "to": [
    "joesph.beatty9@ethereal.email"
  ],
  "displayName": "Christian Schou",
  "replyTo": "test@mail.dk",
  "replyToName": "Test mail",
  "subject": "Hello World",
  "body": "Hola - this is just a test to verify that our mailing works. Have a great day!"
}
Spin up the project and send a request to the endpoint.
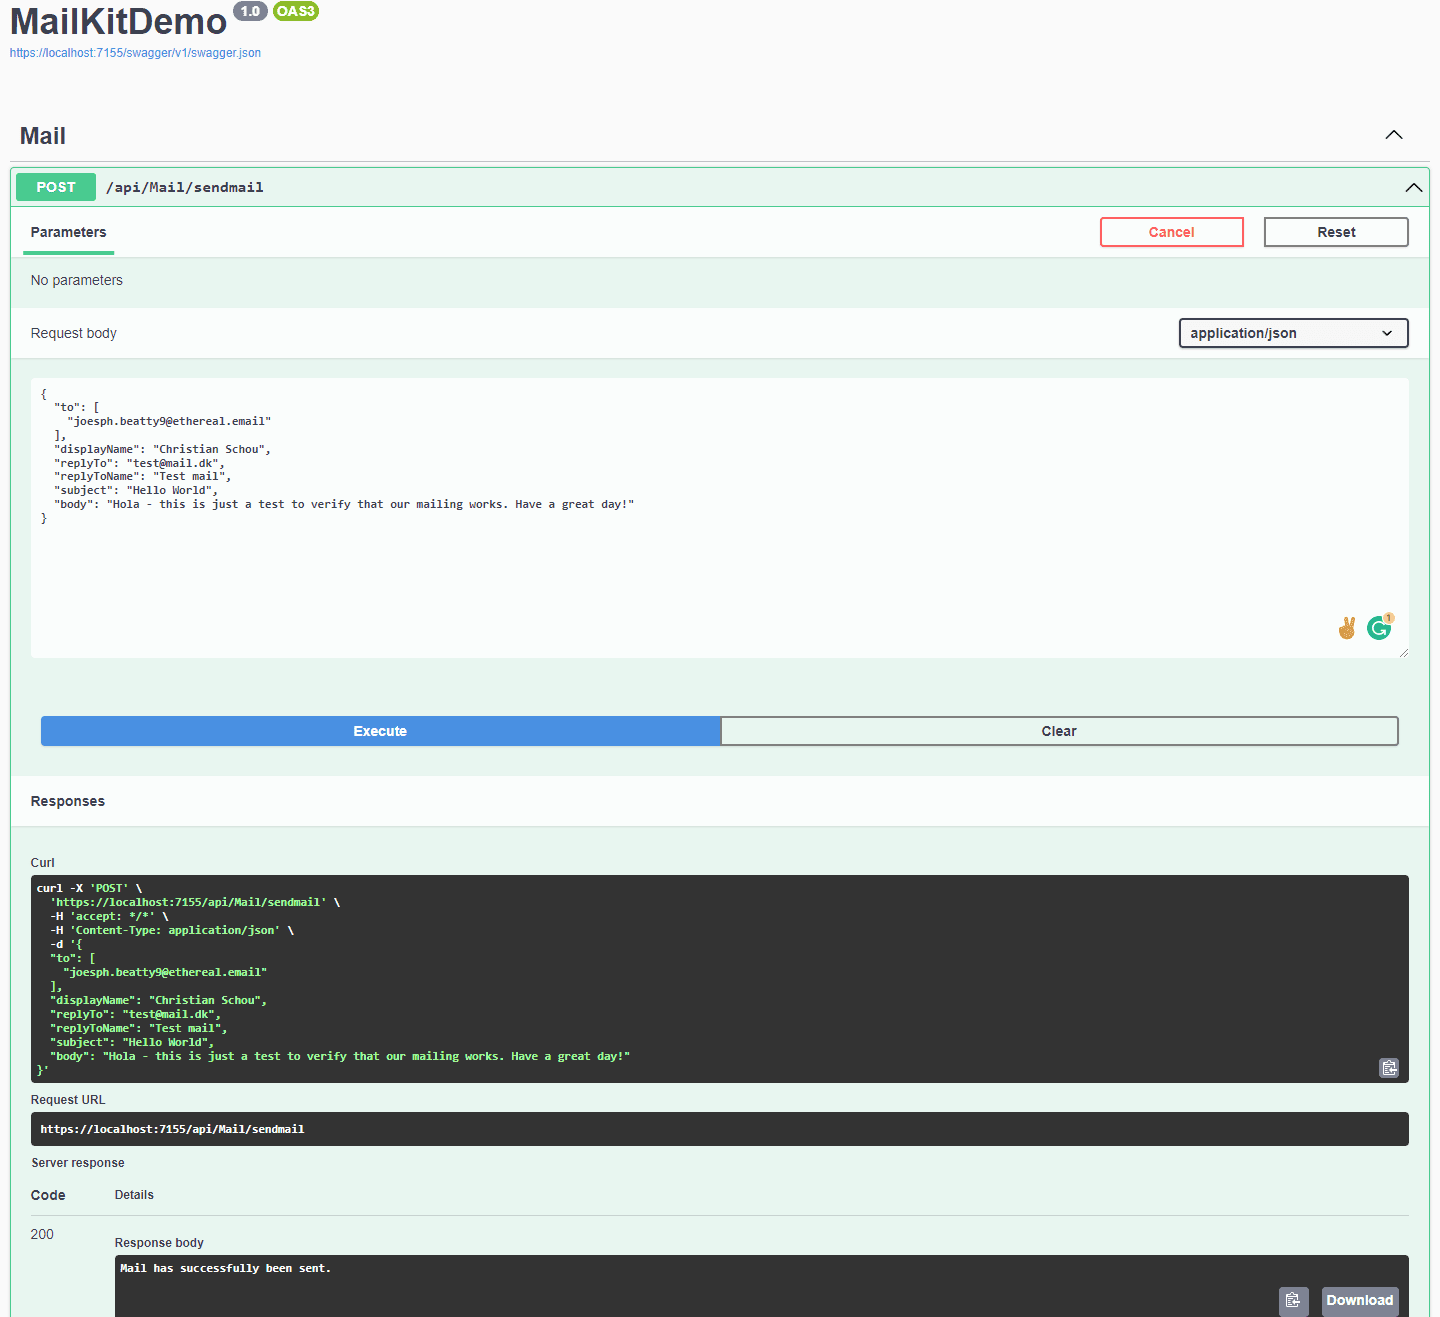
Awesome! We have successfully sent an email! Let’s check Ethereal to verify that data has come through correctly.

Send emails with ASP.NET core including attachment
To add an attachment to our email we have to extend the email service to include logic for that. Open up IMailService and add the following line of code to that interface (line 8).
using MailKitDemo.Models;

namespace MailKitDemo.Services
{
    public interface IMailService
    {
        Task SendAsync(MailData mailData, CancellationToken ct);
        Task SendWithAttachmentsAsync(MailDataWithAttachments mailData, CancellationToken ct);
    }
}
Then we are going to add a new model named MaildataWithAttachments with a IFormFileCollection for the attachments, like below – please notice I am doing it without a constructor in the class this time to show how it also can be done:
namespace MailKitDemo.Models
{
    public class MailDataWithAttachments
    {
        // Receiver
        public List? To { get; set; }
        public List? Bcc { get; set; }
        public List? Cc { get; set; }

        // Sender
        public string? From { get; set; }
        public string? DisplayName { get; set; }
        public string? ReplyTo { get; set; }
        public string? ReplyToName { get; set; }

        // Content
        public string? Subject { get; set; }
        public string? Body { get; set; }
        public IFormFileCollection? Attachments { get; set;  }
    }
}
Then we extend the functionality of our MailService with a new method named SendAsyncWithAttachments(). Take a look at the region Content to see the extra piece of code I have added to send the email with an attachment or multiple attachments (only if the value from the requesting method is not null). Lines to notice: 65-84 as marked below:
using MailKit.Net.Smtp;
using MailKit.Security;
using MailKitDemo.Configuration;
using MailKitDemo.Models;
using Microsoft.Extensions.Options;
using MimeKit;

namespace MailKitDemo.Services
{
    public class MailService : IMailService
    {
        private readonly MailSettings _settings;

        public MailService(IOptions settings)
        {
            _settings = settings.Value;
        }

        public async Task SendAsync(MailData mailData, CancellationToken ct = default)
        {
            try
            {
                // Initialize a new instance of the MimeKit.MimeMessage class
                var mail = new MimeMessage();

                #region Sender / Receiver
                // Sender
                mail.From.Add(new MailboxAddress(_settings.DisplayName, mailData.From ?? _settings.From));
                mail.Sender = new MailboxAddress(mailData.DisplayName ?? _settings.DisplayName, mailData.From ?? _settings.From);

                // Receiver
                foreach (string mailAddress in mailData.To)
                    mail.To.Add(MailboxAddress.Parse(mailAddress));

                // Set Reply to if specified in mail data
                if(!string.IsNullOrEmpty(mailData.ReplyTo))
                    mail.ReplyTo.Add(new MailboxAddress(mailData.ReplyToName, mailData.ReplyTo));

                // BCC
                // Check if a BCC was supplied in the request
                if (mailData.Bcc != null)
                {
                    // Get only addresses where value is not null or with whitespace. x = value of address
                    foreach (string mailAddress in mailData.Bcc.Where(x => !string.IsNullOrWhiteSpace(x)))
                        mail.Bcc.Add(MailboxAddress.Parse(mailAddress.Trim()));
                }

                // CC
                // Check if a CC address was supplied in the request
                if (mailData.Cc != null)
                {
                    foreach (string mailAddress in mailData.Cc.Where(x => !string.IsNullOrWhiteSpace(x)))
                        mail.Cc.Add(MailboxAddress.Parse(mailAddress.Trim()));
                }
                #endregion

                #region Content

                // Add Content to Mime Message
                var body = new BodyBuilder();
                mail.Subject = mailData.Subject;
                body.HtmlBody = mailData.Body;
                mail.Body = body.ToMessageBody();

                // Check if we got any attachments and add the to the builder for our message
                if (mailData.Attachments != null)
                {
                    byte[] attachmentFileByteArray;

                    foreach (IFormFile attachment in mailData.Attachments)
                    {
                        // Check if length of the file in bytes is larger than 0
                        if (attachment.Length > 0)
                        {
                            // Create a new memory stream and attach attachment to mail body
                            using (MemoryStream memoryStream = new MemoryStream())
                            {
                                // Copy the attachment to the stream
                                attachment.CopyTo(memoryStream);
                                attachmentFileByteArray = memoryStream.ToArray();
                            }
                            // Add the attachment from the byte array
                            body.Attachments.Add(attachment.FileName, attachmentFileByteArray, ContentType.Parse(attachment.ContentType));
                        }
                    }
                }

                #endregion

                #region Send Mail

                using var smtp = new SmtpClient();

                if (_settings.UseSSL)
                {
                    await smtp.ConnectAsync(_settings.Host, _settings.Port, SecureSocketOptions.SslOnConnect, ct);
                }
                else if (_settings.UseStartTls)
                {
                    await smtp.ConnectAsync(_settings.Host, _settings.Port, SecureSocketOptions.StartTls, ct);
                }

                await smtp.AuthenticateAsync(_settings.UserName, _settings.Password, ct);
                await smtp.SendAsync(mail, ct);
                await smtp.DisconnectAsync(true, ct);

                return true;
                #endregion

            }
            catch (Exception)
            {
                return false;
            }
        }
    }
}
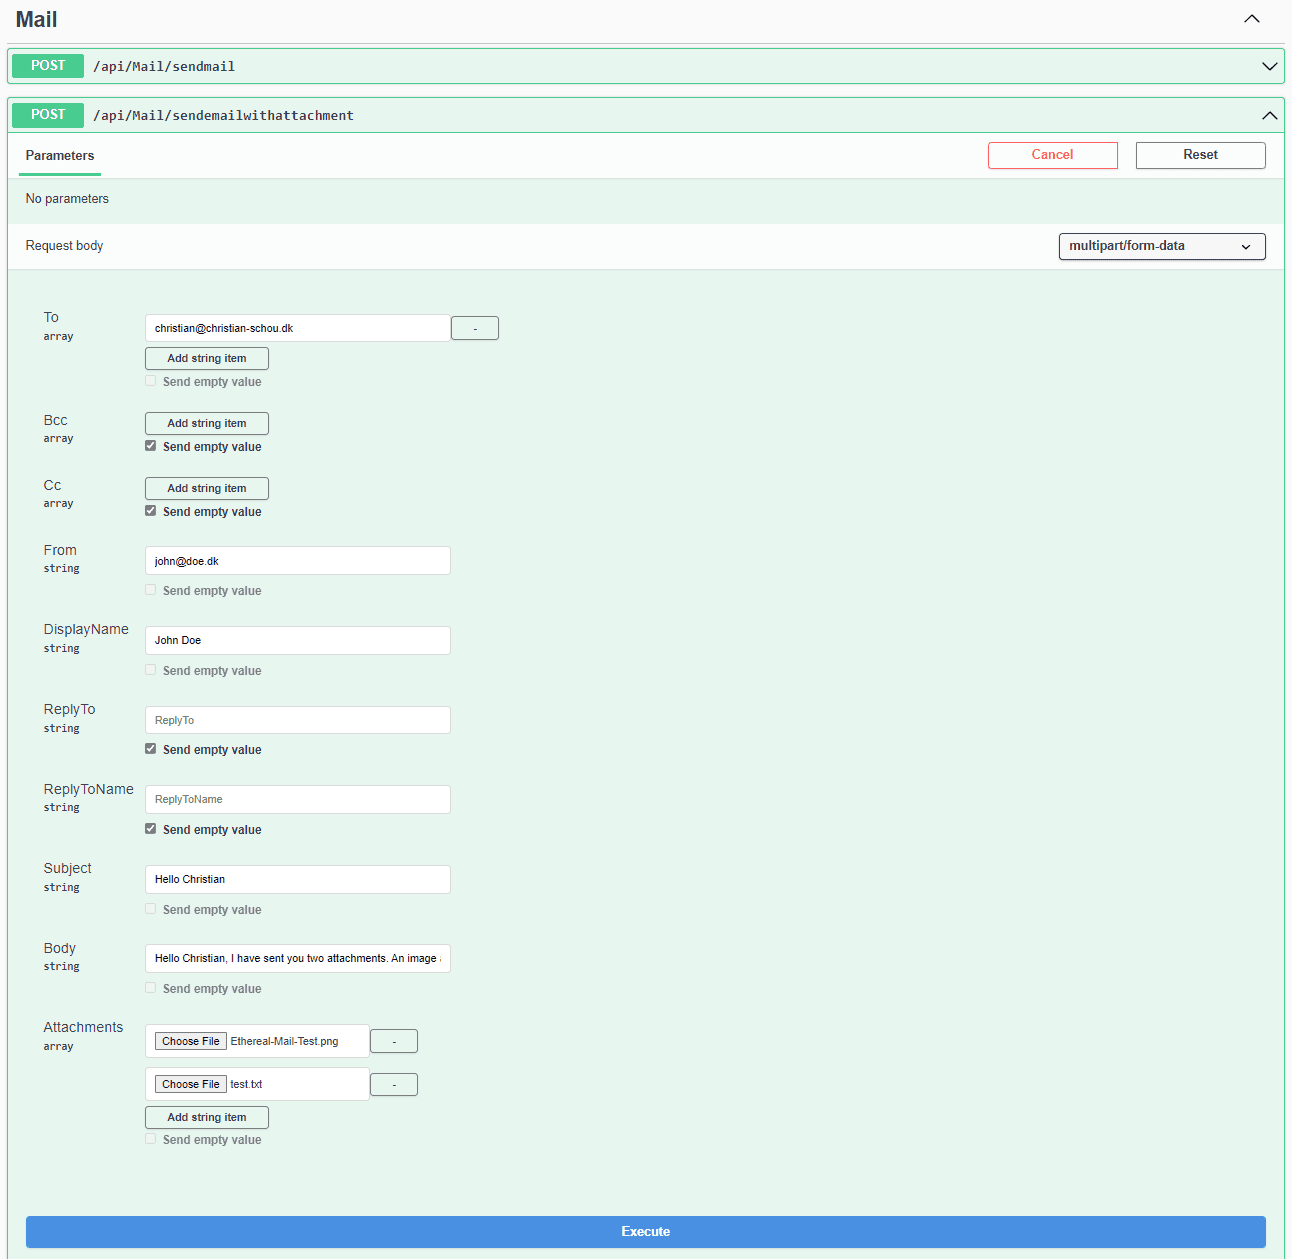
Finally, we have to wire it up in our MailController to accept a POST request for sending the email with attachment(s). Check the code below for accepting a form defined by the model.
[HttpPost("sendemailwithattachment")]
public async Task<IActionResult> SendMailWithAttachmentAsync([FromForm]MailDataWithAttachments mailData)
{
bool result = await _mail.SendWithAttachmentsAsync(mailData, new CancellationToken());
if (result)
{
return StatusCode(StatusCodes.Status200OK, "Mail with attachment has successfully been sent.");
}
else
{
return StatusCode(StatusCodes.Status500InternalServerError, "An error occured. The Mail with attachment could not be sent.");
}
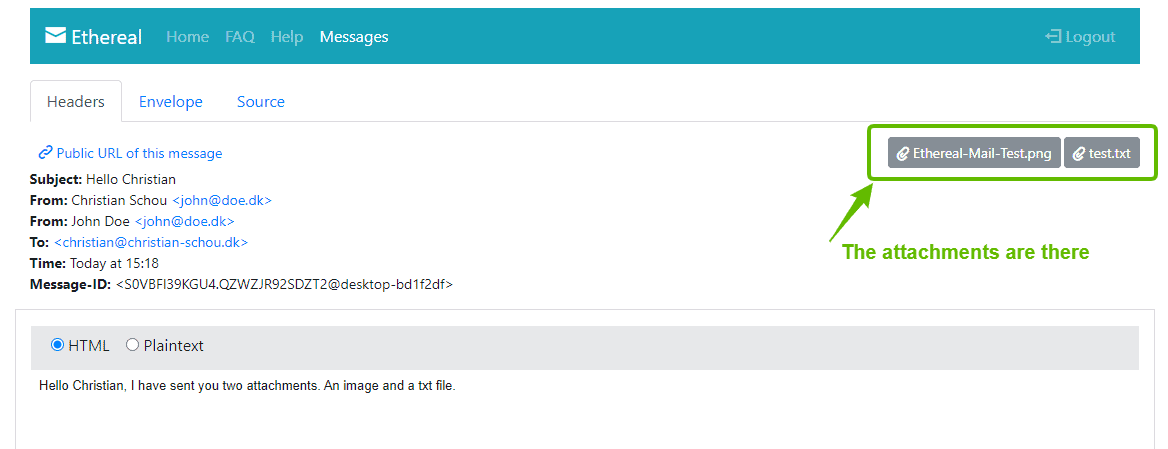
}Alright – let’s spin it up and send an email with an attachment and verify that the attachment got through to the receiver.
The response from the API endpoint when executing that.
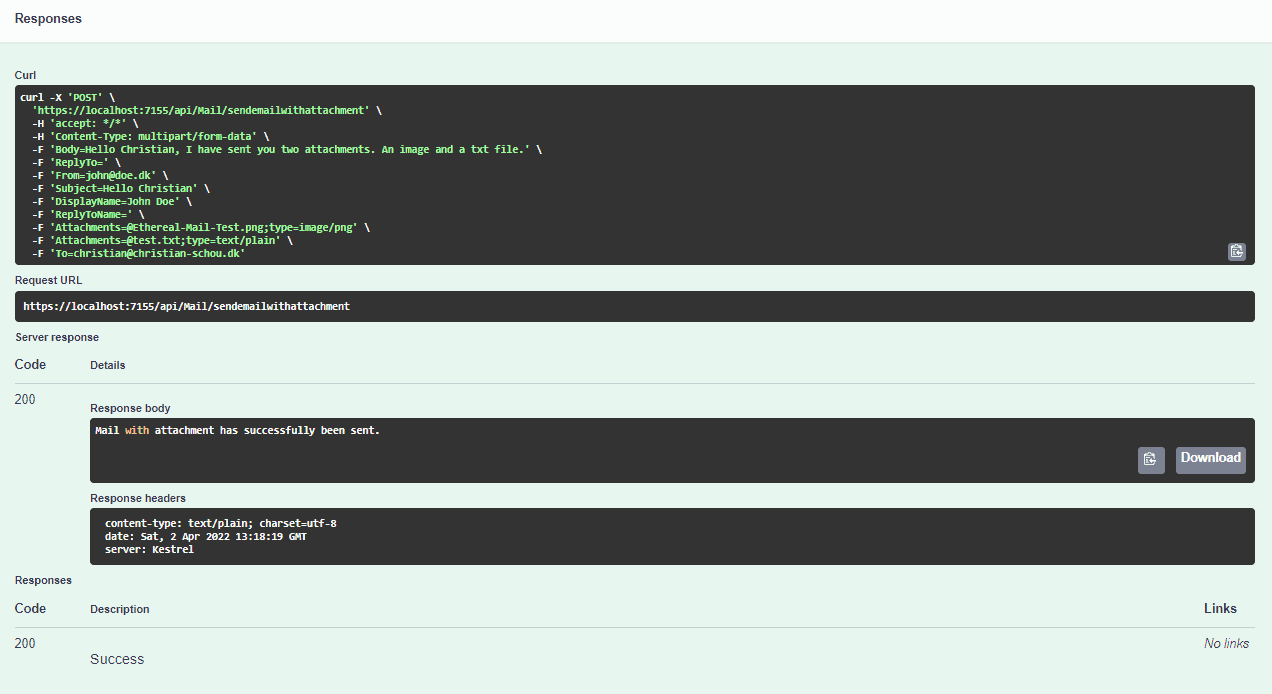
Cool! We can now send emails with ASP.NET Core including attachments! Let’s verify in our inbox that the mail got through and the attachments are there as well.
Send emails using templates in ASP.NET Core
An email template comes in very handy if you are going to automate the process of sending emails to users of your application. I tend to always use HTML-based emails unless I am doing some very important status messages for users in my organization, who just prefer simple text mail.
HTML-based emails are great for greeting new users, sending newsletters, notifications, order confirmations, etc… Now that we got the mailing functionality in place, let’s have a look at how we can send emails using MailKit with ASP.NEt Core. For this, we will make use of the Razor engine and a simple HTML template where we will replace text using models.
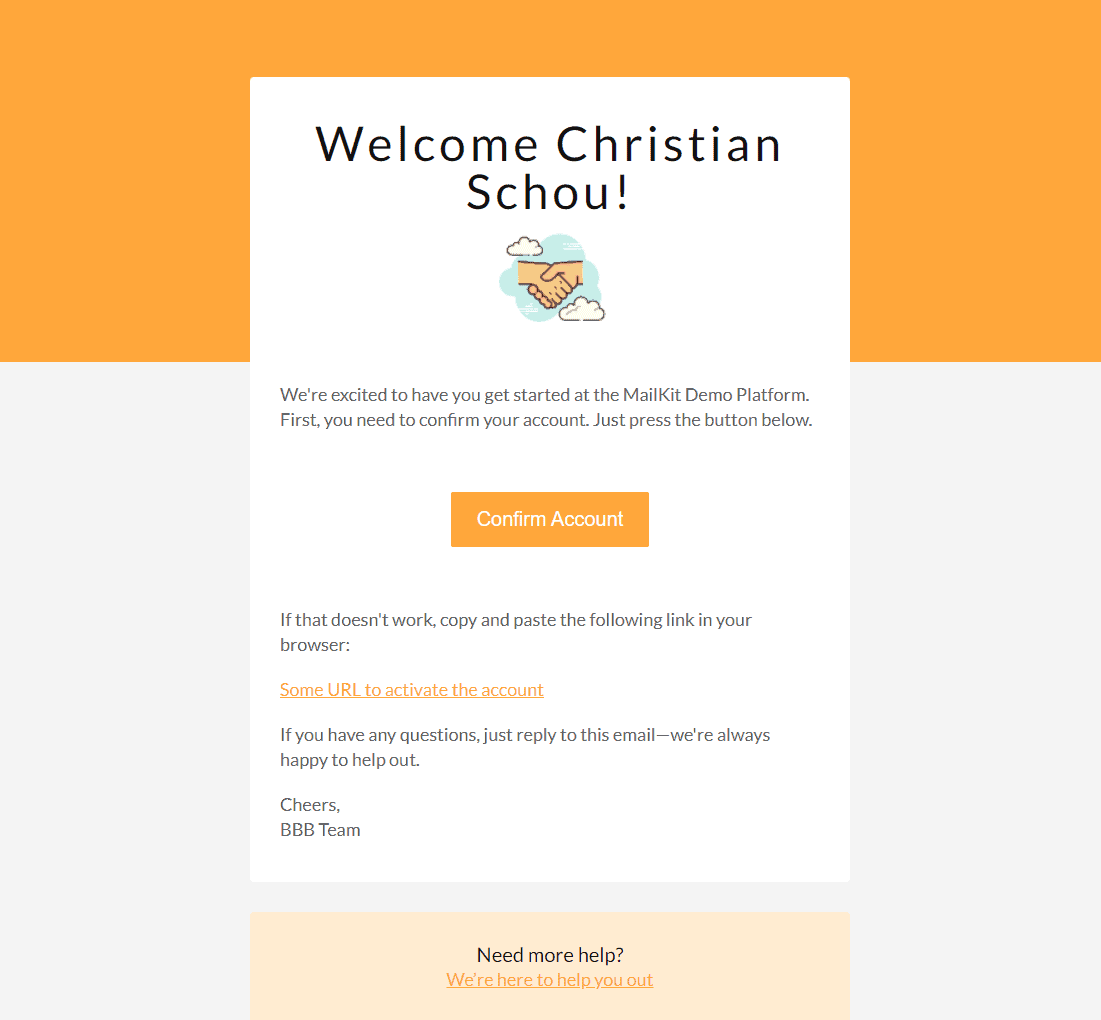
If you are ready, let’s get started and create a welcome email for our users. The final result is going to be the one you can see below.
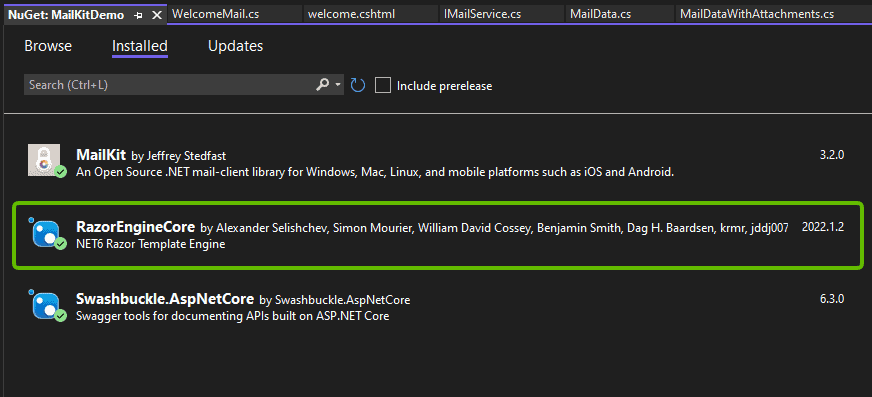
Install the RazorEngineCore package in the project
RazorEngineCore is a NET6 Razor Template Engine. We will use it for modifying our HTML template with data from the model we parse to it.
You can find the package here at nuget.org – RazorEngineCore. Alternatively, you can go to your package manager as we did earlier in this article, and install the package by searching for RazorEngineCore in the browse tab.
### Package Manager
Install-Package RazorEngineCore
###

### .NET CLI
dotnet add package RazorEngineCore
###

### PackageReference
<PackageReference Include="RazorEngineCore" Version="<VERSION-TAG-HERE>" />
###
The HTML Template
The template is made of HTML with a little modification for Razor to use it. We are not storing it as a normal HTML file in our project, it has to be saved as a .cshtml file. The template below is taken from BBBootstrap and can be found here Boostrap 4 Confirm Account Email Template.

When working with .cshtml files, we need a way to escape some special characters in the code. In the template below, I have added @("@") in front of all “@“. This is because we need the @ to be there in order to make the styling work.
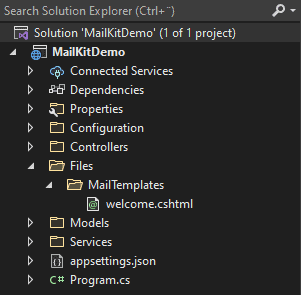
In the heading, I have added @Model?.Name in the pre-hidden text and after the welcome text. This text will be replaced at runtime using a model in a generic method with RazorEngineCore. You can simply copy and paste the HTML code below and put it in a new file named welcome.cshtml. Place that welcome file in a new folder ./Files/MailTemplates/.
<!DOCTYPE html>
<html>
<head>
<title></title>
<meta http-equiv="Content-Type" content="text/html; charset=utf-8" />
<meta name="viewport" content="width=device-width, initial-scale=1">
<meta http-equiv="X-UA-Compatible" content="IE=edge" />
<style type="text/<a class="wpg-linkify wpg-tooltip" title="<h3 class="wpg-tooltip-title">What is <span class="wpg-tooltip-term-title">CSS</span></h3><div class="wpg-tooltip-content">CSS or Cascading Style Sheets is a style sheet language used to define visual appearance and formatting of HTML documents. WordPress themes use CSS and HTML to output the data generated by WordPress. Every WordPress theme contains a style.css file which has style rules to define the formatting of pages generated by WordPress.<p class="wpg-read-more"><a href="https://christian-schou.dk/glossary/css/">Read more..</a></p></div>" target="_blank">css</a>">
@("@")media screen {
@("@")font-face {
font-family: 'Lato';
font-style: normal;
font-weight: 400;
src: local('Lato Regular'), local('Lato-Regular'), url(https://fonts.gstatic.com/s/lato/v11/qIIYRU-oROkIk8vfvxw6QvesZW2xOQ-xsNqO47m55DA.woff) format('woff');
}
@("@")font-face {
font-family: 'Lato';
font-style: normal;
font-weight: 700;
src: local('Lato Bold'), local('Lato-Bold'), url(https://fonts.gstatic.com/s/lato/v11/qdgUG4U09HnJwhYI-uK18wLUuEpTyoUstqEm5AMlJo4.woff) format('woff');
}
@("@")font-face {
font-family: 'Lato';
font-style: italic;
font-weight: 400;
src: local('Lato Italic'), local('Lato-Italic'), url(https://fonts.gstatic.com/s/lato/v11/RYyZNoeFgb0l7W3Vu1aSWOvvDin1pK8aKteLpeZ5c0A.woff) format('woff');
}
@("@")font-face {
font-family: 'Lato';
font-style: italic;
font-weight: 700;
src: local('Lato Bold Italic'), local('Lato-BoldItalic'), url(https://fonts.gstatic.com/s/lato/v11/HkF_qI1x_noxlxhrhMQYELO3LdcAZYWl9Si6vvxL-qU.woff) format('woff');
}
}
/* CLIENT-SPECIFIC STYLES */
body,
table,
td,
a {
-webkit-text-size-adjust: 100%;
-ms-text-size-adjust: 100%;
}
table,
td {
mso-table-lspace: 0pt;
mso-table-rspace: 0pt;
}
img {
-ms-interpolation-mode: bicubic;
}
/* RESET STYLES */
img {
border: 0;
height: auto;
line-height: 100%;
outline: none;
text-decoration: none;
}
table {
border-collapse: collapse !important;
}
body {
height: 100% !important;
margin: 0 !important;
padding: 0 !important;
width: 100% !important;
}
/* iOS BLUE LINKS */
a[x-apple-data-detectors] {
color: inherit !important;
text-decoration: none !important;
font-size: inherit !important;
font-family: inherit !important;
font-weight: inherit !important;
line-height: inherit !important;
}
/* MOBILE STYLES */
@("@")media screen and (max-width:600px) {
h1 {
font-size: 32px !important;
line-height: 32px !important;
}
}
/* ANDROID CENTER FIX */
div[style*="margin: 16px 0;"] {
margin: 0 !important;
}
</style>
</head>
<body style="background-color: #f4f4f4; margin: 0 !important; padding: 0 !important;">
<!-- HIDDEN PREHEADER TEXT -->
<div style="display: none; font-size: 1px; color: #fefefe; line-height: 1px; font-family: 'Lato', Helvetica, Arial, sans-serif; max-height: 0px; max-width: 0px; opacity: 0; overflow: hidden;">@Model?.Name We're thrilled to have you here! Get ready to dive into your new account. </div>
<table border="0" cellpadding="0" cellspacing="0" width="100%">
<!-- LOGO -->
<tr>
<td bgcolor="#FFA73B" align="center">
<table border="0" cellpadding="0" cellspacing="0" width="100%" style="max-width: 600px;">
<tr>
<td align="center" valign="top" style="padding: 40px 10px 40px 10px;"> </td>
</tr>
</table>
</td>
</tr>
<tr>
<td bgcolor="#FFA73B" align="center" style="padding: 0px 10px 0px 10px;">
<table border="0" cellpadding="0" cellspacing="0" width="100%" style="max-width: 600px;">
<tr>
<td bgcolor="#ffffff" align="center" valign="top" style="padding: 40px 20px 20px 20px; border-radius: 4px 4px 0px 0px; color: #111111; font-family: 'Lato', Helvetica, Arial, sans-serif; font-size: 48px; font-weight: 400; letter-spacing: 4px; line-height: 48px;">
<h1 style="font-size: 48px; font-weight: 400; margin: 2;">Welcome @Model?.Name!</h1> <img src=" https://img.icons8.com/clouds/100/000000/handshake.png" width="125" height="120" style="display: block; border: 0px;" />
</td>
</tr>
</table>
</td>
</tr>
<tr>
<td bgcolor="#f4f4f4" align="center" style="padding: 0px 10px 0px 10px;">
<table border="0" cellpadding="0" cellspacing="0" width="100%" style="max-width: 600px;">
<tr>
<td bgcolor="#ffffff" align="left" style="padding: 20px 30px 40px 30px; color: #666666; font-family: 'Lato', Helvetica, Arial, sans-serif; font-size: 18px; font-weight: 400; line-height: 25px;">
<p style="margin: 0;">We're excited to have you get started at the MailKit Demo Platform. First, you need to confirm your account. Just press the button below.</p>
</td>
</tr>
<tr>
<td bgcolor="#ffffff" align="left">
<table width="100%" border="0" cellspacing="0" cellpadding="0">
<tr>
<td bgcolor="#ffffff" align="center" style="padding: 20px 30px 60px 30px;">
<table border="0" cellspacing="0" cellpadding="0">
<tr>
<td align="center" style="border-radius: 3px;" bgcolor="#FFA73B"><a href="#" target="_blank" style="font-size: 20px; font-family: Helvetica, Arial, sans-serif; color: #ffffff; text-decoration: none; color: #ffffff; text-decoration: none; padding: 15px 25px; border-radius: 2px; border: 1px solid #FFA73B; display: inline-block;">Confirm Account</a></td>
</tr>
</table>
</td>
</tr>
</table>
</td>
</tr> <!-- COPY -->
<tr>
<td bgcolor="#ffffff" align="left" style="padding: 0px 30px 0px 30px; color: #666666; font-family: 'Lato', Helvetica, Arial, sans-serif; font-size: 18px; font-weight: 400; line-height: 25px;">
<p style="margin: 0;">If that doesn't work, copy and paste the following link in your browser:</p>
</td>
</tr> <!-- COPY -->
<tr>
<td bgcolor="#ffffff" align="left" style="padding: 20px 30px 20px 30px; color: #666666; font-family: 'Lato', Helvetica, Arial, sans-serif; font-size: 18px; font-weight: 400; line-height: 25px;">
<p style="margin: 0;"><a href="#" target="_blank" style="color: #FFA73B;">Some URL to activate the account</a></p>
</td>
</tr>
<tr>
<td bgcolor="#ffffff" align="left" style="padding: 0px 30px 20px 30px; color: #666666; font-family: 'Lato', Helvetica, Arial, sans-serif; font-size: 18px; font-weight: 400; line-height: 25px;">
<p style="margin: 0;">If you have any questions, just reply to this email—we're always happy to help out.</p>
</td>
</tr>
<tr>
<td bgcolor="#ffffff" align="left" style="padding: 0px 30px 40px 30px; border-radius: 0px 0px 4px 4px; color: #666666; font-family: 'Lato', Helvetica, Arial, sans-serif; font-size: 18px; font-weight: 400; line-height: 25px;">
<p style="margin: 0;">Cheers,<br>BBB Team</p>
</td>
</tr>
</table>
</td>
</tr>
<tr>
<td bgcolor="#f4f4f4" align="center" style="padding: 30px 10px 0px 10px;">
<table border="0" cellpadding="0" cellspacing="0" width="100%" style="max-width: 600px;">
<tr>
<td bgcolor="#FFECD1" align="center" style="padding: 30px 30px 30px 30px; border-radius: 4px 4px 4px 4px; color: #666666; font-family: 'Lato', Helvetica, Arial, sans-serif; font-size: 18px; font-weight: 400; line-height: 25px;">
<h2 style="font-size: 20px; font-weight: 400; color: #111111; margin: 0;">Need more help?</h2>
<p style="margin: 0;"><a href="#" target="_blank" style="color: #FFA73B;">We’re here to help you out</a></p>
</td>
</tr>
</table>
</td>
</tr>
</table>
</body>
</html>Create a new model for welcome emails to users
Inside our Models folder, we will create a new folder named WelcomeMail.cs and put two properties inside it. One for name and another for email. Remember to replace the namespace with your own project.
namespace MailKitDemo.Models.Emails
{
    public class WelcomeMail
    {
        public string? Name { get; set; }
        public string? Email { get; set; }
    }
}
Add Email Template Service to the Mail Service
In order to generate a new template for the mail we would like to send, we need a service to generate the string we later will format as HTML when sending the welcome mail to our user.
Open IMailService.cs and add the following in line 9:
using MailKitDemo.Models;

namespace MailKitDemo.Services
{
    public interface IMailService
    {
        Task SendAsync(MailData mailData, CancellationToken ct);
        Task SendWithAttachmentsAsync(MailDataWithAttachments mailData, CancellationToken ct);
        string GetEmailTemplate(string emailTemplate, T emailTemplateModel);
    }
}
As you can see we are creating a generic method (A generic method is a method that is declared with type parameters). This is because we would like to reuse our code to generate multiple templates, without having to repeat ourselves. By doing it this way, we would only have to create a new model and template file, when adding a new type of mail to our project.
Open MailService and implement the updated interface, like below:
using MailKit.Net.Smtp;
using MailKit.Security;
using MailKitDemo.Configuration;
using MailKitDemo.Models;
using Microsoft.Extensions.Options;
using MimeKit;
using RazorEngineCore;
using System.Text;

namespace MailKitDemo.Services
{
    public class MailService : IMailService
    {
        private readonly MailSettings _settings;

        public MailService(IOptions<MailSettings> settings)
        {
            _settings = settings.Value;
        }

        public async Task<bool> SendWithAttachmentsAsync(MailDataWithAttachments mailData, CancellationToken ct = default)
        {
            try
            {
                // Initialize a new instance of the MimeKit.MimeMessage class
                var mail = new MimeMessage();

                #region Sender / Receiver
                // Sender
                mail.From.Add(new MailboxAddress(_settings.DisplayName, mailData.From ?? _settings.From));
                mail.Sender = new MailboxAddress(mailData.DisplayName ?? _settings.DisplayName, mailData.From ?? _settings.From);

                // Receiver
                foreach (string mailAddress in mailData.To)
                    mail.To.Add(MailboxAddress.Parse(mailAddress));

                // Set Reply to if specified in mail data
                if (!string.IsNullOrEmpty(mailData.ReplyTo))
                    mail.ReplyTo.Add(new MailboxAddress(mailData.ReplyToName, mailData.ReplyTo));

                // BCC
                // Check if a BCC was supplied in the request
                if (mailData.Bcc != null)
                {
                    // Get only addresses where value is not null or with whitespace. x = value of address
                    foreach (string mailAddress in mailData.Bcc.Where(x => !string.IsNullOrWhiteSpace(x)))
                        mail.Bcc.Add(MailboxAddress.Parse(mailAddress.Trim()));
                }

                // CC
                // Check if a CC address was supplied in the request
                if (mailData.Cc != null)
                {
                    foreach (string mailAddress in mailData.Cc.Where(x => !string.IsNullOrWhiteSpace(x)))
                        mail.Cc.Add(MailboxAddress.Parse(mailAddress.Trim()));
                }
                #endregion

                #region Content

                // Add Content to Mime Message
                var body = new BodyBuilder();
                mail.Subject = mailData.Subject;

                // Check if we got any attachments and add the to the builder for our message
                if (mailData.Attachments != null)
                {
                    byte[] attachmentFileByteArray;
                    foreach (IFormFile attachment in mailData.Attachments)
                    {
                        if (attachment.Length > 0)
                        {
                            using (MemoryStream memoryStream = new MemoryStream())
                            {
                                attachment.CopyTo(memoryStream);
                                attachmentFileByteArray = memoryStream.ToArray();
                            }
                            body.Attachments.Add(attachment.FileName, attachmentFileByteArray, ContentType.Parse(attachment.ContentType));
                        }
                    }
                }
                body.HtmlBody = mailData.Body;
                mail.Body = body.ToMessageBody();

                #endregion

                #region Send Mail

                using var smtp = new SmtpClient();

                if (_settings.UseSSL)
                {
                    await smtp.ConnectAsync(_settings.Host, _settings.Port, SecureSocketOptions.SslOnConnect, ct);
                }
                else if (_settings.UseStartTls)
                {
                    await smtp.ConnectAsync(_settings.Host, _settings.Port, SecureSocketOptions.StartTls, ct);
                }

                await smtp.AuthenticateAsync(_settings.UserName, _settings.Password, ct);
                await smtp.SendAsync(mail, ct);
                await smtp.DisconnectAsync(true, ct);

                return true;
                #endregion

            }
            catch (Exception)
            {
                return false;
            }
        }

        public async Task<bool> SendAsync(MailData mailData, CancellationToken ct = default)
        {
            try
            {
                // Initialize a new instance of the MimeKit.MimeMessage class
                var mail = new MimeMessage();

                #region Sender / Receiver
                // Sender
                mail.From.Add(new MailboxAddress(_settings.DisplayName, mailData.From ?? _settings.From));
                mail.Sender = new MailboxAddress(mailData.DisplayName ?? _settings.DisplayName, mailData.From ?? _settings.From);

                // Receiver
                foreach (string mailAddress in mailData.To)
                    mail.To.Add(MailboxAddress.Parse(mailAddress));

                // Set Reply to if specified in mail data
                if(!string.IsNullOrEmpty(mailData.ReplyTo))
                    mail.ReplyTo.Add(new MailboxAddress(mailData.ReplyToName, mailData.ReplyTo));

                // BCC
                // Check if a BCC was supplied in the request
                if (mailData.Bcc != null)
                {
                    // Get only addresses where value is not null or with whitespace. x = value of address
                    foreach (string mailAddress in mailData.Bcc.Where(x => !string.IsNullOrWhiteSpace(x)))
                        mail.Bcc.Add(MailboxAddress.Parse(mailAddress.Trim()));
                }

                // CC
                // Check if a CC address was supplied in the request
                if (mailData.Cc != null)
                {
                    foreach (string mailAddress in mailData.Cc.Where(x => !string.IsNullOrWhiteSpace(x)))
                        mail.Cc.Add(MailboxAddress.Parse(mailAddress.Trim()));
                }
                #endregion

                #region Content

                // Add Content to Mime Message
                var body = new BodyBuilder();
                mail.Subject = mailData.Subject;
                body.HtmlBody = mailData.Body;
                mail.Body = body.ToMessageBody();

                #endregion

                #region Send Mail

                using var smtp = new SmtpClient();

                if (_settings.UseSSL)
                {
                    await smtp.ConnectAsync(_settings.Host, _settings.Port, SecureSocketOptions.SslOnConnect, ct);
                }
                else if (_settings.UseStartTls)
                {
                    await smtp.ConnectAsync(_settings.Host, _settings.Port, SecureSocketOptions.StartTls, ct);
                }

                await smtp.AuthenticateAsync(_settings.UserName, _settings.Password, ct);
                await smtp.SendAsync(mail, ct);
                await smtp.DisconnectAsync(true, ct);

                return true;
                #endregion

            }
            catch (Exception)
            {
                return false;
            }
        }

        public string GetEmailTemplate<T>(string emailTemplate, T emailTemplateModel)
        {
            string mailTemplate = LoadTemplate(emailTemplate);

            IRazorEngine razorEngine = new RazorEngine();
            IRazorEngineCompiledTemplate modifiedMailTemplate = razorEngine.Compile(mailTemplate);

            return modifiedMailTemplate.Run(emailTemplateModel);
        }

        public string LoadTemplate(string emailTemplate)
        {
            string baseDir = AppDomain.CurrentDomain.BaseDirectory;
            string templateDir = Path.Combine(baseDir, "Files/MailTemplates");
            string templatePath = Path.Combine(templateDir, $"{emailTemplate}.cshtml");

            using FileStream fileStream = new FileStream(templatePath, FileMode.Open, FileAccess.Read, FileShare.ReadWrite);
            using StreamReader streamReader = new StreamReader(fileStream, Encoding.Default);

            string mailTemplate = streamReader.ReadToEnd();
            streamReader.Close();

            return mailTemplate;
        }
    }
}
So what happens here? Let’s take them step-by-step, starting from the bottom.
LoadTemplate() is responsible for returning the email template file, which we would like to modify with our model data. I generates a path for the template, then used a file- and stream reader to open the file, read it to the end and return it to the requesting method.
GetEmailTemplate() is responsible for modifying the mail template returned from LoadTemplate() with model data we parsed from the requesting method.
- We create a new
RazorEngineobject. - We then compile the mail template file (in our case
welcome.cshtml). - Finally, we update the compiled file with data from our
emailTemplateModel( in our caseWelcomeMail.cs) and return it.
Add a new endpoint to generate a Welcome Email to the user
Finally, we have to add a new endpoint in our MailController.cs file to accept a new POST request that is responsible for creating a new MailData object with data from our WelcomeMail object and lastly sending the mail.
Below is the final MailController with the final method to send an email using a template with ASP.NET Core.
using MailKitDemo.Models;
using MailKitDemo.Models.Emails;
using MailKitDemo.Services;
using Microsoft.AspNetCore.Mvc;

namespace MailKitDemo.Controllers
{
    [Route("api/[controller]")]
    [ApiController]
    public class MailController : ControllerBase
    {
        private readonly IMailService _mail;

        public MailController(IMailService mail)
        {
            _mail = mail;
        }

        [HttpPost("sendmail")]
        public async Task SendMailAsync(MailData mailData)
        {
            bool result = await _mail.SendAsync(mailData, new CancellationToken());

            if (result)
            {
                return StatusCode(StatusCodes.Status200OK, "Mail has successfully been sent.");
            }
            else
            {
                return StatusCode(StatusCodes.Status500InternalServerError, "An error occured. The Mail could not be sent.");
            }
        }

        [HttpPost("sendemailwithattachment")]
        public async Task SendMailWithAttachmentAsync([FromForm]MailDataWithAttachments mailData)
        {
            bool result = await _mail.SendWithAttachmentsAsync(mailData, new CancellationToken());

            if (result)
            {
                return StatusCode(StatusCodes.Status200OK, "Mail with attachment has successfully been sent.");
            }
            else
            {
                return StatusCode(StatusCodes.Status500InternalServerError, "An error occured. The Mail with attachment could not be sent.");
            }
        }

        [HttpPost("sendemailusingtemplate")]
        public async Task SendEmailUsingTemplate(WelcomeMail welcomeMail)
        {
            // Create MailData object
            MailData mailData = new MailData(
                new List { welcomeMail.Email },
                "Welcome to the MailKit Demo",
                _mail.GetEmailTemplate("welcome", welcomeMail));


            bool sendResult = await _mail.SendAsync(mailData, new CancellationToken());

            if (sendResult)
            {
                return StatusCode(StatusCodes.Status200OK, "Mail has successfully been sent using template.");
            }
            else
            {
                return StatusCode(StatusCodes.Status500InternalServerError, "An error occured. The Mail could not be sent.");
            }
        }
    }
}
On lines 53 – 56 we create the MailData object with the receiver, and subject and also request a generation of the mail template named welcome along with the WelcomeMail object.
On line 59 we request the mail service to send the email async with the MailData object now containing our modified HTML template.
Finally, we return a status to the client requesting this endpoint with a success or non-success message along with an appropriate status code.
Testing the email service for sending emails using HTML templates
Now for the final part of this article. Testing of our new endpoint responsible for sending emails using a template in ASP.NET Core.
Spin up (F5) the application and make a POST request in the swagger interface, as I have done below:
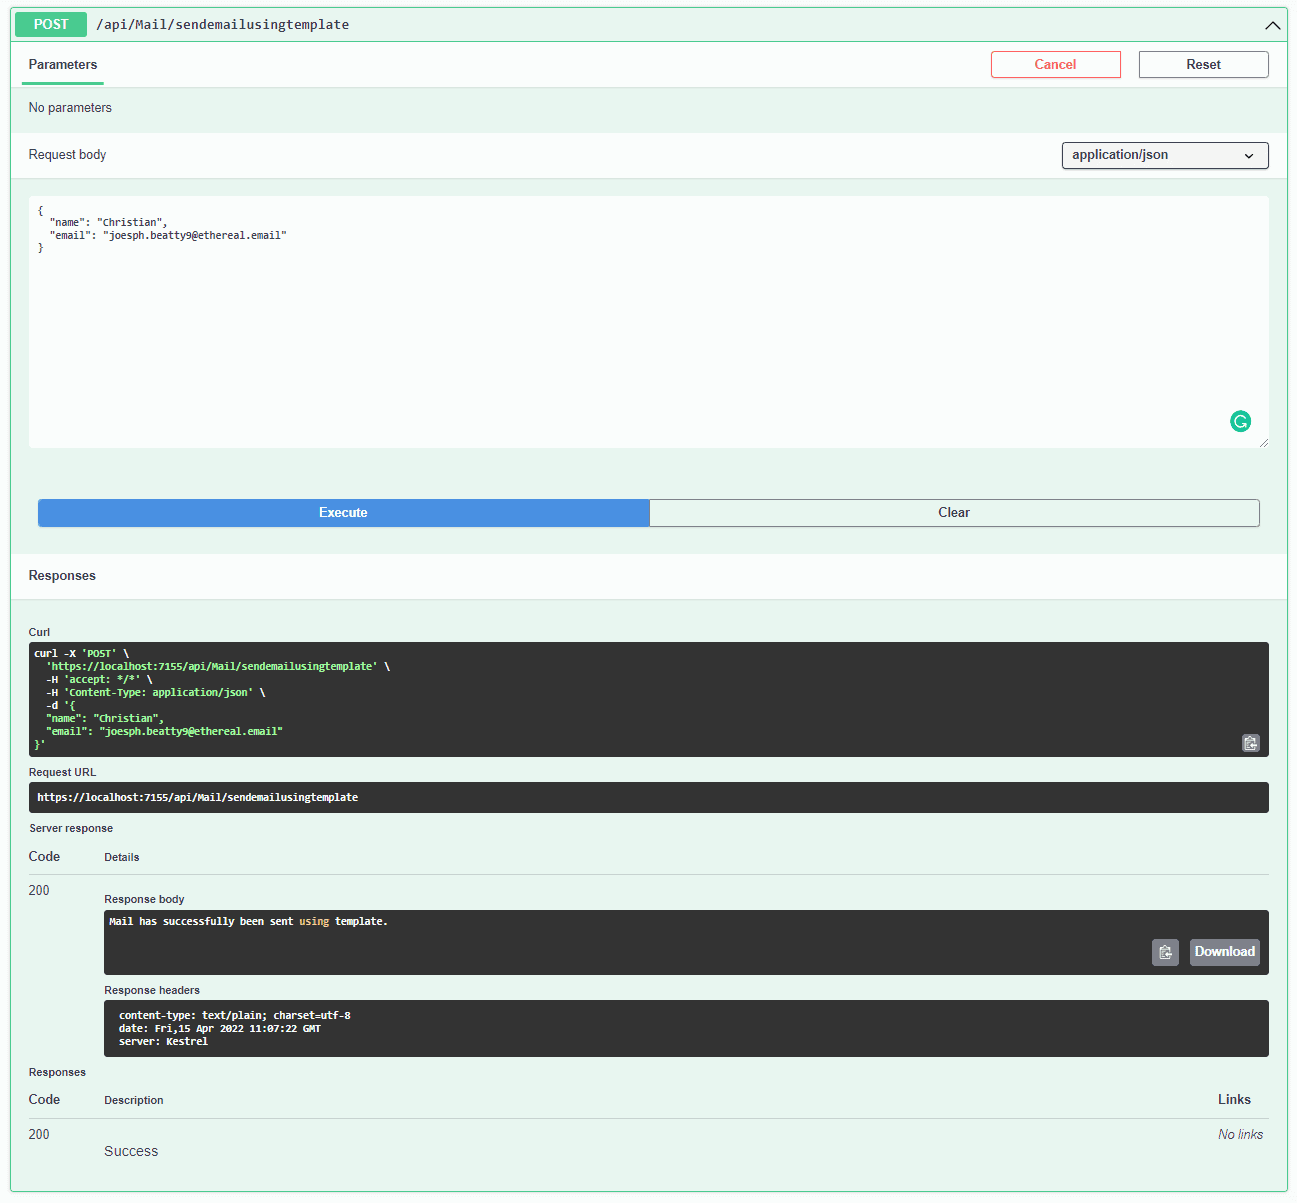
Let’s check it out in our email client.
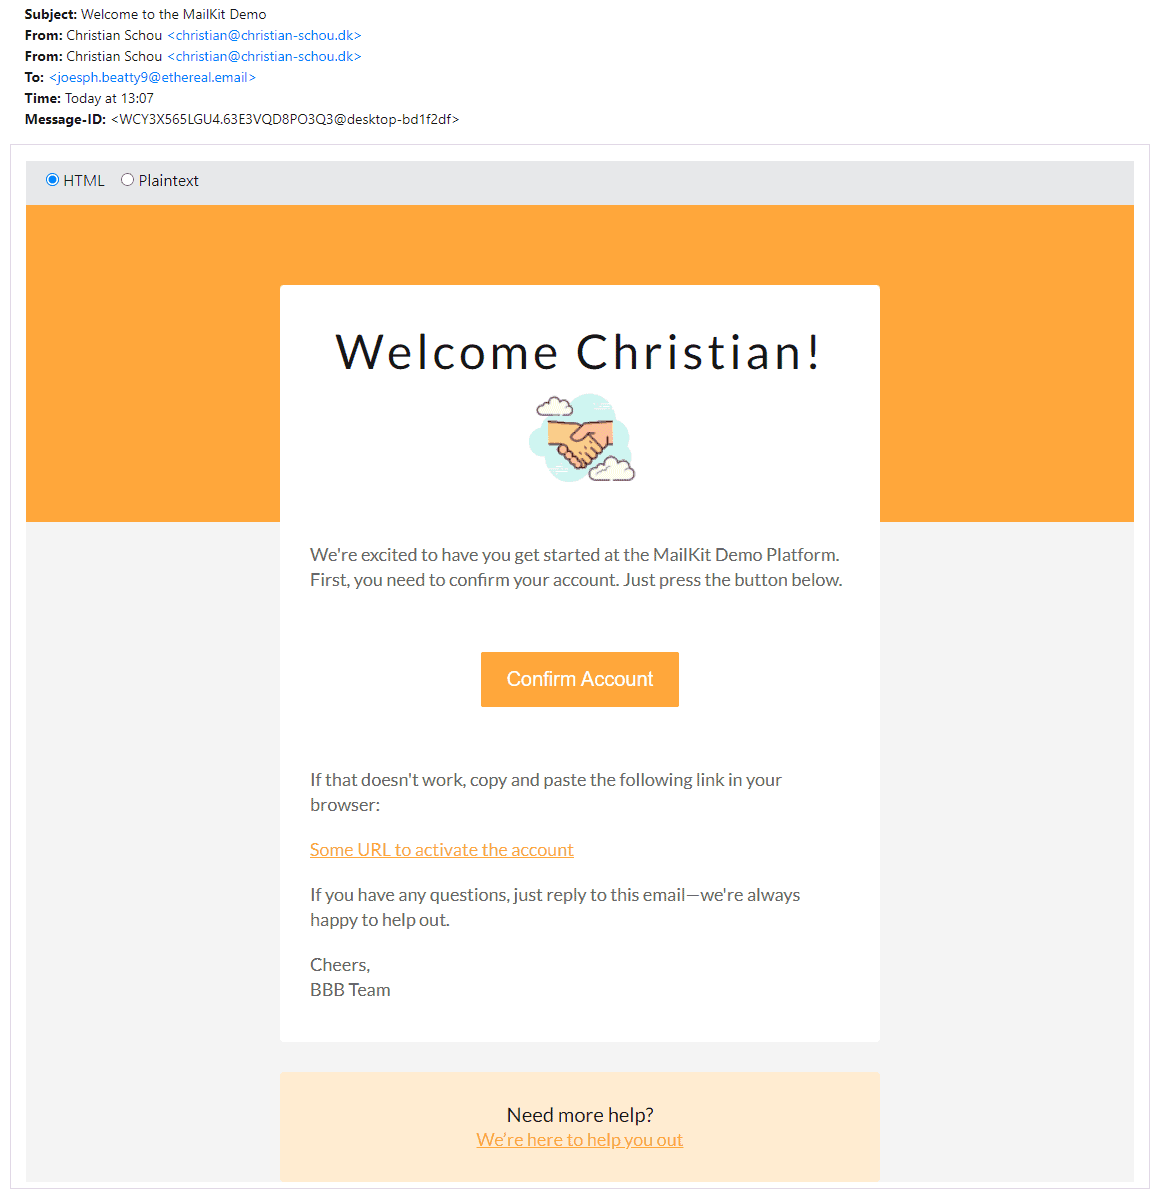
Wohaa! The mail has been dispatched from our application and formatted as HTML when sent to the receiver. It looks great and the Razor Engine has updated our placeholders with data from the model. Perfect!
Summary
In this article, you learned how to send emails with ASP.NET Core. You now got the knowledge to implement MailKit, an SMTP service, and a generic mail template service in your applications. I have added a GitHub link below, if you would like to see the source code, download it, etc…
Emails are still a crucial communication method and are widely used in big applications at Google, Facebook, Github, Twitter, Banking, Authentication Providers, etc… You are now able to add that feature to your applications and use it the same way they do. (Please avoid spamming your users 😉 ).
I hope you like my article. Please let me know your thoughts in the comments below. If you got any issues, suggestions, or questions, please also leave them below. I will get back to you ASAP. Happy coding out there! 😀
You can find the source code here for this tutorial.
 Christian-Schou