What is a JSON Web Token (JWT) and why use them in conjunction with Web APIs?

So what exactly is a JSON Web Token (JWT)? Almost any Web API out there is secured in some way. I only know a few Web APIs that is not secure and they are offered by The European Union in order for applications to validate data about companies etc… But that is not what is article is about.
In this article, I will tell you what a JSON Web Token (JWT) is and why you would be using them to secure your web API. If you are ready, let’s get started.
What is a JSON Web Token?
JWT is short for JSON Web Token – I will use both versions throughout this article. A JSON Web Token is a pre-defined format developers use to exchange claims between two applications. A typical token would consist of claims in the JSON format (hence the J for JSON) accompanied by a mechanism for encrypting and signing the JSON in order for other applications to trust it.
When I started working with JWTs I had a look at the standard for JSON Web Tokens (I always do that, if there are any standards available for the tech I’m working with or starting to learn). Fortunately, there is for JWT – you can take a look for yourself here: RFC 7519. That article explicitly defines common claims for a JSON Web Token (check section 4) – below is a brief summary for each of them.
- “iss” – (Issuer) Claim. The issuer is the way to identify the principal that issues the JWT.
- “sub” – (Subject) Claim. This claim identifies the principal that is the subject of the JWT. In other words, this could be a user id to instruct other applications on who or what they are working with.
- “aud” – (Audience) Claim. This claim is used to tell the consumer/recipient what the JWT is intended for. Normally this would be used for the principal to identify itself with a specific value in the claim.
- “exp” – (Expiration Time) Claim. This claim is used to tell the systems when a JWT must NOT be accepted for processing. In other words, the claim required that the current time has to be before the expiration listens in the exp claim inside the token.
- “nbf” – (Not Before) Claim. A token where the not before the claim is before the actual time of the consumer must not be accepted for processing. This means that the claims required the system to validate that the token can only be used if the time is after or equal to the not before the time listed inside the nbf claim.
- “iat” – (Issued At) Claim. This is a simple one, but very important. This claim identifies the time at which the JSON Web Token was issued. The consuming application can use this claim to determine the age of the JWT.
- “jti” – (JWT ID) Claim. This is a unique ID for each token issued by the token provider. If you are using multiple JWT providers, you must ensure that they do not create the same identifier as you would end up with a collision.
Now you should have a brief understanding of what the common claims in a JWT are giving you a better understanding of the next section, but before we move on, I want to tell a bit more about what a JWT is. The primary purpose of using a JWT is not to hide the data but to ensure that the data transferred between the server and client is sent only if the client is authenticated. This is very important – JSON Web Tokens are not encrypted, they are signed.
A JSON Web Token is actually a token-based stateless authentication mechanism. The great thing about JWTs is that they are client-side-based (when talking sessions). This means that the server doesn’t have to rely totally on a database to save the information about the session – awesome!
Structure of a JSON Web Token
A JSON Web Token is made up of three parts. A header, a body, and a signature. When you see a JWT it would look like this: header.payload.signature.
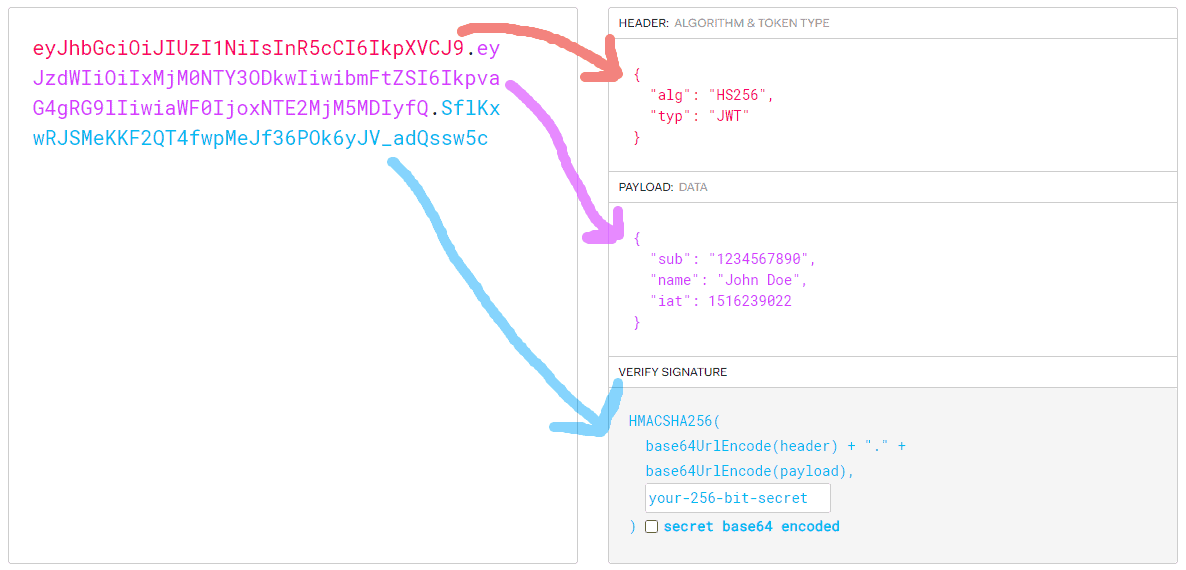
So this would be a valid encoded JSON Web Token using HS256 as the algorithm. Each part is base64 encoded and concatenated using a dot “.”.
Encoded
eyJhbGciOiJIUzI1NiIsInR5cCI6IkpXVCJ9.eyJzdWIiOiIxMjM0NTY3ODkwIiwibmFtZSI6IkpvaG4gRG9lIiwiaWF0IjoxNTE2MjM5MDIyfQ.SflKxwRJSMeKKF2QT4fwpMeJf36POk6yJV_adQssw5cHeader
{
  "alg": "HS256",
  "typ": "JWT"
}
Payload
{
  "sub": "1234567890",
  "name": "John Doe",
  "iat": 1516239022
}
Verify Signature
HMACSHA256(
  base64UrlEncode(header) + "." +
  base64UrlEncode(payload),

your-256-bit-secret

)
The JWT header
The header is a JSON object and would in normal circumstances consist of two properties. These properties are the token type and the signing/encoding algorithm. Algorithms used with JSON Web Tokens are:
A typical header would look like this:
{
  "alg": "HS256",
  "typ": "JWT"
}
The JWT Payload/Body
The body or payload would consist of the data being issued by the authentication provider. A normal payload would consist of a lot of details/claims about the user like name, roles, last login, IP, etc… Below are some standard claims to give you an idea:
{
	"sub": "1234567890",
	"iat": 1516239022,
	"role": "user",
	"user_id": "user2"
	"name": "John Doe"
	"mail": "john@doe.com"
}
I would never recommend putting sensitive data in a JWT like a password as a JWT easily could be decoded and compromise sensitive data about the client.
The JWT Signature
I will not be deep-diving into how the signature is encoded but I believe that it probably is the most important part of the JSON Web Token apart from the payload. The signature is calculated by encoding the header and payload using base64url and concatenating them as I mentioned above and handing them over to the algorithm responsible for the cryptographic.
If we should generate a JwtToken in ASP.NET Core, we could accomplish it by doing this:
private async Task<JwtToken> GenerateNewJWToken(ApplicationUser user)
{
    // Put it all together
    var userClaims = await _userManager.GetClaimsAsync(user);
    var roles = await _userManager.GetRolesAsync(user);
    var roleClaims = new List<Claim>();
    for (int i = 0; i < roles.Count; i++)
    {
        roleClaims.Add(new Claim("roles", roles[i]));
    }
    var claims = new[]
    {
        // jti claim + custom user object claims
        new Claim(JwtRegisteredClaimNames.Sub, user.UserName),
        new Claim(JwtRegisteredClaimNames.Jti, Guid.NewGuid().ToString()),
        new Claim(JwtRegisteredClaimNames.Email, user.Email),
        new Claim("uid", user.Id),
        new Claim("first_name", user.FirstName),
        new Claim("last_name", user.LastName),
    }
    .Union(userClaims)
    .Union(roleClaims);

    // Generate JWT Token

    // Symmetric key and signing
    var symmetricKey = new SymmetricKey(Encoding.UTF8.GetBytes(<JWT_SYMETRIC_SECURITY_KEY>));
    var signingCres = new SigningCreds(symmetricKey, SecurityAlgorithms.HmacSha256);

    var jwtToken = new JwtToken(
        issuer: _jwtSettings.Issuer,
        audience: _jwtSettings.Audience,
        claims: claims,
        notBefore: DateTime.UtcNow,
        expires: DateTime.UtcNow.AddMinutes(_jwtSettings.DurationInMinutes),
        signingCreds: signingCreds);
    return jwtToken;
        }
As you might have guessed – whenever the header or payload changes, the signature has to be calculated one more time. At all times the idP (Identity Provider)/Authentication Provider has the private key to calculate this signature, making the token secure as it cannot be tampered with.
How does a JSON Web Token work?
The client is requesting the identity provider (idP) for login with credentials (username + password). The idP then generates a JWT certifying the user identity. This JWT is a key for the client to authorize itself against a protected resource. The JSON Web token is actually sent in the header of the request when requesting a GET, POST, PUT or DELETE command to the resource server. Let’s break it down:
- The user is signing into idP (Facebook, Azure AD, Google, Keycloak, FusionAuth, etc…)
- The identity provider is verifying the user credentials and upon success returns a JWT signed with a secret key.
- The user forwards this JWT when requesting a protected endpoint at the resource server inside the header of the request.
- The resource server then verifies against Facebook, Azure AD, Google, etc… that the token is valid using the public key.
- The resource server then returns a true/false response to whether the token is valid and issued by them for that client. This would authorize them and give them a role that allows them to perform actions at the resource server.
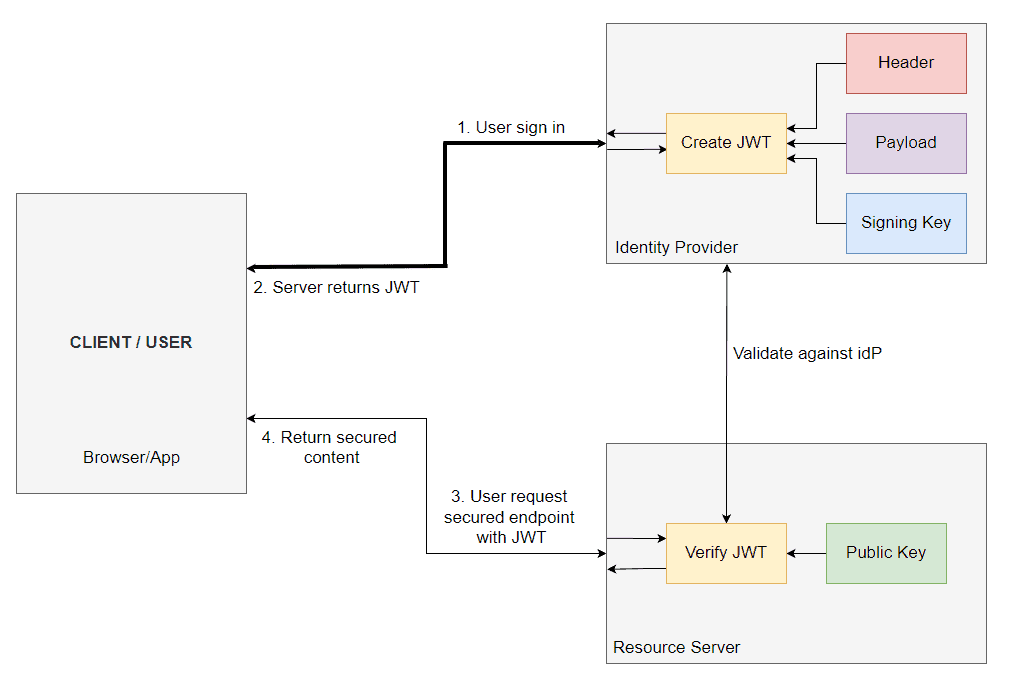
If you need this diagram inside your own documentation, you can download it by clicking it. That would take you to draw.io.

Validation of JWTs
The awesome thing about JSON Web Tokens s that it’s an open-source library where we get the software to generate the JWTs but also software to do all the heavy validation work for us. The library will provide you with a mechanism to validate the format of the token, and time claims, and then verify the signature.
Validate against the issuer or not?
If you want to remove a possible bottleneck, you could remove the part where the token is validated against the issuer. This is a key decision! If you have signed the JSON Web Token, then you got an option to do the validation locally within the resource server and not depend on a third-party identity provider.
Why would you do this? If you want to go the distributed way for your application, this would be the ideal option as the identity provider would not become a bottleneck at runtime. The great thing about JWTs is that we can include custom claims as I showed earlier. We could make sure that the token contained enough data about the user authenticating so that we are not forced to contact the idP and get the data.
What about security? In some cases, a JWT could be compromised and the only way to prevent usage of it is by checking if it’s blacklisted at the identity provider. I have seen the lifespans of some JWT for months and if such a token is compromised and not blacklisted it could cause a lot of damage. To be sure when validating a token every time, I would go with the validation against the identity provider.
Key claims to validate every time
When doing the validation you always check the signature, it’s crucial! Besides the signature, we also have to verify the following claims:
- “exp” (Expiration) – Current date must not be after the “exp” date.
- “nbf” (Not before) – Current data must not be before the “nbf” date.
If you got any custom claims I would always make sure to validate that they have valid values, etc…
JSON Web Token Pros and Cons
JWT got like any other authentication mechanism some pros and cons. Below is a shortlist of some of the JSON Web Token pros and cons that came to my mind, when doing a little reflection on the topic.
Pros
- Used Across Services.
- No database table.
- Simple to use.
- Expiration is built-in.
- Validation can be made offline.
- Can contain custom claims (data).
Cons
- One key to securing it all.
- You cannot manage the client from the server.
- Relies on the signing algorithm, which means that it could be deprecated in terms of the cryptographic algorithm.
- Bigger than a normal session token.
- Revoking a session of a user is difficult as we do not own the idP server.
Why use a JSON Web Token in your Web API?
JWTs are used for authorization and provide an application with a number of benefits compared to the alternatives we got when talking about authorization. I’m here referencing API keys, user:pass credentials, etc…
I would pick JSON Web Tokens because of the following reasons:
Can contain custom data
When working with JWTs we can include a lot of custom claims with data about the subject. When I build APIs I add role authorization on the controllers and specific endpoints in the controller, to make sure that no user is accessing anything they are not allowed to. The roles can be included in the payload under a custom claim.
Validation can be done offline
I mentioned it before under the validation of JWTs section. If the identity provider is using an asymmetric signing algorithm our resource server doesn’t have to request the idP and validate the token. We only have to make sure that the resource server got the public key. By using the public key we can decrypt the JWT and validate that nbf, exp, etc… is as we expected – all on our resource server without contacting the identity provider.
Expiration is built-in
The identity provider issuing the JSON Web Token can enforce the expiration of any JWT at any time, even when the expiration in the JWT is not exceeded. If using multiple JWTs in an application we can offer the client long-time access by overlapping the lifespan of each issued JWT giving the user a better experience.
Typical credentials like username and password would under normal circumstances not expire unless a system administrator has configured password lifetime for a specific period. These credentials have to be validated at the same provider every time it holds the user database. Often you will see these credentials shared across many applications making the applications more vulnerable as it’s easier to compromise several platforms when you got the primary credentials.
On the other hand, if we do separate the generation and validation of our JSON Web Tokens, we can spread the logic into multiple places. This would allow for the API to decompose logic as there is no single place everything has to be carried out. If we do this we could also introduce multiple identity providers in the same application. This would allow your users to sign in with Google, Facebook, Azure AD, LinkedIn, Keycloak realms, FusionAuth, etc…
Summary
I hope that you learned a thing or two about JSON Web Tokens. An important thing to remember from this article is that you always should sign your JWTs with an asymmetric key so that they can be validated offline if you get the requirement in the future. Remember they are not bulletproof! If you got any sensitive data inside the JSON Web Token I would recommend you encrypt the information.
You can use jwt.io to test and validate your JSON Web Token. It is an online tool to generate examples of tokens – I used it to generate the token I have been using in this article. One more thing – don’t start coding this yourself. If you do a simple Google search you will find multiple open-source libraries to handle all the logic you need to implement JWTs in your application.
If you got any questions or suggestions, please let me know in the comments section below.