
In-Memory caching is the perfect way to optimize your ASP.NET Core Web API 🌐 in terms of response time. Caching is a technique of storing data in temporary storage so that it can be accessed more quickly if it hasn't changed.
I recommend caching in services exposed to the internet to lower the pressure on the server backend. Implementing caching in your application will improve the performance significantly without optimizing the backend code. In my own and customer solutions, I implement Redis Caching in most cases, but in some cases, it doesn't make sense and then I go with In-Memory caching. A rule of thumb when working with caching is:
Data that is rarely changing or taking up lots of power to generate should be cached.
In this in-memory caching tutorial I will teach you how to add in-memory caching to your ASP.NET Core (.NET 6) Web API. If you are not in the market for a full-blown caching solution, I would recommend the In-Memory caching 💾 option as it is the easiest way to do caching.
Distributed Cache Solution
If you are looking for a distributed cache, then you can check out my new Azure Redis Cache .NET Guide. It will show you how to set up and configure Azure Cache for Redis and how to implement it into a .NET Core Web API.

If you are ready, then let's get started making some cache code. 👨💻
Requirements
To follow along in this tutorial, you need the following:
- .NET and C# Experience (No advanced skills needed).
- Visual Studio IDE/Code, Rider, or similar.
- An idea of what the decorator pattern is. (a design pattern that allows behavior to be added to an individual object, dynamically, without affecting the behavior of other objects from the same class.)
Create the Web API
For this tutorial, we will be using a clean Web API based on the ASP.NET Core Web API template in Visual Studio by Microsoft. If you already got a solution you are working on and adding In-Memory caching to, that's totally fine. If you are just playing around with caching, then open Visual Studio and create a new Web API (ASP.NET Core) running .NET 6.
Install Dependencies
I mentioned earlier that we will be implementing the In-Memory Caching service using the decorator pattern. In order not to break the SOLID principles, we have to decorate the service returning the data to the requester.
To decorate our service/repository we have to install a package named Scrutor. Scrtor is an assembly scanning and decoration extension for Microsoft.Extensions.DependencyInjection.
 khellang
By decorating the service returning the vehicles (return entity) in this tutorial, we can make sure that our application will remain SOLID. Open the Package Manager Console and enter the following command:
Install-Package ScrutorAs we will be running the application with an in-memory database you also have to add the EF Core In-Memory Database NuGet.
Install-Package Microsoft.EntityFrameworkCore.InMemoryTo test that our API is actually performing faster when running with the In-Memory cache service, we need to be able to show some data. For this tutorial, I will show vehicle data. More precisely are we going to present a list of 500 randomly generated vehicles.
To do this we need something called Bogus. Bogus is a simple and sane data generator for populating objects that supports different locales.
Install-Package BogusI will tell you a bit more about Bogus in a moment.
Add In-Memory Caching to .NET App
The ASP.NET Core Web API is in place from the previous step. Let's move on and add some logic to optimize the performance of our application.
Add Vehicle Entity
This tutorial will return a list of vehicles from a GetAll() endpoint we will be adding inside a vehicle controller.
Create a new folder in the root of your project named Entities and add a new file named Vehicle.cs with the following code inside:
using System;
namespace In_Memory_Caching.Entities
{
    public class Vehicle
    {
        public int Id { get; set; }
        public string? Manufacturer { get; set; }
        public string? Model { get; set; }
        public string? Type { get; set; }
        public string? Vin { get; set; }
        public string? Fuel { get; set; }
    }
}
Add ApplicationDbContext with auto dummy data seeding
Our Application Database Context class will inherit from DbContext located in EF Core. This class is responsible for making sure that our In-Memory database has been created and seeded with 500 vehicles.
Instead of us writing hundreds of different vehicle models, makes, etc... we will use a port of faker.js named Bogus to generate those vehicles for us.
I will not be going in-depth on how to implement Bogus in this article. I will only show you the code that you need. If you wanna learn more about Bogus and how you can create automatic demo/dummy data for your C# application, you can read my Bogus tutorial below.

Create a new folder named Data and add a new file named ApplicationDbContext.cs with the following code inside:
using System;
using Bogus;
using In_Memory_Caching.Entities;
using Microsoft.EntityFrameworkCore;

namespace In_Memory_Caching.Data
{
    public class ApplicationDbContext : DbContext
    {
        public ApplicationDbContext(DbContextOptions<ApplicationDbContext> options) : base(options)
        {
            // Make sure the database is created, else do it
            this.Database.EnsureCreated();
        }

        public DbSet<Vehicle>? Vehicles { get; set; }

        protected override void OnModelCreating(ModelBuilder modelBuilder)
        {
            // Seed database with some dummy vehicles
            var id = 1;
            var vehicles = new Faker<Vehicle>()
                .RuleFor(v => v.Id, f => id++)
                .RuleFor(v => v.Manufacturer, f => f.Vehicle.Manufacturer())
                .RuleFor(v => v.Model, f => f.Vehicle.Model())
                .RuleFor(v => v.Type, f => f.Vehicle.Type())
                .RuleFor(v => v.Vin, f => f.Vehicle.Vin())
                .RuleFor(v => v.Fuel, f => f.Vehicle.Fuel());

            // generate 500 vehicles
            modelBuilder
                .Entity<Vehicle>()
                .HasData(vehicles.GenerateBetween(500, 500));
        }
    }
}
What happens in the code above?
- We inherit from
DbContextand create a constructor for our own database context. The constructor is responsible for making sure that the database has been created. - We then populate a DbSet<> for our Vehicle so we are able to perform queries using LINQ (in our service later) against that table in the in-memory database.
- Inside EF Core
ApplicationDbContextwe can tell it to insert data into our database. The data seeding occurs inside theOnModelCreating()method. This is where we will use Bogus to generate some dummy data for us.
Open Program.cs and add the database context to the startup for the API, as I have done below.
using System;
using In_Memory_Caching.Data;
using In_Memory_Caching.Services;
using Microsoft.EntityFrameworkCore;

var builder = WebApplication.CreateBuilder(args);

// Services
builder.Services.AddControllers();
builder.Services.AddEndpointsApiExplorer();
builder.Services.AddSwaggerGen();

// Database
builder.Services.AddDbContext<ApplicationDbContext>
    (o => o.UseInMemoryDatabase("VehicleDb"));

...
You can name the database anything you would like.
Add Vehicle Service
The vehicle service is responsible for returning a list of vehicles to the controller and other requesting methods. In this tutorial, I will only implement one method GetAllAsync() and that is the method that will return all vehicles in one go from the database.
Create a new folder named Services and add a new file named VehicleService.cs inside it with the following code:
using System;
using In_Memory_Caching.Data;
using In_Memory_Caching.Entities;
using Microsoft.EntityFrameworkCore;

namespace In_Memory_Caching.Services
{
    public interface IVehicleService
    {
        Task<List<Vehicle>> GetAllAsync();
    }

    public class VehicleService : IVehicleService
    {
        private readonly ApplicationDbContext _dbContext;

        public VehicleService(ApplicationDbContext dbContext)
        {
            _dbContext = dbContext;
        }

        public async Task<List<Vehicle>> GetAllAsync()
        {
            var vehicles = await _dbContext.Vehicles
                .ToListAsync();

            return vehicles;
        }
    }
}
Remember to register the service inside Program.cs else, you will get a dependency injection error at runtime.
using System;
using In_Memory_Caching.Data;
using In_Memory_Caching.Services;
using Microsoft.EntityFrameworkCore;

var builder = WebApplication.CreateBuilder(args);

// Services
builder.Services.AddControllers();
builder.Services.AddEndpointsApiExplorer();
builder.Services.AddSwaggerGen();

// Database
builder.Services.AddDbContext<ApplicationDbContext>
    (o => o.UseInMemoryDatabase("VehicleDb"));

// Vehicles
builder.Services.AddScoped<IVehicleService, VehicleService>();

var app = builder.Build();

...
Add Vehicle Controller
To fetch the vehicles from our database we need a controller to provide us access to the GetAllAsync() method from our Vehicle Service. Create a new controller in the Controllers folder named VehicleController and add the following code to it:
using System;
using System.Collections.Generic;
using System.Linq;
using System.Threading.Tasks;
using In_Memory_Caching.Entities;
using In_Memory_Caching.Services;
using Microsoft.AspNetCore.Mvc;

namespace In_Memory_Caching.Controllers
{
    [Route("api/[controller]")]
    public class VehicleController : Controller
    {
        private readonly IVehicleService _vehicleService;

        public VehicleController(IVehicleService vehicleService)
        {
            _vehicleService = vehicleService;
        }

        [HttpGet]
        public async Task<IActionResult> GetAll()
        {
            List<Vehicle> vehicles = await _vehicleService.GetAllAsync();

            return Ok(vehicles);
        }
    }
}
When booted up, we canhave query the API using Swagger or any other tool like Postman.

There we have them. 500 randomly generated vehicles that haveLots been added to our database and returned async using EF Core. Awesome! Lotsby of testing data without having to lift a finger. 😎
Add Cache Service for Vehicles
The first request took 835ms (see image above of Postman). Let's reduce that by secondsusing In-Memory caching to retrieve vehicle data from the API. the easy way to go would be if we changed VehicleService, but that would immediately violate the Open-Closed Principle of SOLID. Short explanation:
Objects or entities should be open for extension but closed for modification. This means that a class should be extendable without modifying the class itself.
To satisfy the Open-Closed Principle we can decorate our VehicleService by applying the decorator pattern. This is done using Scrutor. The first thing, we have to do is create a new class named CachedVehicleService in the Services folder.
Inside the CachedVehicleService.cs file, add the following code - I will explain below.
using System;
using In_Memory_Caching.Entities;
using Microsoft.Extensions.Caching.Memory;

namespace In_Memory_Caching.Services
{
    public class CachedVehicleService : IVehicleService
    {
        private const string VehicleListCacheKey = "VehicleList";
        private readonly IMemoryCache _memoryCache;
        private readonly IVehicleService _vehicleService;

        public CachedVehicleService(
            IVehicleService vehicleService,
            IMemoryCache memoryCache)
        {
            _vehicleService = vehicleService;
            _memoryCache = memoryCache;
        }

        public async Task<List<Vehicle>> GetAllAsync(CancellationToken ct)
        {
            var cacheOptions = new MemoryCacheEntryOptions()
                .SetSlidingExpiration(TimeSpan.FromSeconds(10))
                .SetAbsoluteExpiration(TimeSpan.FromSeconds(30));

            if (_memoryCache.TryGetValue(VehicleListCacheKey, out List<Vehicle> query))
                return query;

            query = await _vehicleService.GetAllAsync(ct);

            _memoryCache.Set(VehicleListCacheKey, query, cacheOptions);

            return query;

        }
    }
}
What happens in the code above?
- We inherit same
GetAllAsync()method as we got in the originalVehicleService. IVehicleServiceandIMemoryCacheis injected into the constructor of the cache service for the vehicles.- Inside the
GetAllAsync()method we configure the cache to have a sliding expiration of 10 seconds and the absolute maximum age of the cache to be 30 seconds. Read below for a short explanation of expiration definitions. - We then check the cache for any vehicle data using the
TryGetValue()method. If the cache is available in the memory, we return the query result of that as the value. - If no cache is available we request the
VehicleServiceto query the database for vehicles usingGetAllAsync(). We then store the value of these vehicles in the In-Memory cache using theSet()method and return the vehicles.
What does the expiration stuff mean?
- Sliding Expiration - If no requests are made for 10 seconds, the data will be cleared in the In-Memory cache.
- Absolute Expiration - is the value defining how long the cached data should live, no matter how many times the data is requested.
Finally, we have to register our vehicle cache service using the decorator in Program.cs along with the In-Memory caching service. See my final Program.cs file below:
using System;
using In_Memory_Caching.Data;
using In_Memory_Caching.Services;
using Microsoft.EntityFrameworkCore;

var builder = WebApplication.CreateBuilder(args);

// Services
builder.Services.AddControllers();
builder.Services.AddEndpointsApiExplorer();
builder.Services.AddSwaggerGen();

// Database
builder.Services.AddDbContext<ApplicationDbContext>
    (o => o.UseInMemoryDatabase("VehicleDb"));

// Vehicles
builder.Services.AddScoped<IVehicleService, VehicleService>();
builder.Services.Decorate<IVehicleService, CachedVehicleService>();

// In-Memory Caching
builder.Services.AddMemoryCache();

var app = builder.Build();

// Configure the HTTP request pipeline.
if (app.Environment.IsDevelopment())
{
    app.UseSwagger();
    app.UseSwaggerUI();
}

app.UseHttpsRedirection();

app.UseAuthorization();

app.MapControllers();

app.Run();
As you can see I have registered CachedVehicleService using the decorator from Scrutor. Just after that, we register the Memory Cache.
That's it, we should now have a fully functioning In-Memory Caching service for our vehicles in the Web API - let's see if it works as expected.
Testing the Cache Service
I have done my tests using Postman to easily see how long time it takes for the API to respond to the 500 vehicles.
In my first test, I got a response from the API within 926ms.
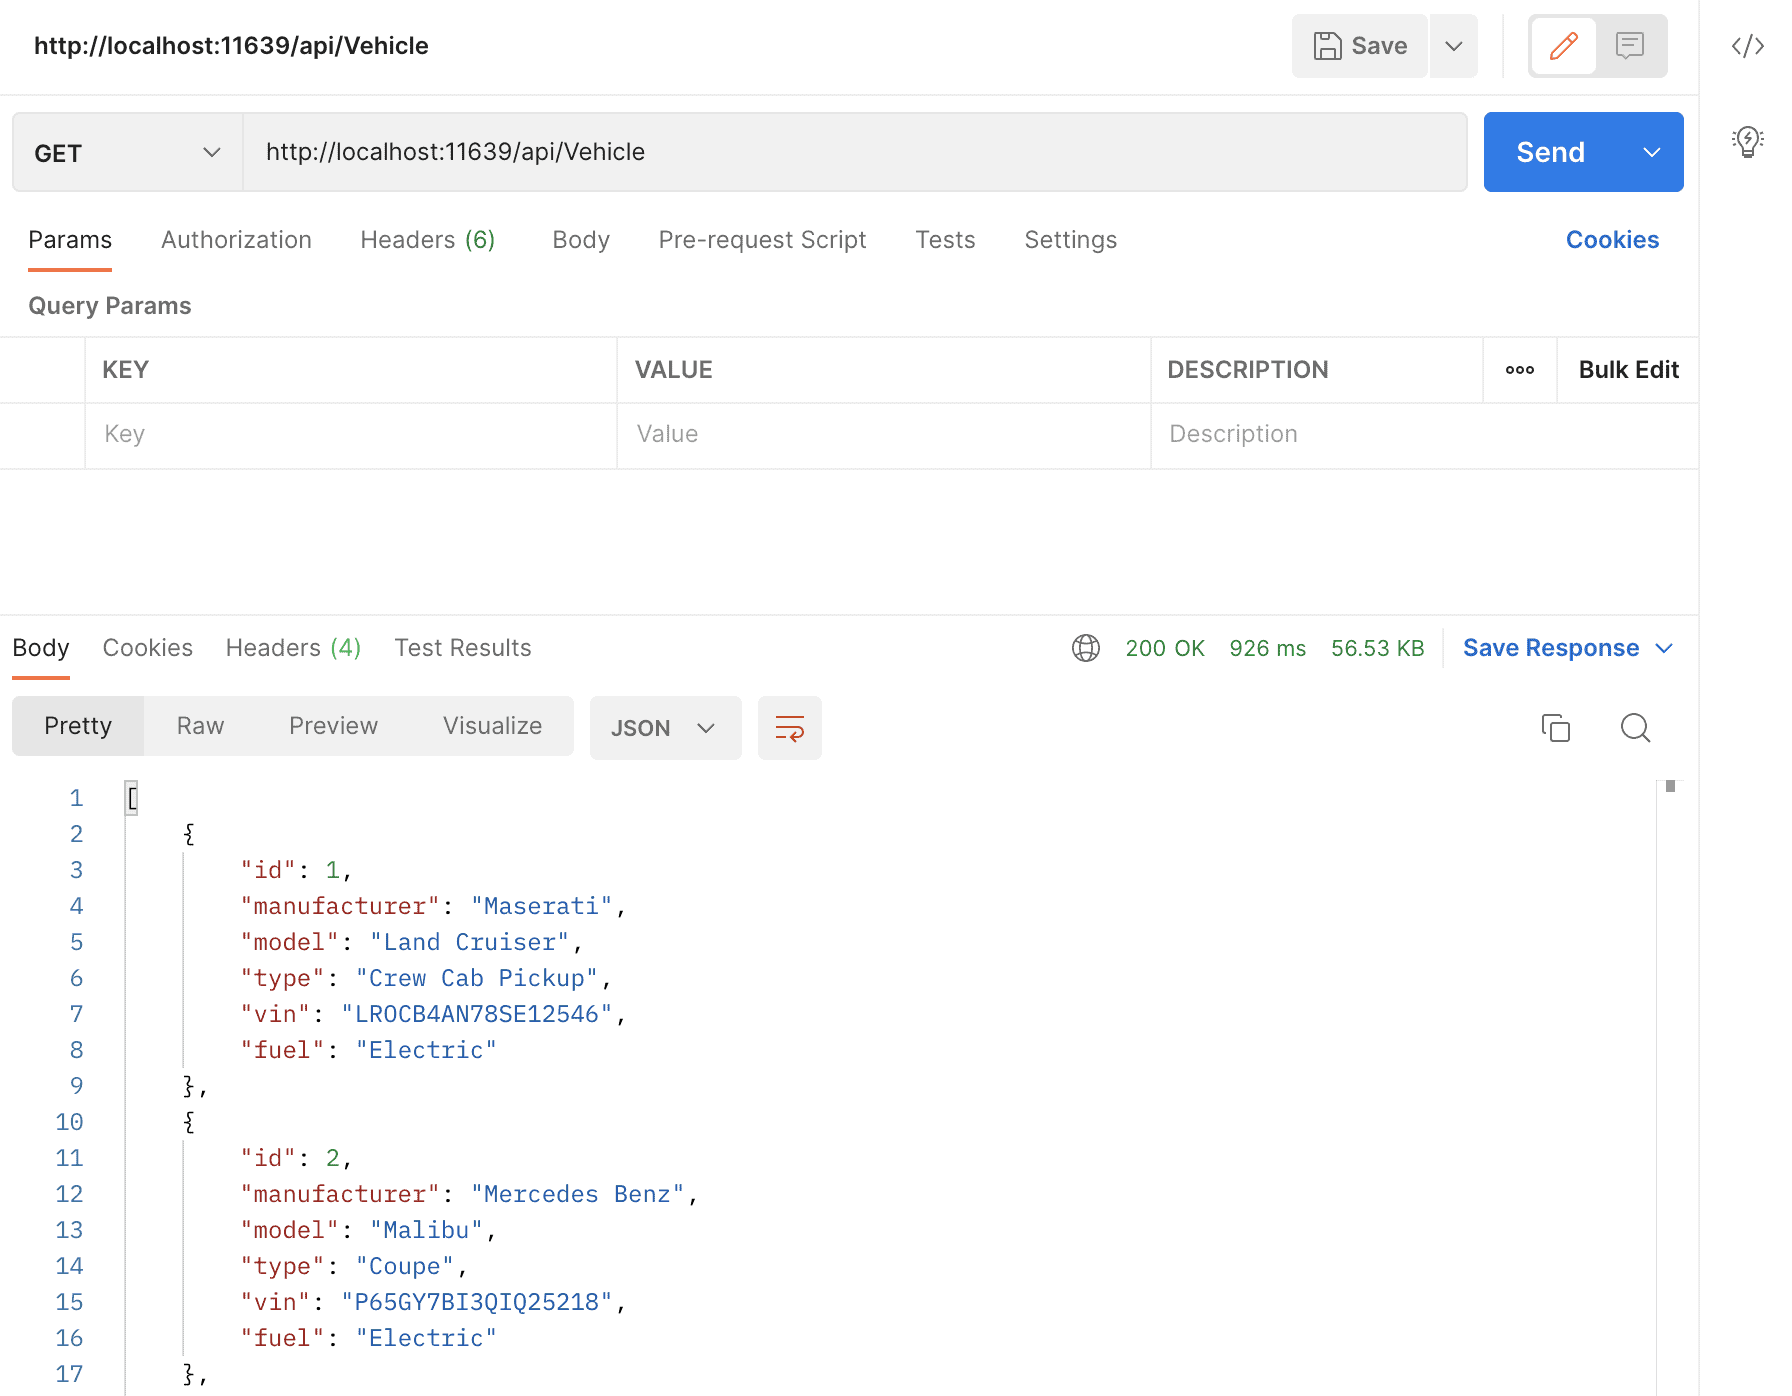
In the second test, I got all vehicles returned in 5ms and the payload size is still 56.53 KB.

How awesome is that!? It takes off the load on the database and the requesting client gets its data within a snap. 5ms is a decrease of 99.46% in response time compared to the first response from the API that we got back in 926ms.
Summary
In-memory caching is a powerful tool for developers when we would like to optimize the performance of our application. Caching is the key to offloading the database requests and is used a lot in production applications.
If you learned something from this article or got an issue solved, please help me spread the word about TWC. If you have any questions, please drop them in the comments below or at my TWC project on GitHub. Until next time, happy coding, and thank you very much for reading till the end. ✌️
Christian-SchouComplete Source Code for this tutorial