Traefik

Great to see you here! We now have a server with the required software installed and we are ready to launch Traefikin in our cluster using Docker Swarm.
In case you missed the last step, you can check it out below.

As mentioned earlier we will be using Traefik Proxy as our reverse proxy to simplify the complexity in networking. This way we can keep our focus on designing, deploying, and operating our applications on the hosting platform.
If you don't know what Traefik is, then hit the link below to learn more about Traefik and why it's such an awesome piece of software.


If you want to skip that part and get a takeaway here and now, then read the below text.
What is Traefik?
Traefik is a leading modern reverse proxy and load balancer that makes deploying microservices easy. Traefik integrates with your existing infrastructure components and configures itself automatically and dynamically.
Traefik is designed to be as simple as possible to operate, but capable of handling large, highly complex deployments across a wide range of environments and protocols in public, private, and hybrid clouds. It also comes with a powerful set of middlewares that enhance its capabilities to include load balancing, API gateway, orchestrator ingress, as well as east-west service communication, and more.
Run Traefik and let it do the work for you!

Create The Folder Structure
Navigate to the folder we created in the previous section at: srv/docker/services/.
cd src/docker/services/Let's create a folder for our Traefik service and navigate to it. This is a one-liner for doing both things in one step instead of navigating manually after the directory is created.
mkdir traefik && cd $_Create a new directory inside the traefik folder named configuration and leave it for now. Now we a ready to make the configuration and spin up Traefik using Docker Compose.
mkdir configurationThis should be enough for the stuff we need for Traefik.
Create The Traefik Configurations
Traefik requires some configuration. Instead of specifying all configurations in the compose file I prefer to use configuration files. Fortunately, Traefik supports config files. 🎉
We will define two config files, one is a static configuration and the other is a dynamic configuration. I will explain the contents of each of them once we get past them.
I have rewritten the two config files to match with the latest available version from Traefik, but the original ones can be found here at Benjamin Rancourt's blog. He has already done a huge ton of work, so let's use his great config files in our project.
Create The Static Configuration
Navigate to the configuration folder and create a new file named traefik.yml. Add the following content inside it. Read more on the link below about the static configuration.
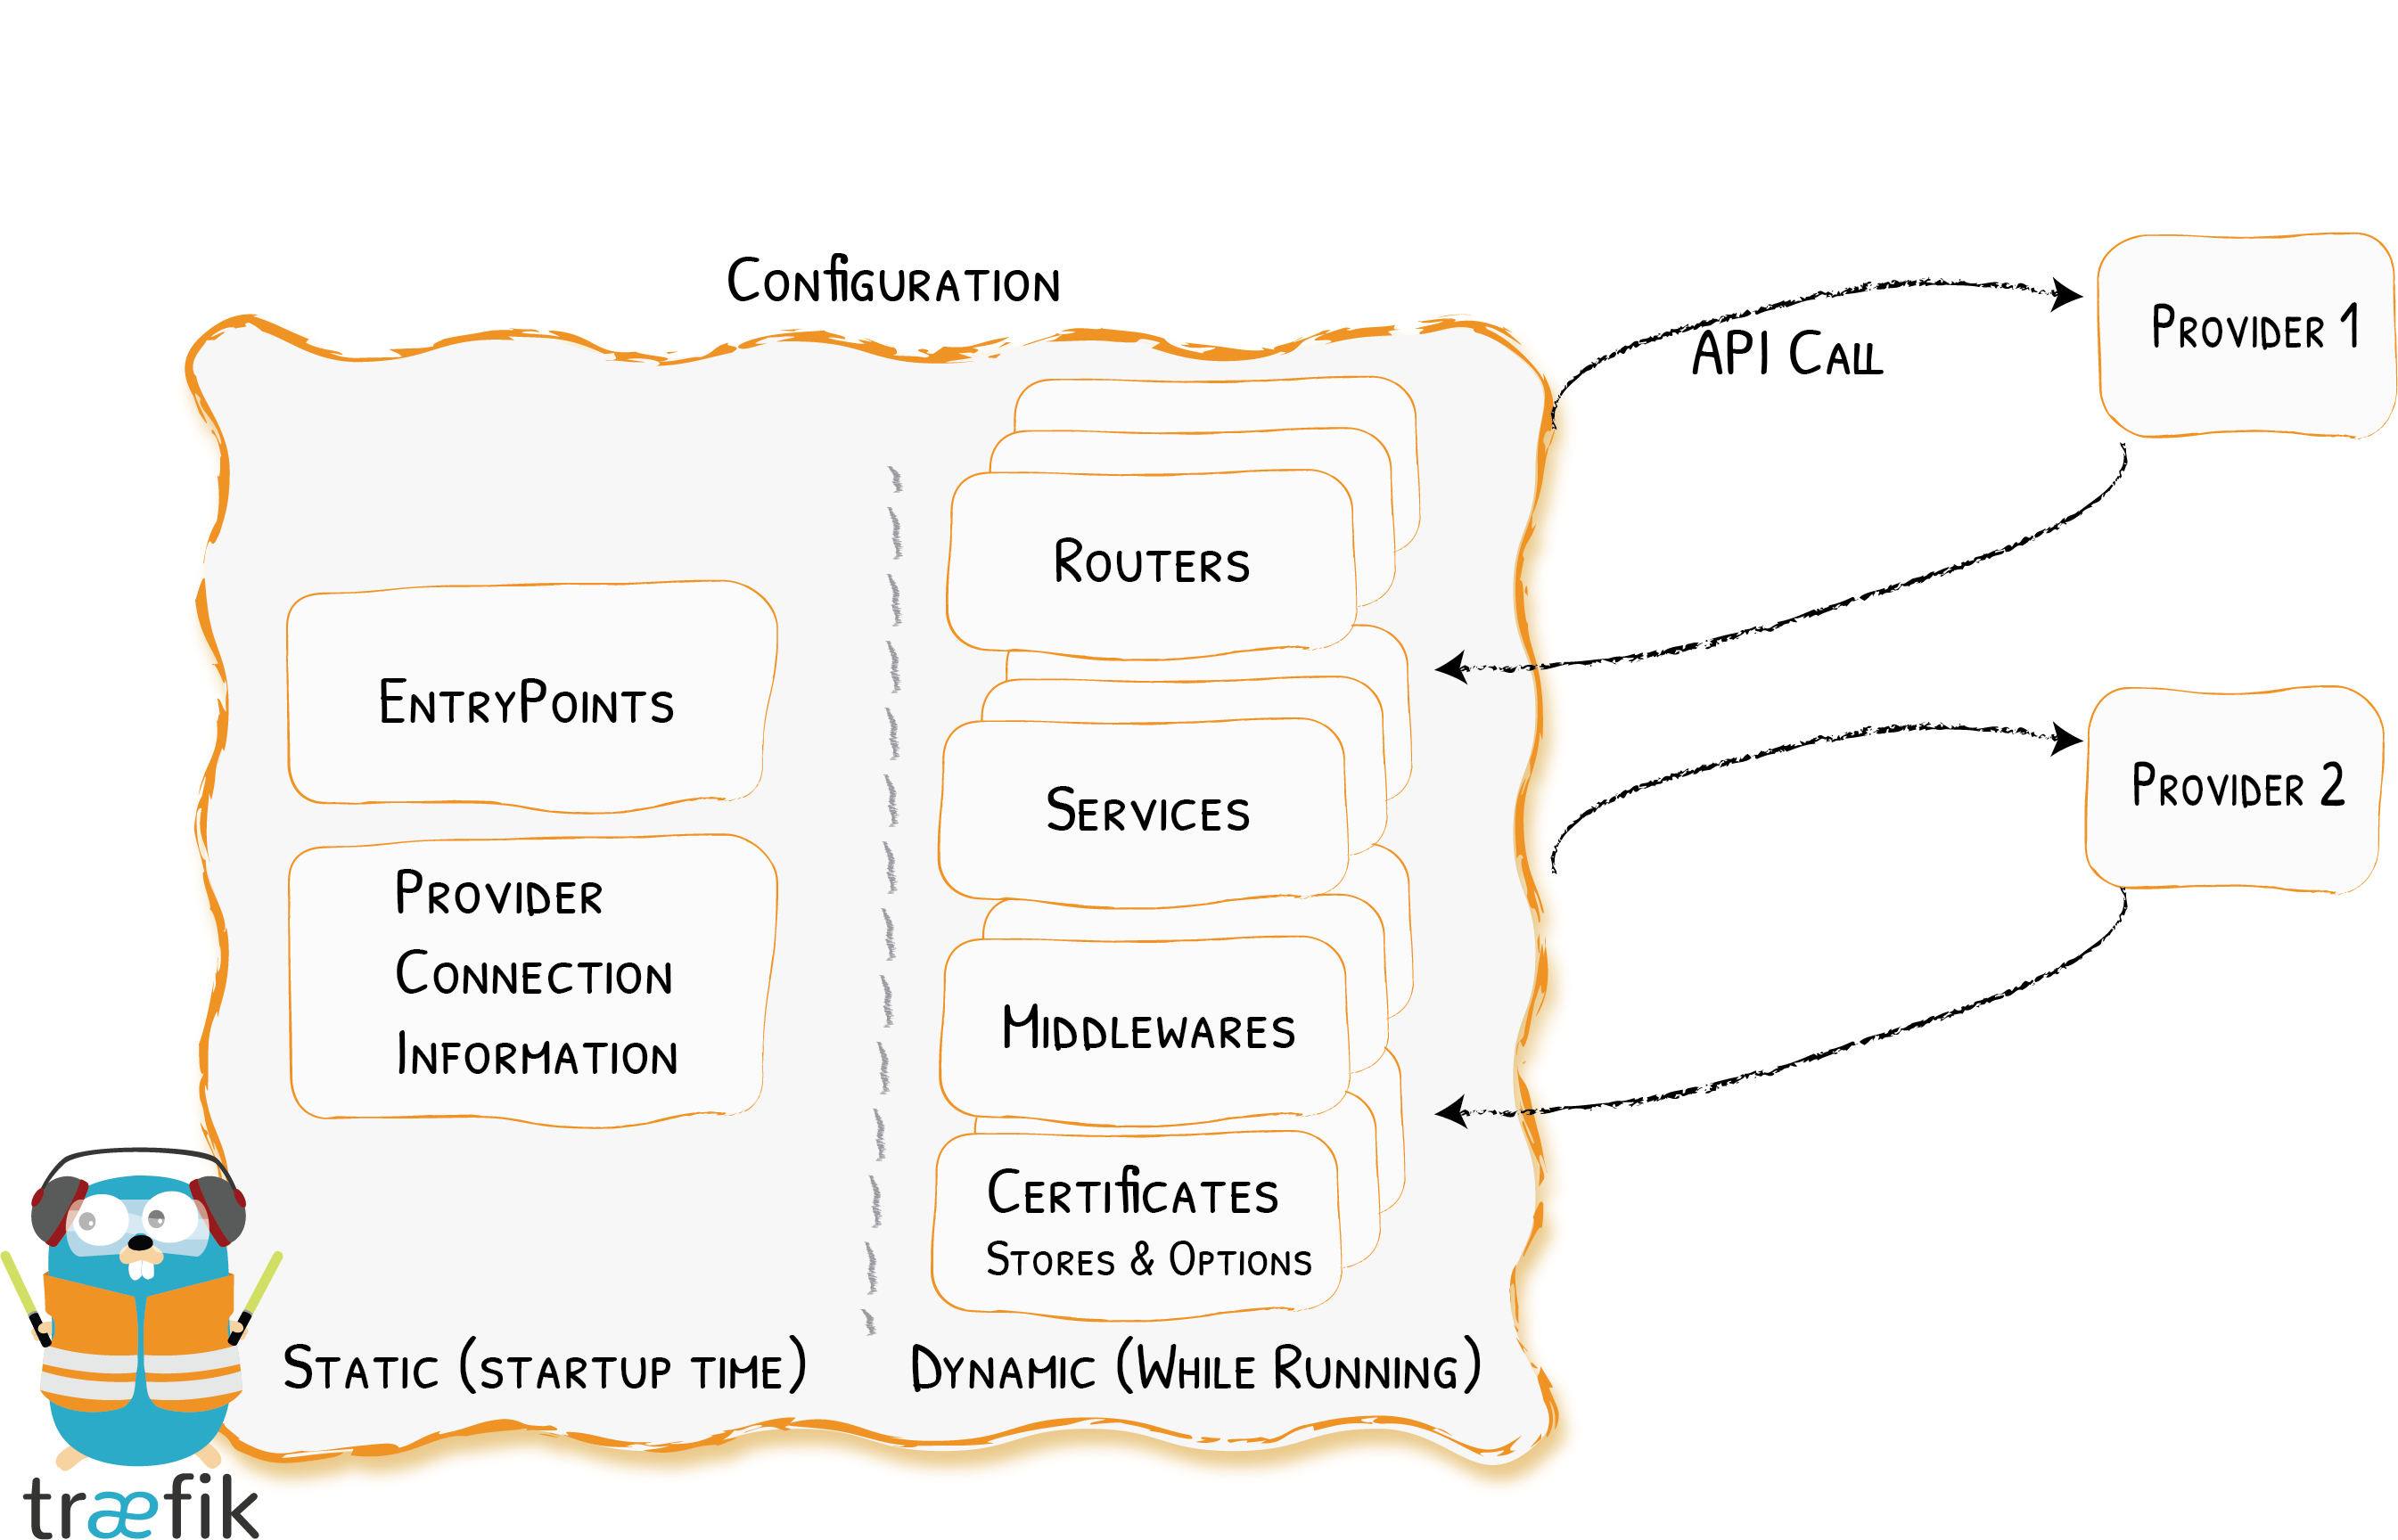
I have added in-line comments for an easier understanding of what each feature enables/does in Traefik.
api:
  dashboard: true                             # Enable the dashboard

# Certificate Resolvers are responsible for retrieving certificates from an ACME server
# See https://doc.traefik.io/traefik/https/acme/#certificate-resolvers
certificatesResolvers:
  letsEncrypt:
    acme:
      email: "chsc@christian-schou.dk"          # Email address used for registration !!! CHANGE THIS !!!
      storage: "/etc/traefik/acme/acme.json"    # File or key used for certificates storage
      tlsChallenge: {}

entryPoints:
  http:
    address: ":80"                            # Create the HTTP entrypoint on port 80
    http:
      redirections:                           # HTTPS redirection (80 to 443)
        entryPoint:
          to: "https"                         # The target element
          scheme: "https"                     # The redirection target scheme
  https:
    address: ":443"                           # Create the HTTPS entrypoint on port 443

global:
  checknewversion: true                       # Periodically check if a new version has been released.
  sendanonymoususage: true                    # Periodically send anonymous usage statistics, change to false if you don't want to do this

providers:
  swarm:
    endpoint: "unix:///var/run/docker.sock"          # Tell Linux to listen at the UNIX Docker socket
    exposedByDefault: false                   # Only expose containers that are explicitly enabled (using label traefik.enabled)
    network: "proxy"                          # Default network to use for connections to all containers.
    watch: true                               # Watch Docker Swarm events
  file:
    filename: "/etc/traefik/config.yml"       # Link to the dynamic configuration
    watch: true                               # Watch for modifications
  providersThrottleDuration: 10               # Configuration reload frequency

metrics:
  prometheus:
    manualRouting: true
    addServicesLabels: true
    addRoutersLabels: true
    addEntryPointsLabels: true
Traefik Configuration
This is our static configuration for traefik. You could place this in the /etc folder if you want to strictly keep your configuration files in that folder, but I like to keep all relevant files for my docker services within the same directory or child directory as the service I am creating in the swarm.
Create The Dynamic Configuration
To read more about the dynamic configuration, check out the link below.
We would like to protect our Traefik dashboard using basic authentication. For that to work, we need to hash our password and place it in the config file we will create in just a moment. Run the following command in your terminal to create a new hashed password for traefik with your desired password.
I always try to keep my servers as clean as possible from weird scripts, etc. To create a new password for use with Traefik I found this awesome Gist at GitHub. It will pull a new docker image that includes httpasswd that we need to generate a hashed password for use with Traefik.
Run the following script on your server, enter a username and password, and you will see some magic! 🪄
#!/usr/bin/env bash

command -v docker >/dev/null 2>&1 || { echo >&2 "I require Docker but it's not installed. Aborting."; exit 1; }

echo "Basic auth for traefik >= v1.7"
read -p "User: "  USER
read -p "Password: "  PW
# Pull httpd:alpine image (small and includes httpasswd)
docker pull httpd:alpine >/dev/null 2>&1

# Generate strings
echo "------- Your string for configuration file (YAML/TOML) --------"
string=$(docker run --rm -i -t httpd:alpine htpasswd -nbB $USER $PW)
echo $string
echo "------- Your string for docker-compose.yml --------"
# Escape string
echo "$string" | sed -e 's/\$/\$\$/g'
Source: GitHub Gist
The result will look like this:
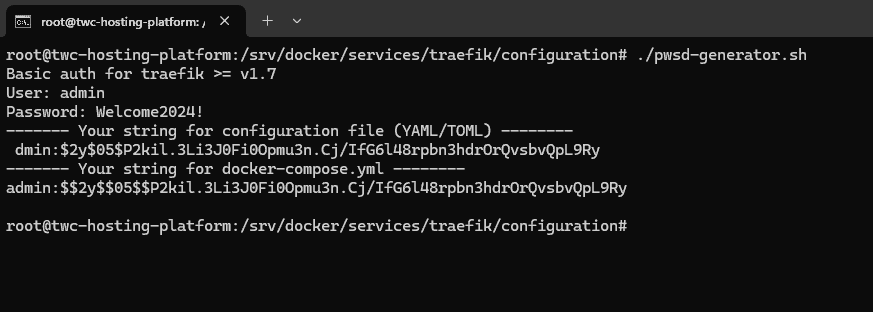
Since we are not configuring Traefik in the Docker Compose file, we will use the first string generated by the script for our configuration. If you don't change the config file contents below, the login for Traefik Admin Dashboard will be:
- Username - admin
- Password - Welcome2024!
Inside the configuration folder, where we just created the static Traefik configuration, we will create our dynamic configuration named config.yml and add the following contents inside it.
http:
  middlewares:
    # A basic authentification middleware, to protect the Traefik dashboard to anyone except yourself
    # Use with traefik.http.routers.myRouter.middlewares: "traefikAuth@file"
    traefikAuth:
      basicAuth:
        users:
          - "admin:$2y$05$5EUVj93Haudys6LVFgUtgeED3pUTfrln98UmSEET9b6TGJMXR7xOC"

    # Recommended default middleware for most of the services
    # Use with traefik.http.routers.myRouter.middlewares: "default@file"
    # Equivalent of traefik.http.routers.myRouter.middlewares: "default-security-headers@file,error-pages@file,gzip@file"
    default:
      chain:
        middlewares:
          - default-security-headers
          - error-pages
          - gzip

    # Add security headers
    # Use with traefik.http.routers.myRouter.middlewares: "default-security-headers@file"
    default-security-headers:
      headers:
        browserXssFilter: true                            # X-XSS-Protection=1; mode=block
        contentTypeNosniff: true                          # X-Content-Type-Options=nosniff
        forceSTSHeader: true                              # Add the Strict-Transport-Security header even when the connection is HTTP
        frameDeny: true                                   # X-Frame-Options=deny
        referrerPolicy: "strict-origin-when-cross-origin"
        sslRedirect: true                                 # Allow only https requests
        stsIncludeSubdomains: true                        # Add includeSubdomains to the Strict-Transport-Security header
        stsPreload: true                                  # Add preload flag appended to the Strict-Transport-Security header
        stsSeconds: 63072000                              # Set the max-age of the Strict-Transport-Security header (63072000 = 2 years)

    # Serve the error pages when the status is included inside the following ranges
    # Use with traefik.http.routers.myRouter.middlewares: "error-pages@file"
    error-pages:
      errors:
        query: "error{status}/"
        service: traefik-error-pages
        status:
          - "403-404"
          - "500"
          - "503"

    # Enables the GZIP compression (https://docs.traefik.io/middlewares/compress/)
    #   if the response body is larger than 1400 bytes
    #   if the Accept-Encoding request header contains gzip
    #   if the response is not already compressed (Content-Encoding is not set)
    # Use with traefik.http.routers.myRouter.middlewares: "gzip@file"
    gzip:
      compress: {}

  services:
    # Error pages
    traefik-error-pages:
      loadBalancer:
        servers:
          - url: "https://your-domain.com/error-pages/"


# See https://doc.traefik.io/traefik/https/tls/
tls:
  options:
    # To use with the label "traefik.http.routers.myrouter.tls.options=modern@file"
    modern:
      minVersion: "VersionTLS13"                          # Minimum TLS Version
      sniStrict: true                                     # Strict SNI Checking

    # To use with the label "traefik.http.routers.myrouter.tls.options=intermediate@file"
    intermediate:
      cipherSuites:
        - "TLS_ECDHE_ECDSA_WITH_AES_128_GCM_SHA256"
        - "TLS_ECDHE_RSA_WITH_AES_128_GCM_SHA256"
        - "TLS_ECDHE_ECDSA_WITH_AES_256_GCM_SHA384"
        - "TLS_ECDHE_RSA_WITH_AES_256_GCM_SHA384"
        - "TLS_ECDHE_ECDSA_WITH_CHACHA20_POLY1305"
        - "TLS_ECDHE_RSA_WITH_CHACHA20_POLY1305"
      minVersion: "VersionTLS12"                          # Minimum TLS Version
      sniStrict: true                                     # Strict SNI Checking

    # To use with the label "traefik.http.routers.myrouter.tls.options=old@file"
    old:
      cipherSuites:
        - "TLS_ECDHE_ECDSA_WITH_AES_128_GCM_SHA256"
        - "TLS_ECDHE_RSA_WITH_AES_128_GCM_SHA256"
        - "TLS_ECDHE_ECDSA_WITH_AES_256_GCM_SHA384"
        - "TLS_ECDHE_RSA_WITH_AES_256_GCM_SHA384"
        - "TLS_ECDHE_ECDSA_WITH_CHACHA20_POLY1305"
        - "TLS_ECDHE_RSA_WITH_CHACHA20_POLY1305"
        - "TLS_ECDHE_ECDSA_WITH_AES_128_CBC_SHA256"
        - "TLS_ECDHE_RSA_WITH_AES_128_CBC_SHA256"
        - "TLS_ECDHE_ECDSA_WITH_AES_128_CBC_SHA"
        - "TLS_ECDHE_RSA_WITH_AES_128_CBC_SHA"
        - "TLS_ECDHE_ECDSA_WITH_AES_256_CBC_SHA"
        - "TLS_ECDHE_RSA_WITH_AES_256_CBC_SHA"
        - "TLS_RSA_WITH_AES_128_GCM_SHA256"
        - "TLS_RSA_WITH_AES_256_GCM_SHA384"
        - "TLS_RSA_WITH_AES_128_CBC_SHA256"
        - "TLS_RSA_WITH_AES_128_CBC_SHA"
        - "TLS_RSA_WITH_AES_256_CBC_SHA"
        - "TLS_RSA_WITH_3DES_EDE_CBC_SHA"
      minVersion: "TLSv1"                                 # Minimum TLS Version
      sniStrict: true                                     # Strict SNI Checking
Spin Up Traefik v3 Using Docker Compose
The core of our hosting platform will be configured in a Docker Compose file. To avoid having a massive compose file holding configs for our services like Traefik, Portainer, and monitoring, we will split things up.
The first service we will define is Traefik. You can read the official documentation for Traefik with Docker at the link below if you would like to see all available options.
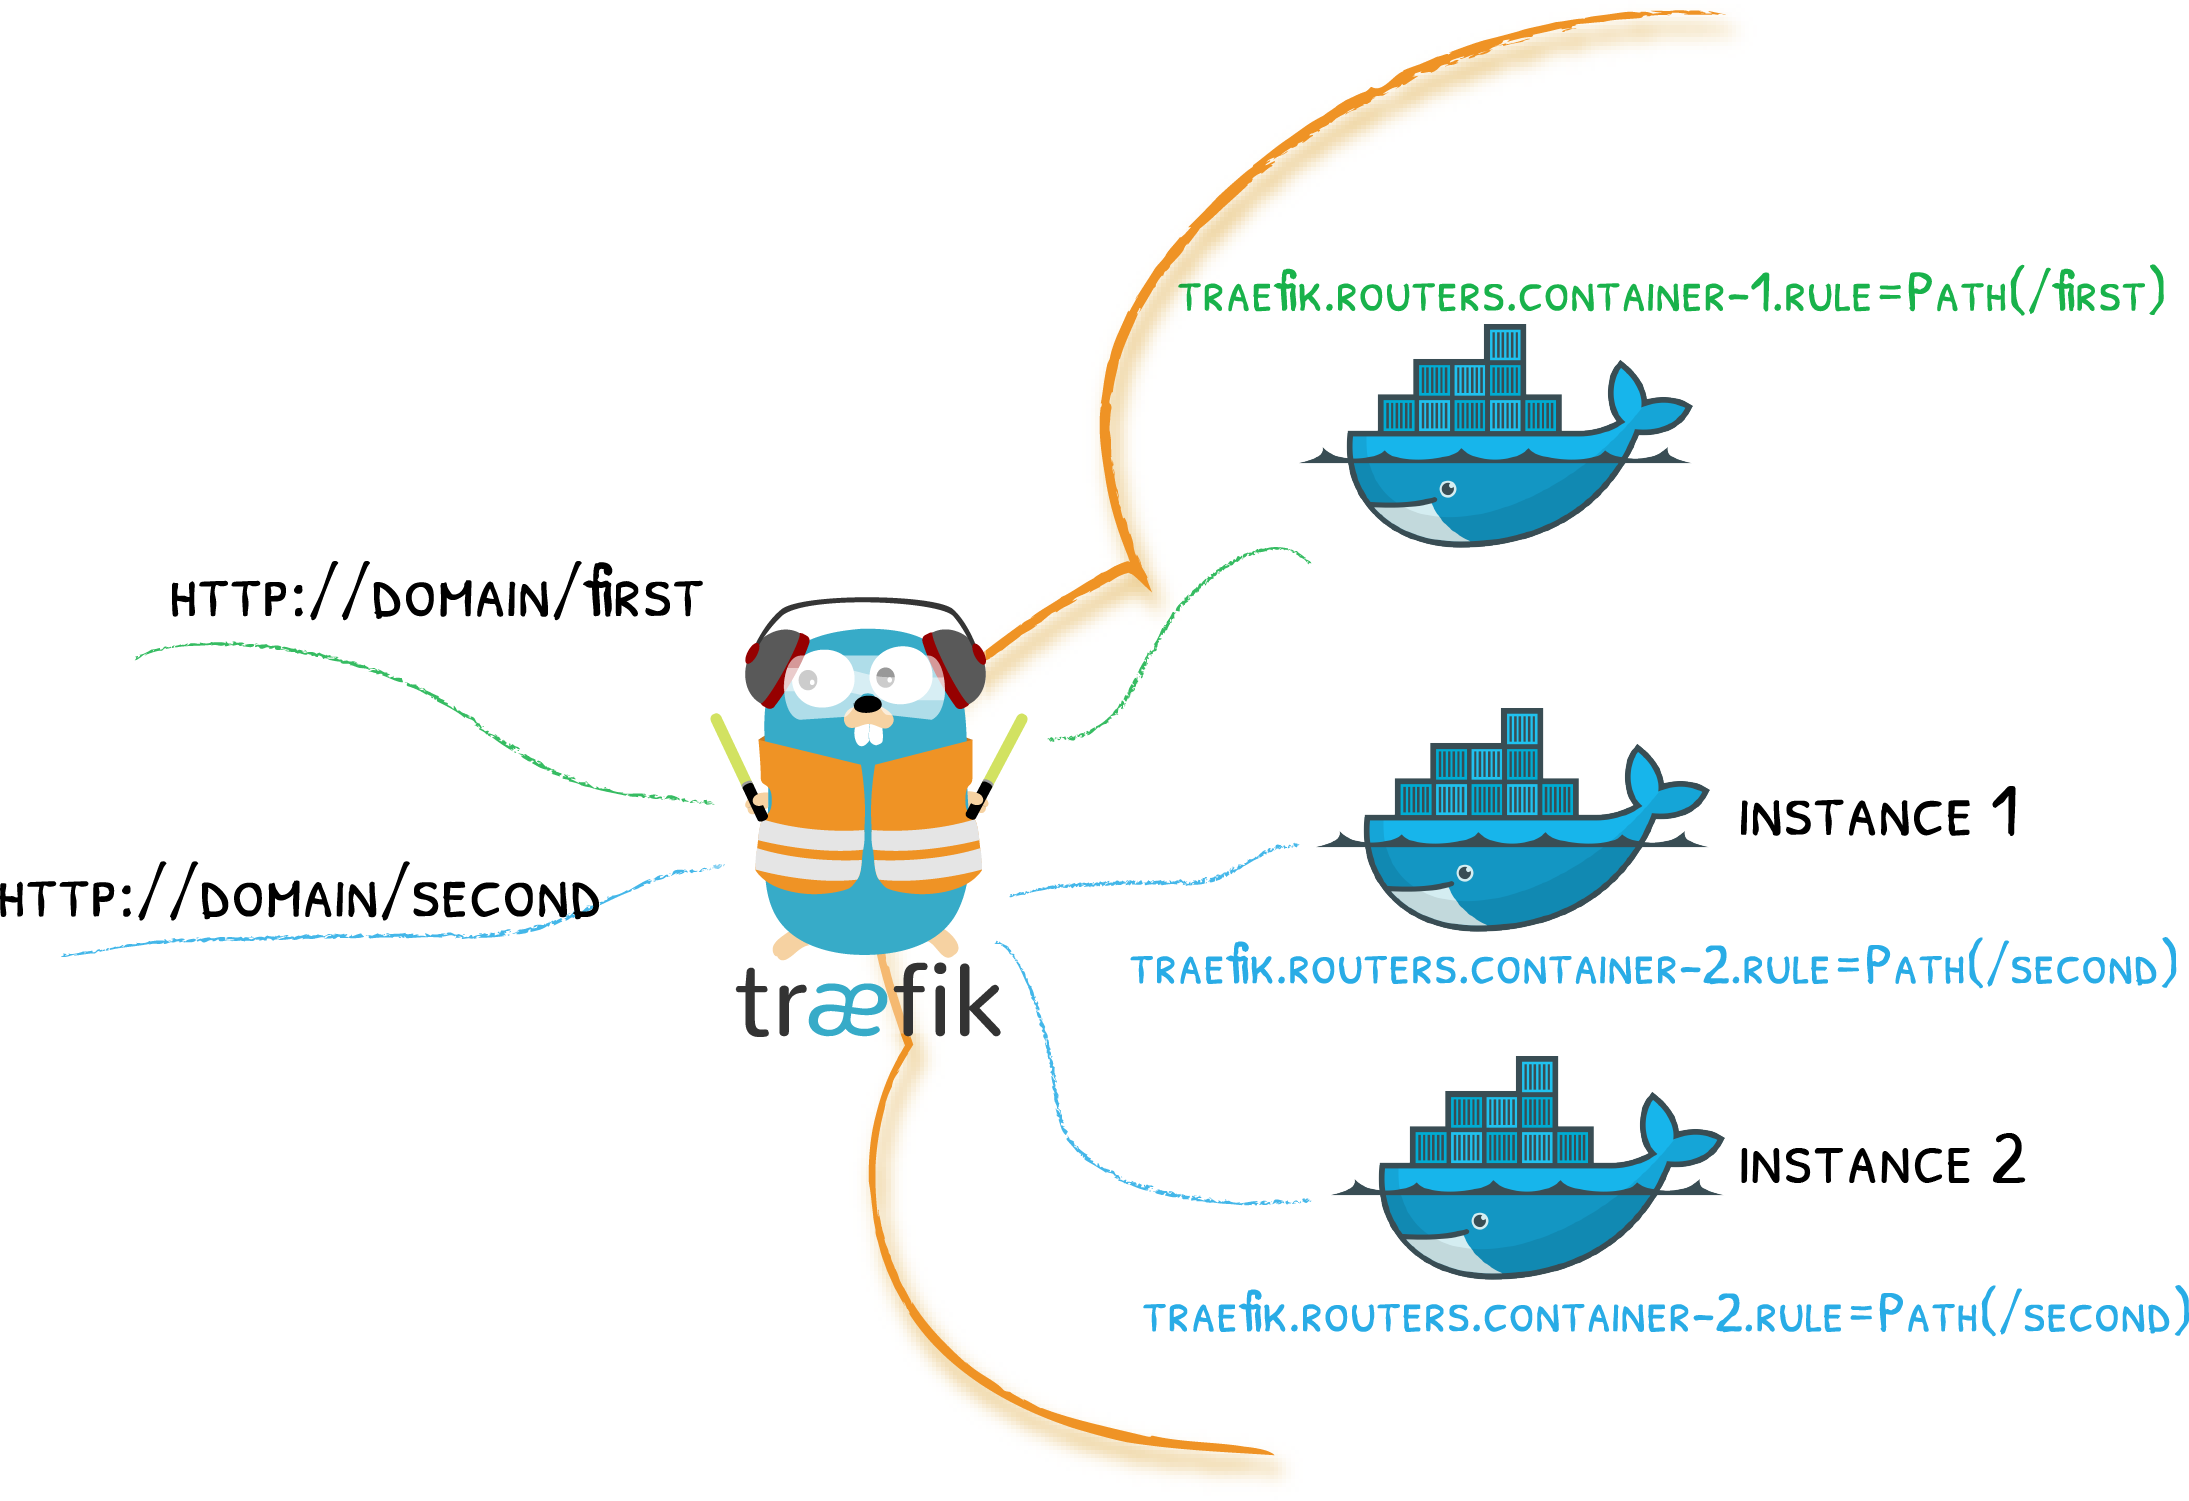
The way Traefik works is by looking for container-level labels. For this series we will define the labels in our Docker Compose file on the services, hence Traefik will get the labels from our service objects.
With that in mind, let's create a folder for our Traefik service and navigate to it. Go back to the traefik folder located here: /srv/docker/services/traefik/ and create a new file named docker-compose.yml.
This is the file that will contain the whole of our definition for our Traefik service. The contents of the compose file should be like the following, which I will explain below.
version: "3.8"

services:
  traefik:
    deploy:
      labels:
        traefik.docker.network: "proxy"
        traefik.enable: "true"
        traefik.http.routers.traefik.entrypoints: "https"
        traefik.http.routers.traefik.middlewares: "traefikAuth@file,default@file"
        traefik.http.routers.traefik.rule: "Host(`traefik.yourdomain.com`)"
        traefik.http.routers.traefik.service: "api@internal"
        traefik.http.routers.traefik.tls.certresolver: "letsEncrypt"
        traefik.http.routers.traefik.tls.options: "modern@file"
        traefik.http.routers.traefik.tls: "true"
        traefik.http.services.traefik.loadbalancer.server.port: 8080
        traefik.http.services.traefik.loadbalancer.sticky.cookie.httpOnly: "true"
        traefik.http.services.traefik.loadbalancer.sticky.cookie.secure: "true"
        traefik.http.routers.traefikmetrics.entrypoints: "https"
        traefik.http.routers.traefikmetrics.middlewares: "traefikAuth@file,default@file"
        traefik.http.routers.traefikmetrics.tls.certresolver: "letsEncrypt"
        traefik.http.routers.traefikmetrics.tls.options: "modern@file"
        traefik.http.routers.traefikmetrics.tls: "true"
        traefik.http.routers.traefikmetrics.service: "prometheus@internal"
        traefik.http.routers.traefikmetrics.rule: "Host(`traefik-metrics.yourdomain.com`)"
        traefik.http.services.traefikmetrics.loadbalancer.server.port: 8082
      mode: global
      # Schedule Traefik on the Swarm manager nodes, as the Swarm API is only exposed on the manager nodes
      # See https://docs.traefik.io/providers/docker/#docker-api-access_1
      placement:
        constraints:
          - node.role == manager
    # Published on https://hub.docker.com/_/traefik?tab=tags
    image: traefik:3.0                                                      # See https://github.com/containous/traefik/releases
    networks:
      - proxy
    ports:
      # To be able to listen on port 80 (http)
      - mode: host
        published: 80
        target: 80
      # To be able to listen on port 443 (https)
      - mode: host
        published: 443
        target: 443
    volumes:
      - /etc/localtime:/etc/localtime:ro                                        # Set the container timezone by sharing the read-only localtime
      - /srv/docker/services/traefik/configuration/config.yml:/etc/traefik/config.yml:ro            # Set the dynamic configuration for the file provider
      - /srv/docker/services/traefik/configuration/traefik.yml:/etc/traefik/traefik.yml:ro          # Set the static configuration
      - /srv/docker/services/traefik/acme:/etc/traefik/acme                                      # Set the location where my ACME certificates are saved to
      - /var/run/docker.sock:/var/run/docker.sock:ro                            # Give access to the UNIX Docker socket

networks:
  proxy:
    driver: overlay
    external: true
The first thing you have to do is replace the `traefik.yourdomain.com" with your own domain.
So what is happening in the compose file above? 🤔
services:- This section defines the services that make up our app. In this case, there's one service namedtraefik.deploy:- This section specifies the deployment configuration for ourtraefikservice. It includes labels, mode, and placement constraints. The labels are used to configure Traefik's behavior. As you can see we now make use of the configuration data we created in the config files from before. Cool right?! ✌️image:- This specifies the Docker image to use for the service. Here, it's using version 3.0 of the Traefik image.networks:- This section defines the networks used by the services. Theproxynetwork we created before is the only network we will add for thetraefikservice in our cluster.ports:- This section maps the container's ports to the host's ports. Here, ports 80 and 443 are being mapped. Our configuration will make sure to register those ports for HTTP and HTTPS.volumes:- This section mounts host paths or named volumes. Here, it's used to mount various configuration files and directories into the container, including the Docker socket (/var/run/docker.sock), which allows Traefik to listen to Docker's events. The other mounts are for our configuration files, certificates and this servers local time.networks:(at the root level) - This section defines networks to be used in the compose file. Here, it defines an overlay network namedproxywhich is marked as external, meaning it should already exist. Luckily it does, because we created it earlier. This is the network that should be attached to all services that needs to communicate with Traefik.
Now we have come to the fun part - the take off! Let's spin up Traefik v3.0 in our cluster. Run the following command in the traefik folder, where you created this docker-compose.yml file with the traefik service in.
docker stack deploy -c docker-compose.yml traefikThe traefik service is now deployed in your Docker Swarm Cluster. Hooray! 🎉🥳
Run this command in the console to get information about Traefik.
docker stack ps traefik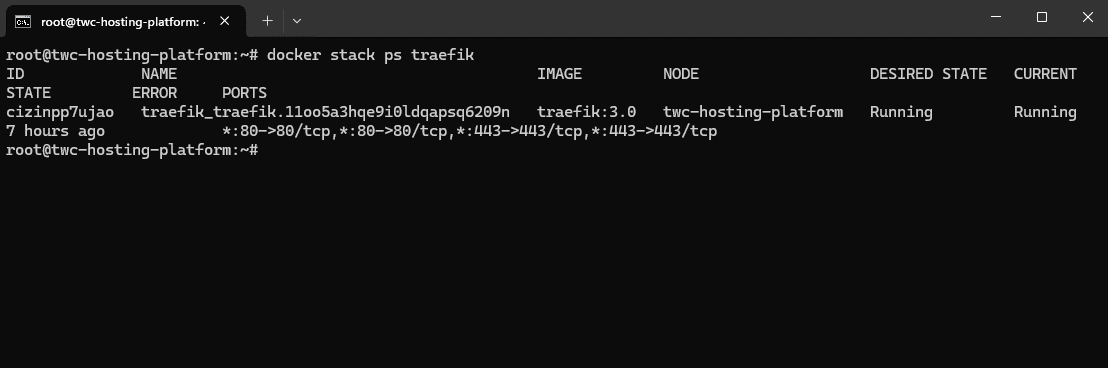
That's it, Traefik is now running in our cluster and is ready to accept incoming requests.
Access The Traefik Admin Dashboard
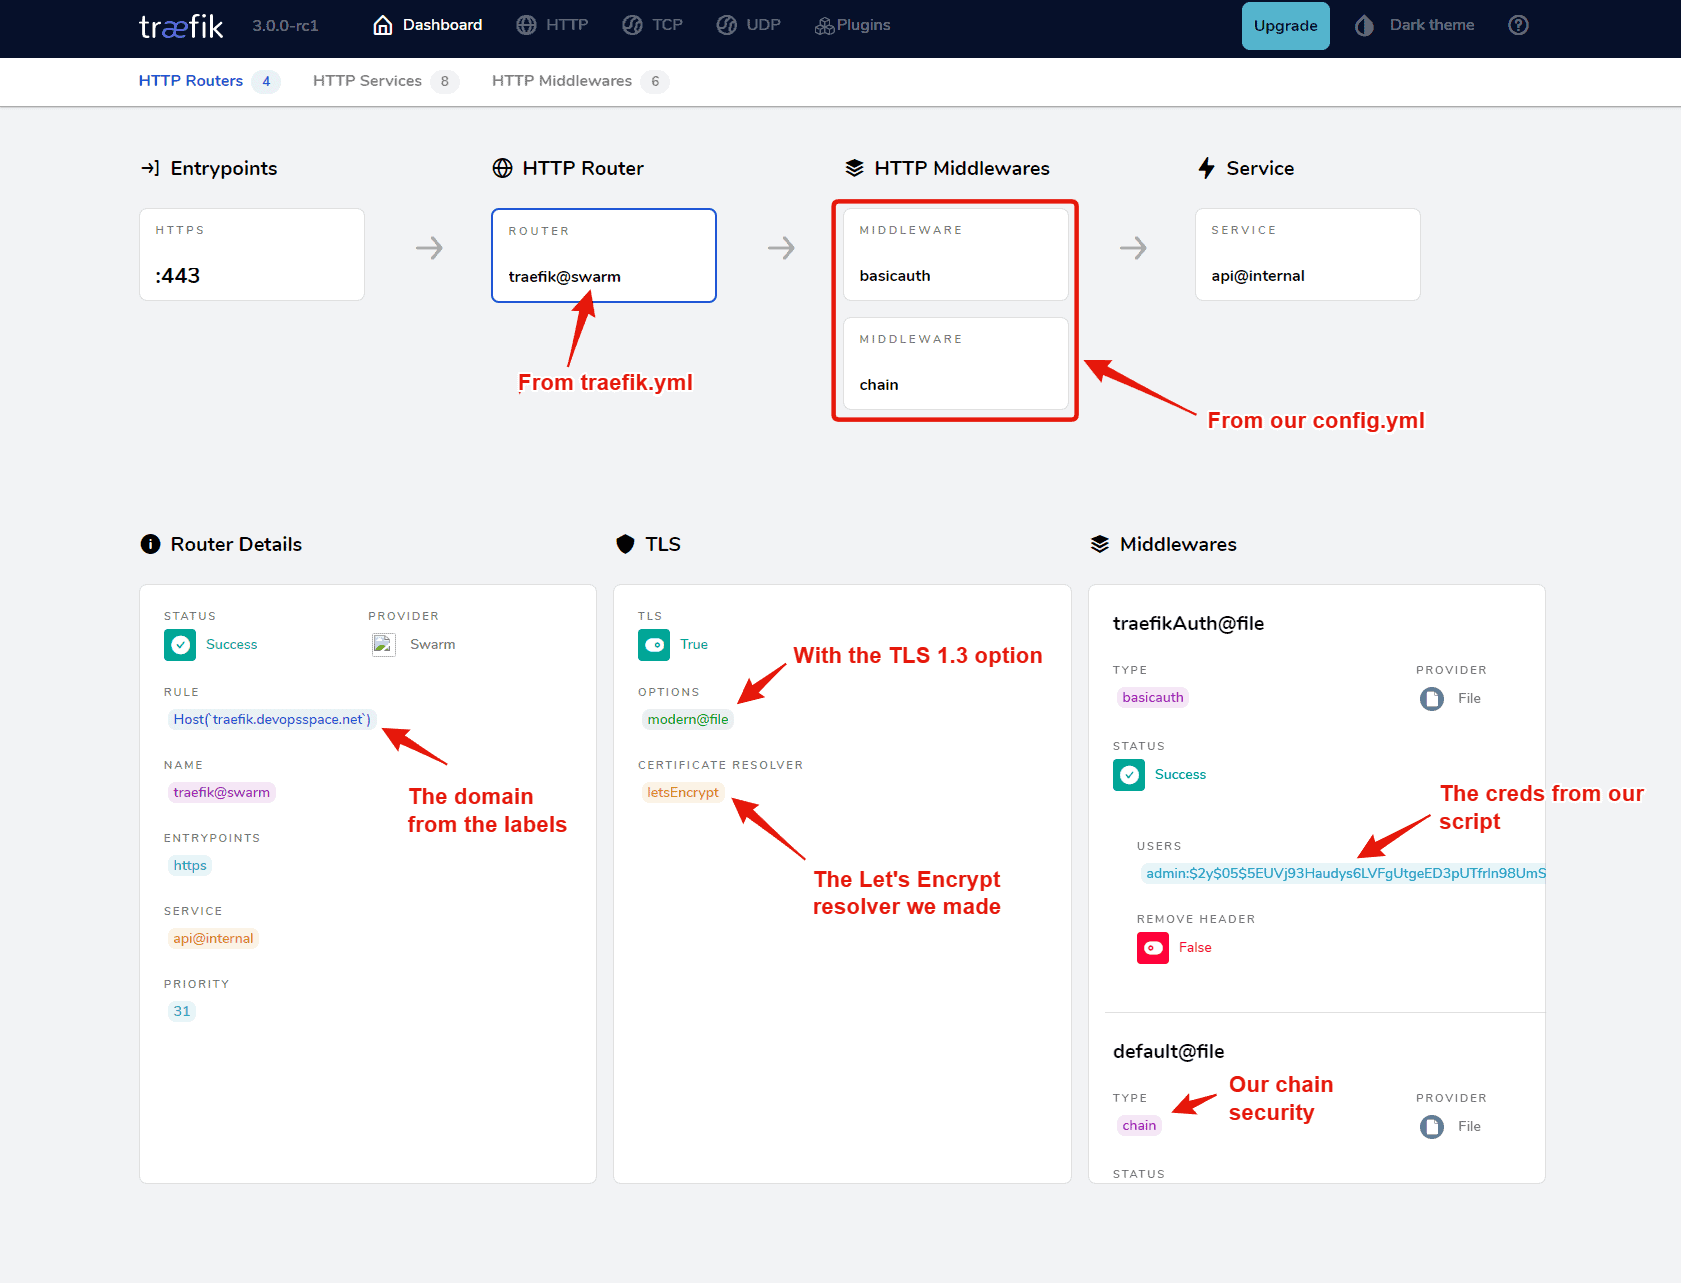
Traefik is running and we have configured the basic authentication for the admin dashboard and told the load balancer label on our traefik service in the compose file for Traefik, that we would like requests made specifically for traefik.yourdomain.com to be routed to the port 8080, which is the admin dashboard for Traefik.
Let's test it out. I will be using my devopsspace.net domain for this series. In the image below I have 3 HTTP Routers. If we take a closer look at them you can see it's the host regex forwarder for HTTP to HTTPS and then one for traefik and one for the traefik metrics.
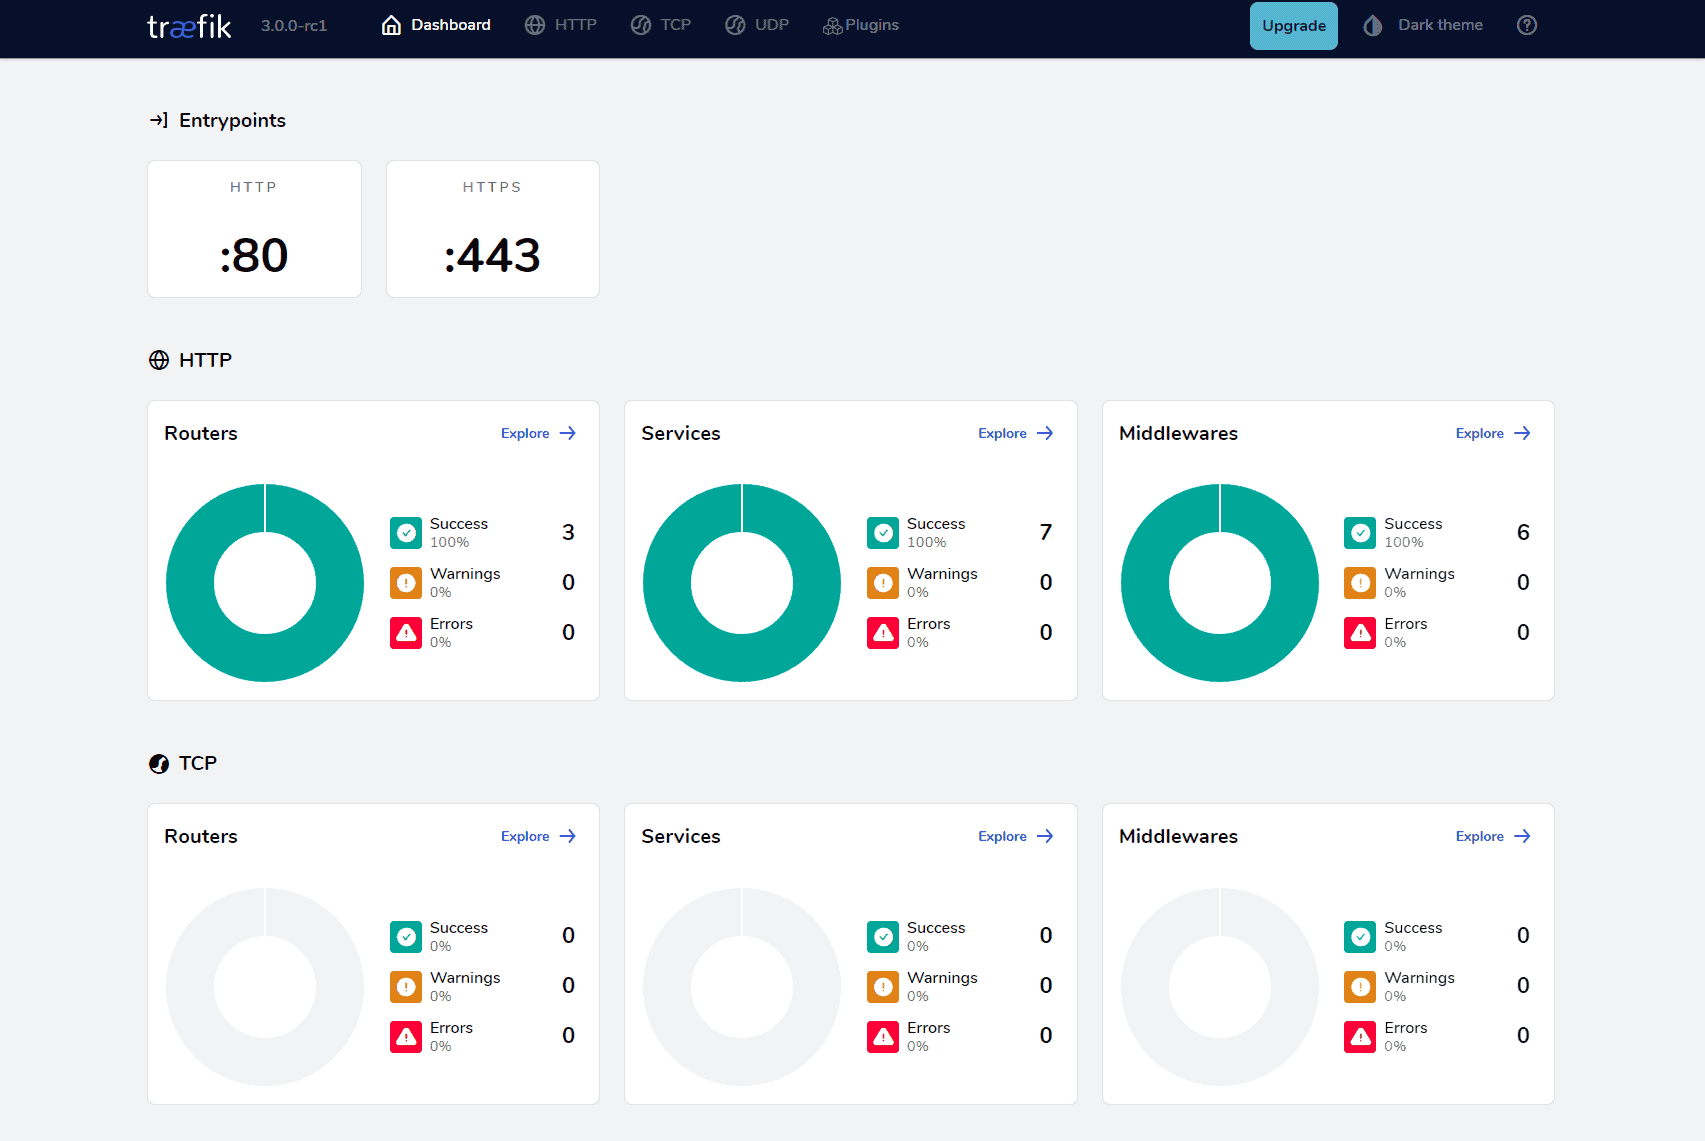
Works like a charm! 😎 Let's have a look at our Traefik service by exploring the HTTP routers and selecting the traefik endpoint. This is the result you should end up with.
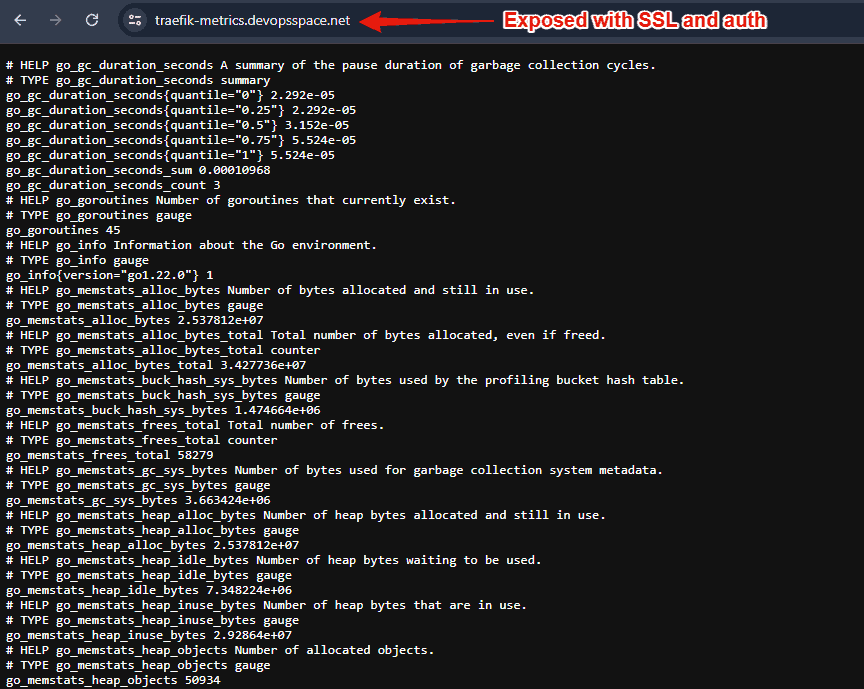
Check The Traefik Metrics
When we launched Traefik we added Prometheus as our metrics service for Traefik with basic auth enabled. Let's test that endpoint.
Navigate to https://traefik-metrics.yourdomain.com and use the same credentials we use for the Traefik Admin Dashboard. You should then be presented with a page like this:
Summary
We now have a fully functioning reverse proxy running! Give yourself a high-five - this was the tough part in this Docker Hosting Platform series. From now on we can spin up services and expose them to the public with a few commands in our console.
In the next section, I will show you how to set up and configure Portainer Business Edition and you will get a free business license for the three nodes! See you in a bit! ✌️